Use and Care Manual with Installation Instructions for Outdoor Coolers RO 510 7084 577-00
Table of Contents Keep these operating instructions in a safe place and pass them on to the next owner, where applicable. Please Read and Follow these Instructions Contents These instructions contain Danger, Warning and Caution notes. Page Please Read and Follow these Instructions.................. 2 Disposal of Old Appliance.............................................. 3 Disposal of this Appliance.............................................. 3 Disposal of Carton...................................
Safety Disposal of Old Appliance DANGER! Risk of child entrapment. Child entrapment and suffocation are not problems of the past. Junked or abandoned refrigerators are still dangerous – even if they will sit for “just a few days.” If you are getting rid of your old refrigerator, please follow these instructions to help prevent accidents.
Safety Important Safety Information Electrical Safety • To prevent injury to you or damage to the unit, the appliance should be unpacked and set up by two people. General electrical requirements • If the appliance is damaged on delivery, contact the supplier immediately before connecting it to the power source. • To guarantee safe operation, ensure that the appliance is set up and connected as described in this manual. • Disconnect the appliance from the power source if a fault occurs.
Safety Safety Regulations Electrical requirements when using the appliance indoors Connect this appliance to a 15 amp or 20 amp, 110120 VAC, circuit which is grounded and protected by a circuit breaker or fuse. Electrical requirements when using the appliance outdoors This appliance must be connected to a GFCI (Ground Fault Circuit Interrupter) receptacle. Contact a qualified electrician if you are not sure whether the receptacle to which this appliance will be connected is GFC-protected.
Changing Over Door Hinges Changing Over Door Hinges Door hinges should only be changed by a trained expert. 4. 4. Remove upper hinge pin. Changing over the door hinges requires two people. 1. Remove screw. 1. 5. Move the door towards the appliance until the pin in the hinge bracket is visible (see detailed drawing). Remove door. 5. 2. Remove screw. 2. 6. 6. Remove cover. 3. Important The door must now be held secure by another person. 3. Pull out hinge pin. 6 7. Unscrew door latch. 7.
Changing Over Door Hinges 8. 12. Take hold of the ventilation grille at top and bottom in the places shown and pull towards you. 8. Compress the covers in the places shown and release. Turn the covers 180° and click into place on the opposite side. 9. Click cover into place. 12. 9. 13. Remove the covers. 13. 10. Screw on the door latch. 10. 14. Unscrew the hinge bracket and re-fit on the left at the top. 11. Transfer door handle and plugs to the opposite side. Insert screws in the marked openings.
Changing Over Door Hinges 18. Insert hinge pin. 18. The door must be open 90°. Insert the hinge pin with the flat part facing the appliance. The hinge pin must be fully inserted in the borehole and may not protrude at the top. 15. Remove the lower retaining bracket and transfer to the opposite side. 15. 16. Unscrew the hinge bracket and re-fit on the left at the bottom. 16. Insert screws in the marked openings. 19. 17. 17. Fit the door on the hinge brackets.
Changing Over Door Hinges 20. Screw in the screws at the top and bottom. 22. Adjusting the lateral tilt of the door If the door is at an angle, adjust the angle. 22. Undo screws and slide hinge bracket to the right or left. Tighten screws. 20. 23. 23. Fit the covers. 21. 21. Close door and check to ensure that it is aligned with the side walls of the appliance. 24. Fit the ventilation grille and click into place. 24.
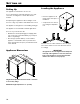
Setting up Setting Up Leveling the Appliance The appliance is intended for out door use. It is recommended to install the appliance in a sheltered area, avoiding direct contact with extreme weather. Avoid placing the appliance in direct sunlight or near the stove, range top, radiators and similar heat sources. The appliance is designed for a freestanding setting up. • Place the appliance in its final position at the place of installation. • Compensate floor unevenness using the adjustable feet.
Features Description of the Appliance Operating and control elements Adjustable door rack Sectioned glass shelf Interior light (LED light strip) Model plate Door rack Adjustable glass shelf Pull-out shelf Adjustable-height feet Operating and Control Elements The electronic control panel features "touch capacitive technology". Any function can be activated by touching the corresponding icon.
Operation Switching the Appliance On and Off Switching the appliance on Press the On/Off button until the temperature display lights up. Switching the appliance off Keep the On/Off button pressed for approx. 3 seconds until the temperature display goes out. Setting the Temperature Reducing the temperature Press the Down button. Increasing the temperature Press the Up button. - When you press one of the buttons for the first time, the display will start to flash.
Operation Setup Mode = Sabbath mode This feature considers the religious requirements on the Sabbath or holidays. When the Sabbath mode is active, some functions of the electronic controls are switched off. • The lighting remains off. • The cooling fan remains in its actual state: If it is on, it remains on, if it is off, it remains off. • There is no door alarm. • There is no temperature alarm.
Refrigerator Compartment Interior Light = Child lock The child lock is designed to protect the appliance from being switched off and the temperature setting from being changed accidentally. Activating the child lock Press for 5 seconds. Display = The interior light will always switch on when the appliance door is opened. The interior light will go out when the door is closed. The light intensity of the LED light corresponds to laser class 1/1M.
Refrigerator Compartment Additional Features Sectioned glass shelf If you need to make space for tall containers, simply carefully slide the front half of the sectioned glass shelf underneath the back half. Pull-out shelf The pull-out shelf allows stored items to be viewed and removed more easily. IMPORTANT 1 The sectioned glass shelf Repositioning the glass shelf 1 Lift the shelf at the front. may only be inserted in the top channel of the supports.
Cleaning Cleaning WARNING! • To prevent possible injury due to an electrical shock, be sure to disconnect the power cord or turn off the circuit breaker before cleaning the appliance. • To avoid injury or damage, do not use steam cleaning equipment to clean the appliance. Cleaning the appliance outside • Clean the side panels, top panel and door surface using a soft cloth and a high-quality stainless steel cleaner. Always clean and polish in the direction of the grain and finish.
Cleaning Inserting the bottom shelf Removing the bottom shelf Pull the shelf upwards on the right and left at the back and then remove it towards you. Extend the pull-out rails as far as they will go. Place the front recesses of the shelf on the securing pins. Slide the shelf together with the pull-out rails into the appliance as far as they will go. Removing the door racks Slide the door rack up and remove it towards you. Push the shelf downwards on the right and left at the back.
Troubleshooting Your appliance is designed and manufactured for a long life and reliable operation. If a problem occurs during operation, check whether it is due to an operating error. Please note that even during the warranty period, you may be responsible for certain repair costs. Problem Possible cause and remedy Appliance does not work, display is off.
Warranty Vacation or Off-Season Storage Appliance Information If you are away for any length of time, please consider the following: Record this information when the appliance is installed. If the power supply to the appliance is to be left on • Remove all food from the interior. • Disconnect the appliance from the power supply and clean the interior. • Close the appliance door. • Connect the appliance to the power supply and set the interior temperature to the warmest value (58°F or 14°C).
Warranty LIEBHERR WARRANTY PLAN FULL TWO YEAR WARRANTY For two years from the date of original purchase, your Liebherr warranty covers all parts and labor to repair or replace any part of the product which proves to be defective in materials or workmanship. FULL FIVE YEAR WARRANTY For five years from the date of original purchase, your Liebherr warranty covers all parts and labor to repair or replace any components that prove to be defective in materials or workmanship in the sealed system.
For Service in the U.S. Liebherr Service Center Toll Free: 1-866-LIEBHER or 1-866-543-2437 Email: Service-appliances.us@liebherr.com PlusOne Solutions, Inc. 3501 Quadrangle Blvd, Suite 120 Orlando, FL 32817 For Service in Canada Liebherr Service Center Toll Free: 1-888-LIEBHER or 1-888-543-2437 www.euro-parts.