Installation instructions Combined fridge-freezer for integrated use, door-on-door 170215 7085634 - 02 (S)IC.../ (S)ICB.../ ICU... ...
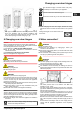
General safety information Contents 2 Transporting the appliance 1 General safety information................................... 2 2 Transporting the appliance................................... 2 3 Installing the appliance......................................... 2 4 Appliance dimensions........................................... 3 5 Recess dimensions............................................... 3 6 Unit door.................................................................
Appliance dimensions q The more R 600a refrigerant there is in the appliance, the larger the room in which the appliance is standing needs to be. In rooms that are too small, a flammable mix of gas and air may be created if there is a leak. According to the EN 378 standard, every 11 g of R 600a refrigerant requires at least 1 m3 space in the room for the appliance. The amount of refrigerant in your appliance is on the type plate inside the appliance.
Unit door F G H J K L (mm) (mm) (mm) (mm) (mm) (mm) ICU 33.., ICUN 33.., ICP 33.., ICNP 33.., ICN 33.., SICN 33.., ICBP 32.., ICBN 33.., SICBN 33.. 1772 — 1788 560 — 570 min. 550, reco mme nded 560 min. 500 min. 40 Appliance type Refrigerator compartment door max. 19 The specified energy consumption applies to a unit depth of 560 mm. The appliance will work properly at a unit depth of 550 mm, but at a slightly higher energy consumption.
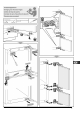
Changing over door hinges The instructions apply to several models. Only carry out this step if it is relevant for your appliance. Choose between the alternatives given. Loosen the screws only, do not undo them all the way. Check the screws and tighten if necessary. Fig. 4 - The upper ventilation shaft can either be positioned directly above the appliance with an optional ventilation grille Fig. 4 (C), close to the ceiling above the unit Fig. 4 (D) or as an air outlet opening in a false ceiling Fig. 4 (E).
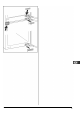
Installing the appliance in the recess - Do not damage or kink the water inlet pipe when installing the appliance. There is a risk of injury during this stage! Please observe the safety instructions! The instructions apply to several models. Only carry out this step if the appliance is equipped with the corresponding feature. Choose between the alternatives given. Loosen the screws only, do not undo them all the way. Check the screws and tighten if necessary. Fig.
* Depending on model and options
* Depending on model and options
* Depending on model and options
* Depending on model and options
* Depending on model and options
Liebherr Hausgeräte Ochsenhausen GmbH * Memminger Strasse 77-79 * 88416 Ochsenhausen * Deutschland * www.liebherr.