Operating instructions Refrigerator Read the operating instructions before switching on for the first time Installation instructions Page 10 7084 537-00 UKes 1752
Content Description of the appliance......................................................2 Disposal notes...........................................................................2 Safety instructions and warnings..............................................3 Range of appliance use.............................................................3 Climate rating............................................................................4 Setting up.............................................................
Safety instructions and warnings • To prevent injury or damage to the unit, the appliance should be unpacked and set up by two people. • In the event that the appliance is damaged on delivery, contact the supplier immediately before connecting to the mains. • To guarantee safe operation, ensure that the appliance is set up and connected as described in these operating instructions. • Disconnect the appliance from the mains if any fault occurs. Pull out the plug, switch off or remove the fuse.
Climate rating The climate rating indicates the room temperature at which the appliance may be operated in order to achieve full refrigeration performance. Operating and control elements The climate rating is indicated on the type plate. The position of the type plate is shown in the section entitled Description of the appliance.
Fan switch Interior light The interior fan ensures a constant and even interior temperature and a suitable climate for wine storage. The interior light will always switch on when the appliance door is opened. The humidity in the appliance can be increased even further by activating the fan switch. This has a particularly positive effect for long-term storage. The interior light will go out approx. 5 seconds after the door is closed.
Setup mode In setup mode you can set the child lock and adjust the brightness of the display. The child lock is designed to protect the appliance from being switched off accidentally. Adjusting the display brightness Press for 5 seconds. Display = Activating the child lock Press for 5 seconds. Display = Display = Display = Display = Use buttons Display = and to select the desired setting.
Equipment Sectioned glass shelf If you need to make space for tall containers, simply carefully slide the front half of the sectioned glass shelf underneath the back half. Pull-out shelf The pull-out shelf allows bottles or cans to be viewed and removed more easily. Repositioning the glass shelf 1 Lift the shelf at the front. IMPORTANT 1 The sectioned glass shelf may only be inserted in the top channel of the supports.
Cleaning Before cleaning, always switch off the appliance. Disconnect from the mains or switch off or unscrew the fuse. • Clean the inside and outer walls with lukewarm water and a little detergent. Do not use abrasive or acid cleaners or chemical solvents. • Use a glass cleaner to clean the glass surfaces and a commercially available stainless-steel cleaning agent for the stainless-steel surfaces. Do not use steam cleaners because of the risk of injury and damage.
Malfunctions • F1 appears in the display. – The appliance has suffered a fault. Contact the customer service department. • The fans inside the appliance are running although the fan function has been deactivated and the compressor (refrigeration unit) is idle. – This is a normal operating state depending on the set interior temperature and ambient temperature at the place of installation.
Mounting the dust filter Supplied accessories The supplied dust filter prevents that dirt enters the motor compartment, reducing the refrigeration performance.Therefore always install the dust filter. Remove the protective film from the dust filter. Insert the filter at the bottom and click into place at the top. Ventilation grille Cover strips Appliance venting The required air flow is directed through the plinth. It is important to use the provided ventilation grille for the ventilation opening.
Appliance dimensions Installation dimensions Important View from above In order to avoid any problems when installing the appliance and to avoid damage to the appliance, the following conditions must be complied with. The floor on which the appliance stands must be horizontal and level. The kitchen unit must be aligned horizontally and vertically. Maximum door opening angle Side view 1 In this area, the power cord comes out of the appliance rear.
Installing the appliance 1. Remove cover 1. Apply the cover strips to the leading edge of the appliance housing on the left and right. 1. 3. 3. Slide in the appliance until the front surface of the appliance door is flush with the unit fronts. When sliding in the appliance, make sure that the mains cable is not damaged! 4. 2. 4 x 30 TX™ 15 4. • Screw the appliance to the body of the unit at the top lefthand side. • Click cover into place again. 2.
7. Insert the ventilation grille in the plinth panel. 5. Screw the appliance to the body of the unit at the bottom on the left and right. 7. 5. 6. Insert the foam moulding approx. 10 mm into the opening in the appliance plinth as indicated. 8. 8. Fit the plinth panel. In doing so, the foam moulding is pushed backwards into its final position. Important 6. The foam moulding must be touching the ventilation grille.
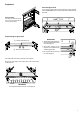
Changing over door hinges Door hinges should only be changed by a trained expert. Changing the door hinges must be done by two people. 4. 4. Remove upper hinge pin. 1. Remove screw. 1. 5. Move the door towards the appliance until the pin in the hinge bracket is visible (see detailed drawing). Remove door. 5. 2. Remove screw. 2. 3. 6. 6. Remove cover. Important The door must now be held secure by somebody. 3. Pull out hinge pin. 7. 7. Unscrew door latch.
8. 12. Remove the covers. 12. 8. Compress the covers in the places shown and release. Turn the covers through 180° and click into place on the opposite side. 9. Click cover into place. 9. 13. 13. Unscrew upper hinge bracket. 10. Screw on the door latch. 10. This will subsequently be re-fitted on the left at the bottom. 14. Unscrew the lower hinge bracket. This will subsequently be re-fitted on the left at the top. 11. 11. Transfer door handle and plugs to the opposite side. 14.
18. Screw in the hinge bracket (from top right) at the bottom left. 15. 18. 15. Remove the upper retaining bracket and transfer to the opposite side. 19. 19. Fit the door on the hinge brackets. Important 16. 16. Remove the lower retaining bracket and transfer to the opposite side. The door must now be held secure by somebody. 20. 20. Insert hinge pin. The door must be open 90°. Insert the hinge pin with the flat part facing the appliance.
23. 23. Close door and check that it is aligned with the side walls of the appliance. 21. Adjusting the lateral tilt of the door If the door is at an angle, adjust the angle. 21. Insert the bottom hinge pin in the same way. 24. Undo screws and slide hinge bracket to the right or left. Tighten screws. 24. 22. Screw in the screws at the top and bottom. 22. 25. 25. Fit the covers.
Liebherr Hausgeräte Lienz GmbH * Dr.-Hans-Liebherr-Strasse 1 * A-9900 Lienz ** www.liebherr.