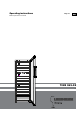
Operating instructions Multi-temperature wine cabinet Page 16 GB 7082 063-02 WT
Content Description of the appliance.................................................... 16 Disposal notes......................................................................... 16 Safety instructions and warnings............................................ 17 Range of appliance use........................................................... 17 Climate rating.......................................................................... 18 Setting up.............................................................
Safety instructions and warnings • To prevent injury or damage to the unit, the appliance should be unpacked and set up by two people. • In the event that the appliance is damaged on delivery, contact the supplier immediately before connecting to the mains. • To guarantee safe operation, ensure that the appliance is set up and connected as described in these operating instructions. • Disconnect the appliance from the mains if any fault occurs. Pull out the plug, switch off or remove the fuse.
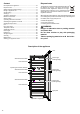
Climate rating The climate rating indicates the room temperature at which the appliance may be operated in order to achieve full refrigeration performance. Appliance dimensions The climate rating is indicated on the type plate. The position of the type plate is shown in the section entitled Description of the appliance.
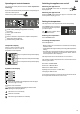
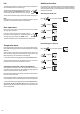
Operating and control elements The electronic control panel has the new "touch capacitance technology". Any function can be activated by touching the corresponding icon. The exact contact point is between the symbol and its label Switching the appliance on and off GB Switching the appliance on Press the On/Off button until the temperature display lights up. Switching the appliance off Keep the On/Off button pressed for approx. 3 seconds so that the temperature display goes out.
Fan The interior fan ensures a constant and even interior temperature and a suitable climate for wine storage. The humidity in the appliance can be increased even further by activating the Ventilation button. This has a particularly positive effect for long-term storage. Additional functions In set-up mode you can set the child lock and adjust the brightness of the display.
Interior light GB Adjusting the display brightness The interior of the appliance is lit by an LED light strip at the top of each compartment. Press The interior light will always switch on when the appliance door is opened. for 5 seconds. Display = The interior light will go out approx. 5 seconds after the door is closed. Display = Press the Light button if you want the interior light to be on even when the door is closed.
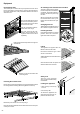
Equipment Presentation shelf The middle pull-out shelf in the top compartment can be used for the presentation of wine bottles or to keep opened bottles at the perfect temperature. The presentation shelf can be used in all three zones. The wooden shelf above it must be removed so that the presentation shelf can be used. Raise and remove the shelf. Pull the presentation shelf forwards as far as it will go. The front section of the presentation shelf consists of two segments which can be raised separately.
Storage diagram for 0.75 l Bordeaux bottles to standard NF H 35-124 Number of bottles 7 Cleaning GB Before cleaning always switch off the appliance. Pull out the mains plug or switch off or unscrew the fuse. • Clean the inside and outer walls with lukewarm water and a little detergent. Do not use abrasive or acid cleaners or chemical solvents. • Use a glass cleaner to clean the glass surfaces and a commercially available stainless-steel cleaning agent for the stainless-steel surfaces.
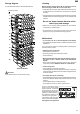
Changing over door hinges Door hinges should only be changed by a trained expert. Changing the door hinges must be done by two people. 1 1. Open door as far as possible. 2. Remove cover. 2 5 3. 3 Slide red safety bracket over the hinge. The two knobs on the safety bracket must be fully inserted into the marked openings on the hinge. 6 6 4 5. Pivot soft stop mechanism to the right. 6. Remove screws. WARNING! 4. Remove pin.
GB 11. Remove screw. 12. Pivot soft stop mechanism outwards on the right, pull to the right and remove. 12 13. Slide spacer to the left and remove. 11 13 8 14 8. Compress the cover in centre and release. Remove cover. 14. Turn spacer through 180° and re-fit on the opposite side. 15. Rurn soft stop mechanism through 180° and re-fit on the opposite side. Then secure both parts with the screw. 15 16 16. Remove red safety bracket. Refer to warning in point 7. 9 9. Transfer plate to other side of cover.
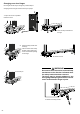
19 23 19. Remove screw from hinge bracket and screw 3 to 4 turns into the hinge pin. 23. Unscrew lock and re-fit on the opposite side. 20 24 Important The door weighs 30 kg. 24. Click cover into place. The door must now be held secure by somebody. 20. Pull out hinge pin. 21 21. Tilt door slightly to the side and remove by lifting upwards. 26 25 25. Release pressure plates at the front 1 and pull them backwards to remove 2. 26. Transfer door handle and plugs to the opposite side. 22.
GB 33 28 34 28 33. Slide cover (with the smaller opening) from outside to inside and click into place. 28. Release covers on the inside, slide them towards the outside and remove. 34. Guide cover with the larger opening over the hinge bracket, slide it from outside to inside and click into place. 29 30 29. Unscrew hinge bracket. 30. Unscrew closing bracket. 31 35. Undo adjustable foot with the spanner provided. 35 36 36. Pull hinge pin upwards and unscrew it from the adjustable foot. 37.
39 39. Transfer fastener for soft stop mechanism on hinge bracket to the opposite side. 45. Place door on pin and move the top of it to the hinge bracket. 40. Transfer cover to the opposite side. Important The door must now be held secure by somebody. 40 45 41 41. Remove cover, turn it through 180° and re-fit on the opposite side. 46 46. Insert hinge pin. 42 Front view of top hinge bracket 47 42. Screw hinge bracket into place. 47.
Adjusting the lateral tilt of the door GB If the door is at an angle, adjust the angle. 49 49. Move soft stop mechanism hinge to the fastener. 54 54. Release cover on the inside and slide to the outside. 50 50. Insert pin. 51. Remove red safety bracket. 51 55. Turn cover downwards. 52. Click cover into place. 55 52 Front view of top hinge bracket 56. Undo screws and slide hinge bracket to the right or left. Tighten screws. 56 Re-fit cover following the instructions above in reverse order.