Operating instructions Cigar storage unit Page 18 7081 293-01 413
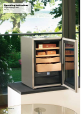
Many thanks for your trust. Congratulations on your purchase of this cigar storage unit. In buying this product, which is distinguished by its perfect user-friendliness, impeccable reliability and high quality, you have chosen a top class appliance. We hope that you enjoy your new cigar storage unit - and that you get a lot of pleasure from your exclusive cigars. Optimum humidity and temperature are key. The very best humidors keep cigars at an even and constant relative humidity.
Inhalt Seite GB Setting up....................................................................................................... 20 Range of appliance use................................................................................. 20 Dimensions.................................................................................................... 20 Electrical requirement................................................................................... 21 Operating and control elements................
Setting up • Avoid locating the appliance in direct sunlight or near heat sources such as an oven or a radiator. • The floor should be level and even. You can compensate for an uneven floor by adjusting the adjustable feet. • Please make sure the appliance is properly ventilated.
GB Electrical requirement Power supply (AC) and voltage at the operating point must comply with the details on the type plate. The type plate is located on the rear of the appliance. The socket must be fused with a 10 A fuse or higher, it must be away from the rear of the appliance and must be easily accessible. Operating and control elements The electronic control panel has the new "touch capacitance technology". Any function can be activated by touching the corresponding icon.
Switching on for the first time Before switching on the appliance, fill the water tank with 1 litre of distilled water. Use distilled water only! Fold down the front flap completely and if necessary slide it into the appliance as far as it will go. Lift the water tank slightly, remove and fill with water. Replace the water tank, sliding it in as far as it will go. Pull out the front flap completely and fold upwards at a 90° angle. To switch on Press the On/Off button. The display will flash.
Adjusting the humidity GB To reduce the humidity Press the Down button. To increase the humidity Press the Up button. - While you are setting the humidity, the display will flash. - About 5 seconds after the button was last pressed, the actual interior humidity will be displayed. The humidity can be adjusted between 68% and 75%. Extremely accurate measurement of humidity requires a complex sensor system such as the one integrated in your appliance.
Audible warning signal The audible warning signal sounds in the event of a malfunction. It will always sound when the door has been left open for longer than 60 seconds. It will also sound if the interior becomes too cold or too warm or if the humidity is too high or too low. The corresponding display will also flash. The LED will light up. Stop the signal by pressing the Alarm button. Control elements LED lights up when the lighting is operational. LED lights up when the child lock is active.
GB Setup mode The following functions can be activated in setup mode: = Child lock = Display brightness = Child lock The child lock is designed to protect the appliance from being switched off accidentally. Activating the child lock • Activate setup mode by pressing the button for 5 seconds. - The display reads • Press the button. - The display reads • Press the - The button again. symbol will light up to indicate that the child lock is activated.
= Display brightness Adjusting the display brightness • Activate setup mode by pressing the • Press the Press the button until button for 5 seconds. appears in the display. button. - The display reads • Press the buttons and set the brightness between 0 = minimum and 5 = maximum. • When you reach the desired level, press the • Exit setup mode by pressing the button. button. • Close the door. The new setting will activate after about 1 minute.
Equipment GB Air exchange with activated charcoal filter To guarantee optimum air throughput, the appliance is fitted with an activated charcoal filter at the top of the rear wall. We recommend that you replace the illustrated filter once a year. Filters can be obtained from your dealer. Changing the filter: The filter can be removed by depressing the recesses on the left and right with a small screwdriver. Spanish cedarwood shelves The presentation boxes are designed for storing cigars individually.
Alternative interior layouts The different fitting layouts for optimum cigar storage are illustrated and described below. Alternative 1 (as supplied) Use this layout to store large numbers of cigars individually in the presentation boxes and small cigar boxes on the shelves. Alternative 2 (with top shelf removed) Use this layout to store large cigar boxes.
GB Alternative 3 (with both presentation boxes removed) This layout is only suitable for storing large cigar boxes (see figure). Important! 1. To ensure constant humidity, there must be at least two pull-out shelves or presentation boxes in the appliance at all times. 2. To ensure adequate air circulation there must always be a shelf or presentation box immediately above the control panel. 3. The pull-out shelves should only be used for storing cigar boxes.
Cleaning Before cleaning, always switch off the appliance. Disconnect from the mains or switch off or unscrew the fuse. • Remove all cigars from the appliance and store them in a suitable place. • Remove all shelves and presentation boxes. • Clean the inside, the door seal and the inside of the glass with a clean, damp cloth. Important: Never use detergents or other substances that emit odours. • Always keep the door closed when cleaning the outside of the appliance.
Malfunctions GB If a malfunction occurs during operation, check whether it is due to an operating error. Please note that even during the warranty period the resultant servicing costs in this case will have to be borne by the owner.
Safety instructions and warnings • To prevent injury or damage to the unit, the appliance should be unpacked and set up by two people. • In the event that the appliance is damaged on delivery, contact the supplier immediately before connecting to the mains. • To guarantee safe operation, ensure that the appliance is set up and connected as described in these operating instructions. • Disconnect the appliance from the mains if any fault occurs. Pull out the plug, switch off or remove the fuse.
GB Disposal notes • Keep packaging materials away from children - polythene sheets and bags can suffocate! • Please return the packaging material to an official collection point. Your old appliance: This contains some reusable materials and should be disposed of properly - not simply with unsorted household refuse. • Disable discarded appliances by removing the plug and cutting through the connection cable. Render the catch unusable so that children cannot become trapped inside.