Ab / Back Owners Manual
Ab / Back 1.
Ab / Back 1.
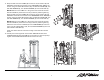
1. Assemble the TOWER (A) to the CAM FRAME (B) using two 3/8 X 92mm BOLTS (6), four 3/8 X 67mm BOLTS (2), twelve 3/8" SAE WASHERS (3), twelve 3/8" RH WASHERS (4), six 3/8" LOW HT LOCK NUTS (5) as shown. Finger tighten the bolts and nuts at this time. 2. Assemble the SEAT FRAME (C) to the CAM FRAME (B) using two 3/8 X 92mm BOLTS (6), four 3/8" SAE WASHERS (3), four 3/8" RH WASHERS (4), two 3/8" LOW HT LOCK NUTS (5) as shown. Finger tighten the bolts and nuts at this time. 3.
Ab / Back 1. Assembly Instructions 7. WEIGHT STACK ASSEMBLY Insert the two GUIDE RODS (12) into the base of the TOWER (A) as shown. Slide two WEIGHT STACK CUSHIONS (13) down over the GUIDE RODS as shown. Lubricate the GUIDE RODS with a slicon or teflon spray that is available at most hardware stores. Using EXTREME CARE, slide fifteen 10 LB. WEIGHT PLATES (14) down over the GUIDE RODS. Carefully Slide the HEAD PLATE ASSEMBLY (15) down over the GUIDE RODS onto the weight stack.
11. Wrap the ball end of the CABLE (8) around one 4-1/2" PULLEY (9) and SECURELY assemble the PULLEY to the FORWARD PIVOT ARM (L) as shown using one 3/8 X 46mm BOLT (39), one PULLEY COVER (28), one 3/8" SAE WASHER (3), one 3/8" RH WASHER (4) and one RH CAP (7). NOTE: Make sure the CABLE is in the groove of the PULLEY and the PULLEY COVER is positioned correctly (as shown), before tightening.
Ab / Back 1. Assembly Instructions 13. Slide the metal ring of the WEIGHT STACK PIN (29) over the STEM on the HEAD PLATE ASSEMBLY (15) as shown. Screw the threaded end of the CABLE (8) into the STEM of the HEAD PLATE ASSEMBLY far enough that the HEAD PLATE just begins to lift off of the first WEIGHT PLATE. Then tighten jam nut SECURELY. Apply WEIGHT STACK LABELS to the WEIGHT PLATES (14) and HEAD PLATE ASSEMBLY.
18. SECURELY assemble the CAM SHROUD (40) to the CAM FRAME (B) using two 3/8 X 89mm BOLTS (41), four 3/8" SAE WASHERS (3), four 3/8" RH WASHERS (4), two 3/8" LOW HT LOCK NUTS (5) and four RH CAPS (7) as shown. 19. SHROUD ASSEMBLY SECURELY assemble the FRONT SHROUD (42) and the REAR SHROUD (43) to the TOWER (A) using ten 3/8 X 90mm BUTTON HEAD BOLTS (44), twenty 3/8" FLAT BLK WASHERS (22) and ten 3/8" ACORN NUTS (45) as shown.
Ab / Back 2. Safety & Warranty It is the sole responsibility of the purchaser of LIFE FITNESS products to instruct all individuals, whether they are the end user or supervising personnel on proper usage of the equipment. It is recommended that all users of LIFE FITNESS exercise equipment be informed of the following information prior to its use. PROPER USAGE 1. Do not use any equipment in any way other than designed or intended by the manufacturer.
WARRANTY WHAT IS COVERED This Life Fitness commercial exercise equipment (Hip Abduction / Adduction) is warranted to be free of all defects in material and workmanship. WHO IS COVERED The original purchaser or any person receiving the Product as a gift from the original purchaser. WHO PAYS TRANSPORTATION & INSURANCE FOR SERVICE If the Product or any covered part must be returned to a service facility for repairs, We, Life Fitness, will pay all transportation and insurance charges for the first year.
Ab / Back 2. Safety & Warranty EXCLUSIVE WARRANTY THIS LIMITED WARRANTY IS IN LIEU OF ALL OTHER WARRANTIES OF ANY KIND EITHER EXPRESSED OR IMPLIED, INCLUDING BUT NOT LIMITED TO THE IMPLIED WARRANTIES OF MERCHANTABILITY AND FITNESS FOR A PARTICULAR PURPOSE, AND ALL OTHER OBLIGATIONS OR LIABILITIES ON OUR PART. We neither assume nor authorize any person to assure for us any other obligation or liability concerning the sale of this Product.
Ab / Back 3. Specifications General Specifications 1. Frame Construction Frame is constructed of mechanical quality steel purchased in mill run quantities Frame is primarily 2" x 3" tubing with 11 gauge wall thickness. 2. Frame Finish Prior to applying finish, each part is chemically washed to prepare surface for maximum adhesion 3. Bolts All hardware is metric and has a corrosion resistant finish. 4. Instructional Placard Visual placard provides illustration for proper use. 5.
Abdominal Crunch 4.
CLEAN Abdominal Crunch 5. Maintenance O Upholstery with a mild soap and water. O Hand grips with mild soap and water. INSPECT O Hardware should be checked for looseness. Tighten as required. O Frames should be inspected for wear or damage. All paint chips should be filled immediately with touch-up paint. O Handgrips should be checked for wear or damage. ONCE A DAY O Wipe down upholstery with a mild soap and water or comparable all purpose cleaner.
2007 Life Fitness, a division of Brunswick Corporation. All rights reserved. Life Fitnessis a registered trademark of Brunswick Corporation. © FSABBA 2.09.