Achieve Console o p e rat i o n manual
CORPORATE HEADQUARTERS 5100 River Road Schiller Park, Illinois 60176 • U.S.A. 847.288.3300 • FAX: 847.288.3703 800.735.3867 (Toll-free within U.S.A., Canada) Global Website: www.lifefitness.com AMERICAS North America Life Fitness Inc. 5100 N River Road Schiller Park, IL 60176 U.S.A Telephone: +1(847) 288 3300 Fax: +1(847) 288 3703 Service Email: internationalservicesupport@lifefitness.com Sales/Marketing Email: commercialsales@lifefitness.
Before using this product, it is essential that this ENTIRE operation manual and ALL installation instructions be read. This will help in setting up the equipment quickly and in instructing others on how to use it correctly and safely . Avant toute utilisation de ce produit, il est indispensable de lire ce manuel d'utilisation dans son INTÉGRALITÉ, ainsi que TOUTES les instructions d'installations. Ce manuel explique comment installer l'équipement et comment l'utiliser correctement et sans danger.
TABLE OF CONTENTS Section Description . . . . . . . . . . . . . . . . . . . . . . . . . . . . . . . . . . . . . . . . . . . . . . . . . . . . . . . . . Page 1. Getting Started . . . . . . . . . . . . . . . . . . . . . . . . . . . . . . . . . . . . . . . . . . . . . . . . . . . . . . . . . . . . . . .5 1.1 Important Safety Instructions . . . . . . . . . . . . . . . . . . . . . . . . . . . . . . . . . . . . . . . . . . . . . . . 2. The Achieve Display Console . . . . . . . . . . . . . . . . . . .
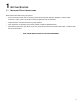
This Operation Manual describes the functions of the Achieve Console CAUTION: Health-related injuries may result from incorrect or excessive use of exercise equipment. Life Fitness STRONGLY recommends seeing a physician for a complete medical exam before undertaking an exercise program, particularly if the user has a family history of high blood pressure or heart disease, or is over the age of 45, or smokes, has high cholesterol, is obese, or has not exercised regularly in the past year.
1 GETTING STARTED 1.1 IMPORTANT SAFETY INSTRUCTIONS Read all instructions before using this product. • If this Life Fitness product does not function properly af ter it has been dropped, damaged, or even p artially immersed in water, contact Life Fitness Customer Support Services for assist ance. • Always follow the console instructions for proper operation. • Close supervision is necessary when used by children, invalids or disabled persons.
1 POINT 1.1 CONSIGNES DE DÉPART DE SÉCURITÉ IMPORTANTES Lisez toutes les instructions avant le fait d'utiliser ce produit. • Si l'appareil Life Fitness ne fonctionne p as correctement après avoir subi une chute, des dommages ou une immersion même partielle dans l'eau, contactez le service d'assistance clientèle de Life Fitness. • Pour un fonctionnement correct, suivez toujours les instructions de la console.
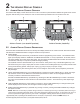
2 THE ACHIEVE DISPLAY CONSOLE 2.1 ACHIEVE DISPLAY CONSOLE OVERVIEW The Achieve LED display console allows the user to t ailor a workout to personal fitness abilities and goals and to monitor progress. With this easy-to-use console, the user can track fitness improvement from one workout to the next. K K A G C H D I L F A B G J Achieve Console (non-treadmill products) 2.
F. CLEAR (non-treadmill products): Pressing the CLEAR key once transitions the system to the W orkout Summary mode. Pressing CLEAR during the data entry phase of the workout program will return the entry to the system default (i.e. pressing CLEAR while entering your weight will return the weight value to 150 lbs). Pressing CLEAR twice activates the console for programming a new workout. The activated console lights up and displays “SELECT WORKOUT OR PRESS QUICK START”.
J. WORKOUT PROFILE window: This window displays shapes, made of columns of light s, that represent the levels of intensity in a workout-in-progress. The height of the first column on the lef t side of the window is proportional to the current level of intensity. During a Fat Burn or Cardio workout, which requires the use of a Polar ® heart rate chest strap or the Lifepulse system sensors, the Workout Profile window displays a flashing heart shape while detecting the user ’s heart rate signal.
2.4 THE ACCESSORY TRAY / READING RACK A built-in reading rack (A) allows a book or magazine to be supported during the workout. A built-in accessory tray (B) provides storage for items such as water bottles, personal media devices, and cell phones.
3 HEART RATE ZONE TRAINING EXERCISE 3.1 WHY HEART RATE ZONE TRAINING EXERCISE? Research shows that maintaining a specific heart rate while exercising is the optimal way to monitor the intensity of a workout and to achieve maximum result s. That is the idea behind the Life Fitness heart rate zone training approach to exercise. Zone training identifies an exerciser's ideal heart rate range, or zone, for burning a higher percent age of calories from fat or increasing cardiovascular fitness.
3.2 HEART RATE MONITORING THE LIFEPULSETM DIGITAL HEART RATE MONITORING SYSTEM The patented Lifepulse system sensors are the built-in heart rate monitoring system. For the most accurate reading possible, during a workout: • Grasp the sensors (A) firmly. • Hold each sensor at the horizont al (treadmill, recumbent bike and upright bike) or vertical mid point (cross-trainer and upright bike). • Keep hands steady and in place.
THE POLAR® TELEMETRY HEART RATE MONITORING CHEST STRAP The Polar® heart rate monitoring system transfers heart rate signals to the console when electrodes are pressed against the skin. These electrodes are attached to a chest strap that the user wears during the workout. The chest strap and telemetry electrodes are optional. To order, call Life Fitness Customer Support Services (see page 1 of this manual). See the diagram below for correct positioning of the strap.
4 THE WORKOUTS 4.1 WORKOUT OVERVIEWS This section lists the available pre-programmed workouts. For more detailed information, see Section 4.2 titled Using the Workouts. QUICK START is the fastest way to begin exercising and byp asses the steps involved in selecting a specific workout program. On non-treadmill products, after the QUICK START key is pressed, a constant-level workout begins. The intensity level does not change automatically.
SELECTING AND USING QUICK START QUICK START is the fastest way to begin exercising and byp asses the steps of selecting a specific workout program. At the MESSAGE CENTER prompt to select a workout, press the QUICK ST ART key on the console or Activity Zone or Walk/Jog/Run keys (on treadmills). The workout begins at an intensity level that remains the same unless manually changed.
LEVEL % INCLINE LEVEL % INCLINE 1 0.0 – 1.5 11 2.0 – 8.5 2 0.0 – 2.2 12 3.0 – 9.2 3 0.0 – 2.9 13 3.5 – 9.9 4 0.0 – 3.6 14 5.0 – 10.6 5 0.0 – 4.3 15 5.5 – 11.3 6 0.0 – 5.0 16 6.5 – 12.0 7 0.0 – 5.7 17 7.0 – 12.7 8 0.0 – 6.4 18 8.0 – 13.4 9 0.5 – 7.1 19 8.7 – 14.1 10 1.5 – 7.8 20 9.0 – 15.
4.3 WORKOUT DESCRIPTIONS WORKOUT MODES On bikes, the MANUAL, QUICK START, HILL and RANDOM workouts default to BIKE MODE which simulates the experience of riding an actual bicycle. The rate of calories burned and tot al distance travelled increase automatically as the user increases the pedaling speed. On bikes, the FAT BURN, CARDIO, and FIT TEST workouts default to CONSTANT-CALORIES-PER-HOUR-MODE which enables a user to maintain a constant rate of calories burned per hour.
Each column, as seen in the WORKOUT PROFILE window and the chart above, represent s one interval. The overall duration of the workout determines the length of each interval. The Hill program cannot complete all four phases adequately for a workout lasting less than 10 minutes. The program condenses a workout of this duration at various st ages. Treadmills: Intervals occur every 10 seconds if the workout duration is less than or equal to 10 minutes. Intervals occur every 11, 12, 13,..
To set up the Fit Test (on treadmills): Press the CHANGE WORKOUT button repeatedly until the FIT TEST option appears in the MESSAGE CENTER. Press ENTER to select the FIT TEST option. The MESSAGE CENTER will prompt for a user weight (ENTER WEIGHT). Use the TIME UP/DOWN ARROW keys (center keys) to input your weight. Press ENTER to accept the weight. The MESSAGE CENTER will next prompt for a user age (ENTER AGE). Use the TIME UP/DOWN ARROW keys (center keys) to input your age. Press ENTER to accept the age.
It is important for you to take the Fit Test under similar circumstances each time.
The tables below list fit test result s.
LIFE FITNESS ACHIEVE CONSOLE WORKOUT SETUP STEPS QUICK START Press QUICK START Enter weight Begin workout MANUAL Press CHANGE WORKOUT repeatedly until MANUAL appears; press ENTER Enter weight (cross-trainer and treadmill) Enter time Select level (non-treadmill) Select incline (treadmills) Select speed (treadmills) Begin workout RANDOM Press CHANGE WORKOUT repeatedly until RANDOM appears; press ENTER Enter weight (cross-trainer and treadmill) Enter time Select level Select speed (treadmills) Begin workout FA
5 MANAGER CONFIGURATIONS 5.1 ENTERING AND USING THE MANAGER CONFIGURATION SETTINGS Fitness facility managers and other authorized personnel can use the Manager Configurations feature to change default settings or to enable or disable cert ain workouts or displays on the Life Fitness exercise equipment. To access the console diagnostics to view version numbers and customize optional settings, users must be in the Select W orkout Mode. Hold the COOL DOWN key while pressing the CLEAR key twice.
The following version numbers, for treadmills, can be displayed: console version, console software part number, motor controller version, Life Pulse version, CSafe version, and bootloader version. MANAGER CONFIGURATION OPTIONAL SETTINGS: TREADMILL Setting Default Value Description MAX WORKOUT DURATION 60 MINUTES This is the maximum possible duration for a workout. The value can range from 1 to 99, unless Marathon Mode is enabled.
6 SERVICE AND TECHNICAL DATA 6.1 PREVENTIVE MAINTENANCE TIPS Life Fitness equipment is backed by the engineering excellence of Life Fitness. Commercial Life Fitness product s have proven to be durable in health clubs, colleges, and milit ary facilities the world over. NOTE: The safety of the equipment can be maintained only if the equipment is examined regularly for damage or wear. Keep the equipment out of use until defective parts are repaired or replaced.
6.2 PREVENTIVE MAINTENANCE SCHEDULE - ACHIEVE CONSOLE Follow the schedules below to ensure proper operation of the Achieve Console.
6.4 TROUBLESHOOTING THE LIFEPULSE SYSTEM SENSORS If the heart rate reading is erratic or missing, do the following: • Dry the hands if necessary to prevent slipping. • Apply hands to both sensors, one in each hand. • Grasp the sensors firmly. • Apply constant pressure around the sensors. 6.5 HOW TO OBTAIN PRODUCT SERVICE 1. Verify the symptom and review the operating instructions. The problem may be unfamiliarity with the product and it s features and workouts. 2.
7 SPECIFICATIONS 7.1 LIFE FITNESS ACHIEVE CONSOLE Console: Type: Displays: Summaries: Character size: MESSAGE CENTER with UP/DOWN ARROW keys Elapsed time, Speed, Level, Calories, Heart Rate, Dist ance. When enabled: METs and Watts Total elapsed time of workout, total calories burned, total distance 0.
7.2 WARRANTY INFORMATION WARRANTY COVERAGE: ACHIEVE CONSOLE FOR 97C, 95C, 95R, 95T, 95X WHAT IS COVERED: This Life Fitness commercial exercise equipment (“Product”) is warranted to be free of all defects in material and workmanship. WHO IS COVERED: The original purchaser or any person receiving the Product as a gift from the original purchaser. HOW LONG IS IT COVERED: All coverage is provided by specific Product according to the guidelines listed on the chart accompanying this warranty card.