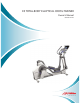
X5 TOTAL-BODY ELLIPTICAL CROSS-TRAINER Owner’s Manual 8973801 REV B-3
CORPORATE HEADQUARTERS 5100 River Road Schiller Park, Illinois 60176 • U.S.A. 847.288.3300 • FAX: 847.288.3703 Service phone number: 800.351.3737 (toll-free within U.S.A., Canada) Global Website: www.lifefitness.com INTERNATIONAL OFFICES AMERICAS North America Life Fitness Inc. 5100 N River Road Schiller Park, IL 60176 U.S.A Telephone: (847) 288 3300 Fax: (847) 288 3703 Service Telephone: (800) 351 3737 Service Email: customersupport@lifefitness.com Sales/Marketing Email: consumerproducts@lifefitness.
Thank you for purchasing a Life Fitness Total-Body Elliptical Cross-Trainer. Before using this product, please read this owner’s manual in its entirety to ensure that you have the knowledge to safely and properly operate all of the features of your Total-Body Elliptical Cross-Trainer. We hope you achieve the product experience that you expect, but if you do have any service issues, please go to the How to Obtain Product Service section which will provide information on obtaining product service.
TABLE OF CONTENTS 1. Important Safety Instructions . . . . . . . . . . . . . . . . . . . . . . . . . . . . . . . . . . . . . . . . . . . . . . . . . . . . . . . . . . .5 2. X5 Total Body Elliptical Cross-Trainer Overview . . . . . . . . . . . . . . . . . . . . . . . . . . . . . . . . . . . . . . . . . . . .7 3. Assembly . . . . . . . . . . . . . . . . . . . . . . . . . . . . . . . . . . . . . . . . . . . . . . . . . . . . . . . . . . . . . . . . . . . . . . . . . .8 3.1 Tools & Hardware . . . . .
This Operation Manual describes the functions of the following product: Life Fitness Cross-Trainer Model: X5 Statement of Purpose: The Life Fitness Total-Body Elliptical Cross-Trainer is an exercise machine that combines lowimpact elliptical pedaling, where resistance is independent of speed, with push/pull arm motion to provide an efficient, effective total body workout. CAUTION: Health-related injuries may result from incorrect or excessive use of exercise equipment.
1 IMPORTANT SAFETY INSTRUCTIONS WARNING: Read all instructions before using the Total-Body Elliptical Cross-Trainer. Save these Instructions. WARNING: Heart rate monitoring systems may be inaccurate. Over exercising may result in serious injury or death. WARNING: Any adjustment devices that could interfere with the user’s movement should not be left projecting. DANGER: To reduce the risk of electrical shock, always unplug this Life Fitness product before cleaning or attempting any maintenance activity.
• Make sure that all components are fastened securely. • An appliance should never be left unattended when plugged in. Unplug from outlet when not in use, and before putting on or taking off parts. • Do not operate under blanket or pillow. Excessive heating can occur and cause fire, electric shock, or injury to persons. • Never operate this appliance if it has a damaged cord or plug, if it is not working properly, if it has been dropped or damaged, or dropped into water.
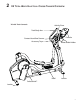
2 X5 TOTAL-BODY ELLIPTICAL CROSS-TRAINER OVERVIEW X5 with Track Console Activity Zone Total Body Arm Console Contact Heart Rate Sensors Accessory Tray Water Bottle Holder Pedal Leveler SelectStride™ Leveler 7
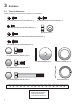
3 ASSEMBLY 3.1 TOOLS & HARDWARE Identify the following components after unpacking your cross-trainer: M3.5 X 12MM BLACK PHILLIPS HEAD SCREW (QTY. 4) M5 X 8MM BLACK PHILLIPS HEAD SCREW (QTY. 4) M3.5 X 8MM CLEAR ZINC PHILLIPS HEAD SCREW (QTY. 4) M10 HEX NUT (QTY. 2) M5 X 12MM BLACK PHILLIPS HEAD SCREW (CONSOLE MOUNTING) (QTY. 4) M5 X 12MM SILVER PHILLIPS HEAD SCREW (QTY. 8) M10 X 15MM SILVER HEX HEAD BOLT (QTY. 6) FLAT WASHER 10MM ID (QTY. 2) LARGE FLAT WASHER (QTY.
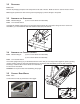
3.2 PACKAGING Parts: None Remove all packaging and place main components to the side of the box. Break box down in each of the four corners. Note: Support pedal levers when removing internal packaging to prevent damage to the pedals. 3.3 ASSEMBLE THE STABILIZERS Parts: Hardware Bag #1 (4, M10 X 15mm Silver Hex Head Bolts) Tools: 17mm Socket Wrench Assemble the stabilizer tubes (feet) (A) to the bottom base brackets (B) of the product using two M10 X 15mm Hex Head Bolts (1) on each stabilizer tube.
3.6 ASSEMBLE THE ROCKER ARMS; MOVING ARM PIVOT COVERS Parts: Hardware Bag #3 (2, (2, (2, (4, Wave Washers, 2 Large Flat Washers) Flat Washers) M10 X 20mm Silver Hex Head Bolts) M3.5 X 12mm Black Phillips Head Screws) Tools: 17mm Socket Wrench, Phillips Screwdriver Slide one large Flat Washer (4) and one Wave Washer (5) onto the user right pivot shaft (F). Slide the washers fully over the pivot shaft until seated against the pre-installed stop ring (G).
3.7 ASSEMBLE MOVING ARMS TO PEDAL ARMS; PEDAL / MOVING ARM JOINT PIVOT COVERS Parts: Hardware Bag #4 (2, M10 X 74mm Silver Hex Head Bolts) (2, M10 Hex Nuts) (4, M5 X 8mm Black Phillips Screws) Tools: 17mm Socket Wrench, Phillips Screwdriver Lift the front end of the user left pedal lever (K) to meet the left rocker arm clevis (L). Secure the pedal lever to the rocker arm clevis using one M10 X 74mm Silver Hex Head Bolt (9) and one M10 Hex Nut (10). Tighten the bolt and nut securely.
3.8 ASSEMBLE FRONT BASE SHROUD; CONSOLE BRACKET Parts: Hardware Bag #5 TO THE UPRIGHT (8, M5 X 12mm Silver Phillips Head Screws) (2, M10 X 15mm Silver Hex Head Bolts) Tools: Phillips Screwdriver, 17mm Socket Wrench Position the left side base shroud (N) over the metal bracket (O) and screw in with four M5 X 12mm Silver Phillips Head Screws (12). Repeat for the right side base shroud. Slide the console bracket (P) into the upright.
3.9 CONNECT ALL CONSOLE WIRING; CONSOLE BACK PLASTIC SHELL Parts: Hardware Bag #6 TO CONSOLE BRACKET; (4, M5 X 12mm Black Phillips Screws) (4, M3.5 X 8mm Clear Zinc Screws) Go Console Connections Tools: Phillips Screwdriver Position the console (Q) close to the console bracket (P) and follow the below instructions to connect all wiring. 15P G Plug cables into the back of the display console: 13P 1.
4 INITIAL SETUP Read the entire User Manual before setting up the Total-Body Elliptical Cross-Trainer. Note: This Total Body Elliptical Cross-Trainer is speed independent. Resistance can be adjusted by means other than speed. WHERE TO PLACE THE TOTAL-BODY ELLIPTICAL CROSS-TRAINER After following all safety instructions move the Total-Body Elliptical Cross-Trainer to the place where it will be used. Allow a minimum clearance of 12 inches (30.5 cm) around the product.
5 MAIN FEATURES 5.1 CONTACT HEART RATE The X5 includes hand pulse sensors on the stationary handle bar that are a built-in heart rate monitoring system. During a workout grasp the hand pulse sensors to monitor your heart rate.We recommend using the heart rate chest strap provided with your console during workouts and using the hand pulse sensors to only occasionally monitor your heart rate when not using the chest strap.
5.4 SELECTSTRIDE™ The X5 features SelectStride Technology which provides the user with the ability to adjust the stride length to any increment between 18 and 24 inches (46 cm to 61 cm). By adjusting the stride length, you can personalize the motion to your body or to your specific workout. For example, a longer stride length may feel the most comfortable and natural to taller individuals.
6 COACHZONE™ 6.1 COACHZONE™ OVERVIEW The CoachZone is designed to provide extra workout variety and motivation through additional instruction and feedback. The ArmToner and GluteToner workout enhancements help users target specific muscle groups and break the workout into manageable increments. The appropriate muscle groups that you should be using will illuminate when you perform specific movements. The UP/DOWN level arrow keys are a convenient way for users to change difficulty levels.
6.3 ARMTONER™ The ArmToner selection utilizes a pre-programmed series of prompts and intervals focused on upper-body muscles. ACTIVATE ARMTONER Press the ArmToner key during any workout to activate the selection. PAUSE ARMTONER Press the ArmToner key once while using the ArmToner selection. PAU will display on the CoachZone Timer. Press the ArmToner key again to resume. The CoachZone automatically shuts off if the ArmToner key isn’t pressed within 5 minutes.
6.4 GLUTETONER™ The GluteToner selection utilizes a pre-programmed series of prompts and intervals focused on lower body muscles and glutes. ACTIVATE GLUTETONER Press the GluteToner key during any workout to activate the selection. PAUSE GLUTETONER Press the GluteToner key once while using the GluteToner selection. PAU will display on the CoachZone Timer. Press the GluteToner key again to resume. STOP GLUTETONER Press and hold the GluteToner key while using the GluteToner selection.
6.5 TIMER The amber LED timer breaks workouts into manageable increments by displaying a count down of the time remaining on specific movements. When the timer reaches zero, the Coach LEDs will change. Slow your movement to a complete stop, and begin the next interval. 6.6 RESISTANCE LEVEL & INTENSITY LEVEL KEY PRESS The Resistance Level UP/DOWN Arrow Keys only function after a user selects and begins a workout using the X5 main console.
7 SERVICE & PRODUCT MAINTENANCE 7.1 TROUBLESHOOTING Problem Cause / Solution Check to see that the power cord is fully plugged into the back of the Total-Body Elliptical Cross-Trainer and into the wall. Make sure the power cord is fully seated into the back of the Total-Body Elliptical Cross-Trainer. No power. You may be in “Energy Saver Mode”. Press the “Energy Saver” button to see if the console turns on. Verify that all customer assembly connections are working properly.
Problem Creaking sound is coming from the stabilizers. Cause / Solution It is very important that the nut on the leveler is tightened against the stabilizer tube after the product is leveled. Ensure that this nut is tight. Turn the unit off and then on again. “OFF” is displayed in the LEVEL window on the console. If power cycling the product did not work, there is a problem with the resistance system. Contact Customer Support Services for assistance.
7.2 PREVENTATIVE MAINTENANCE TIPS The Life Fitness Total Body Elliptical Cross-Trainer is backed by the engineering excellence and reliability of Life Fitness and is one of the most rugged and trouble-free pieces of exercise equipment on the market today. Note: Safety of the equipment can be maintained only if the equipment is examined regularly for damage or wear. Keep the equipment out of use until the defective parts are required or replaced.
8 SPECIFICATIONS LIFE FITNESS X5 CROSS-TRAINER SPECIFICATIONS Designed Use: Home Max User Weight: 400 lbs / 182 kilograms Resistance System: Eddy Current Stride Length: 18 inches to 24 inches (46 cm to 61cm) (Adjustable in any increment, marked at 18, 19, 20,21, 22, 23, and 24.) CoachZone™ User Controls: Yes Contact Heart Rate: Yes FlexPedal™ Shock Absorption System: Yes Accessories: 2 water bottle holders and 1 removeable accessory tray Power Supply: 120 Volt (U.S.
9 WARRANTY INFORMATION Model Limited Lifetime 3 Years 1 Year X5 Cross-Trainer Base Frame Electrical Parts & Mechanical Parts Labor WHAT IS COVERED: This Life Fitness consumer product ("Product") is warranted to be free of all defects in material and workmanship. WHO IS COVERED: The original purchaser or any person receiving a newly purchased Product as a gift from the original purchaser. Warranty will be voided on subsequent transfers.
HOW TO GET PARTS & SERVICE: Refer to page one of this manual for your local service contact information. Reference your name, address and the serial number of your Product (consoles and frames may have separate serial numbers). They will tell you how to get a replacement part, or, if necessary, arrange for service where your Product is located.