
Installation Manual


L L
L L
L L
L L
L
L
L
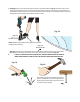
This hole is drilled level without any
angle on the drill because the front
and the back holes are on the same
straight line.
Point of Triangle
& Lean Direction
Toward Pool
Point of Triangle
& Lean Direction
Away from Pool
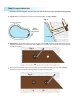
Understand the Angle to be Drilled: See Fig. 15a-17
90
100
110
120
130
140
150
160
170
180
80
0
90
100
110
120
130
140
150
160
170
180
80
0
Fig. 16
PRO NOTES: Any hole to be drilled will have a hole in
front of it and one in the back of it as shown in Fig.
15a. If the hole to be drilled is in the heavy lean range,
it will require a Heavy Lean. If the hole to be drilled is in
the light lean range, it will require a Light Lean. See Fig.
15b
Imaginary Line:
1R
1L
C
u
t
-
S
e
c
t
i
o
n
L
L
L
L
PRO NOTES:
Smoother transitions
when contouring the
fence are best. Avoid
heavy turns where
ever possible. This
example shows all
Light Leans
AVOID
Heavy Lean
Level (L)
Fig. 15a
AVOID
Light Lean
Level (L)
Hole to be Drilled & Point of Triangle
Front Hole
Back Hole
Back Hole
Front Hole
Fig. 15b
Fig. 17
PRO NOTES: When determin-
ing the lean of a hole, simply
stand over the hole you are
about to drill, then look at the
hole in front of you and the
hole behind you. If you
connected all three holes with
imaginary lines it would make
a triangle. The point of the
triangle indicates the direction
of lean. The further away from
the imaginary line the more of
a lean. If it doesn’t make a
triangle then it is level.
Imaginary Line:
Fence Line:
Fence Line
Light Lean
Imaginary Line
Pool
Hole to be Drilled & Point of Triangle
Heavy Lean
Imaginary Line
Pool
Fence Line
LL
LL
LL
LL
LL LL
LL
LL
LL
LL
LL
LL
LL
LL
LL
LL
LL
LL
LL
LL
LL
LL
LL
LL
LL
KEY:
LL = Light Lean
HL = Heavy Lean
L = Level
HL
LL