S C R A T C H C O D I N G K I T Logic boost CODING CLASS CLASS forever imagine program share 1
CLASS 1 Before You Start Don’t just play games, make one. Learn to code for your future. Barack Obama (The 44th President of the U.S.
S C R A T C H C O D I N G Table of Contents Intro to Coding ………………………………………………………………………………………………………… 4 Lesson 1. DC MOTOR ……………………………………………………………………………………………… 28 Lesson 2. Lizard Robot …………………………………………………………………………………………… 43 Lesson 3. Random numbers and loop ……………………………………………………………………… 57 Lesson 4. Gunman Robot ………………………………………………………………………………………… 70 Lesson 5. Transportation Robot ……………………………………………………………………………… 81 Lesson 6.
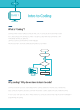
CLASS 1 Intro to Coding What is “Coding”? Coding is simply a way of telling a computer what to do. A computer can’t do anything by itself, but it does a great job in carrying out orders. If you give out clear and exact commands, it will immediately do what you asked for. Learning to code is just like learning a new language. The more you learn, the more complicated programs you can make! Why coding? Why do we have to learn to code? Coding is the power source of today’s digital world.
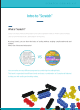
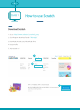
S C R A T C H C O D I N G Intro to “Scratch” What is “Scratch”? Scratch is an object-oriented coding program. Every code is organized in blocks of different colors and shapes. Users can combine these blocks to easily program moving robots. By using Scratch, you can learn the basics of coding without studying complicated words and symbols. Which one of these two looks easier? VS You can make so many different programs by combining the coding blocks.
CLASS 1 How to use Scratch Download Scratch 1. Go to http://www.robotori.com/web_eng 2. Click “Program Download” under “Moretips” 3. Download s4a and scratch download driver 4. Unzip the file 5. Activate s4a 1.
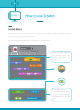
S C R A T C H C O D I N G How to use Scratch Appellation Scratch Pallette Rotation Settings There are 8 block buttons. Each serve a The user can change the sprite’s different purpose. These blocks are used rotation using this sequence: to make a program. *Rotate *Left-Right *Don’t rotate The area where you can control the sprite. Sprite is the character that will be used in Scratch. Sprite Button The user can control the sprite using these three buttons.
CLASS 1 How to use Scratch Scratch Blocks The blocks vary in color and shape. Different color means they serve different purposes. For example, blue blocks are action blocks that are used to move a motor. Different shapes show if a block can be connected with other blocks or not. Blocks with these shapes can be connected to each other. It’s easy if you think of it as a puzzle! These blocks can’t be connected to anything. Instead, they can fit inside other blocks.
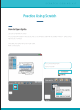
S C R A T C H C O D I N G Practice Using Scratch How to Open Sprite Let’s start using blocks in Scratch. First, activate S4A program. Once you activate it, you will see a screen like this. Delete ‘Arduino 1’ sprite using a right button of a mouse. Click ‘Select new sprite file’ icon and open ‘Celly’. Refer to the pictures.
CLASS 1 Practice Using Scratch How to Use Sprite Were you able to open the sprite, ‘Celly’? You can easily open a sprite. Later, you will be making your own robots and coding its motions. Right now, we will learn the basics of Scratch. Let’s see what kind of blocks we have.
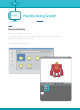
S C R A T C H C O D I N G Practice Using Scratch How to Change the Size of a Sprite We are going to code a program that will change the size of ‘Celly.’ Refer to the picture to organize the blocks by dragging them from the Double click to edit numbers. and menus.
CLASS 1 Practice Using Scratch How to Change the Size of a Sprite Did you make the script? If it’s hard to make one, just drag the blocks in and organize them like the picture on the front page.
S C R A T C H C O D I N G Practice Using Scratch How to Rotate the Sprite Were you able to change the size of the sprite? Just change the numbers in the blocks for more different sizes! Now let it rotate every time we click on it. Refer to the picture and organize the blocks by dragging them from the ‘Control’ and ‘Motion’ menus. Edit angles by double clicking the blocks.
CLASS 1 Practice Using Scratch How to Rotate a Sprite Did you make the script? Now we can easily make scripts. The script we just made starts with ‘Sprite 1 when clicked,’ so the blocks under it will start working once we click the sprite. Click ‘Celly’ when you finish making the script! Everytime you click ‘Celly’, you will see the sprite rotate 15 degrees.
S C R A T C H C O D I N G Practice Using Scratch How to Change the Color of a Sprite Were you able to rotate the sprite? You can change the angles by editing the numbers in blocks! Now, we will change the color of a sprite. Everytime you click the space bar on your keyboard, the color of ‘Celly’ will change. Refer to the picture to organize the blocks.
CLASS 1 Practice Using Scratch How to Change the Color of a Sprite Did you make the script? This script starts with ‘when a space bar is pressed,’so the blocks under it will start working once you press the space bar.
S C R A T C H C O D I N G Practice Using Scratch How to Set Rhythm for the Sprite’s Movement Were you able to change the color? You can change the color effect by editing the numbers in the blocks! Now, we will set the rhythm for the sprite’s movements. We’re going to use the sound tap of Scratch, so turn on your speakers or plug in earphones! Refer to the picture to organize the blocks.
CLASS 1 Practice Using Scratch How to Set Rhythm for the Sprite’s Movement Did you make the script? You can make the script by dragging in blocks from Scratch’s sound tab. Click the flag icon to activate the script! When it’s activated, the sprite, ‘Celly’ will move ‘100’ beats in rhythm. You can change the sound of the drum by clicking the black arrow of the block that plays the music.
S C R A T C H C O D I N G Practice Using Scratch How to Make a Speaking Sprite. Were you able to move the sprite rhythmically? You can change its movement by editing the numbers in blocks! Now, we are going to make a speaking sprite. Click the ‘New sprite file’ icon and drag in ‘Chacha’! Click ‘Celly’ and make the script ‘when sprite1 is clicked.’ Click ‘Chacha’ and make the script ‘When sprite2 is clicked.’ Refer to the picture to organize the blocks.
CLASS 1 Practice Using Scratch How to Make a Speaking Sprite. Did you make the script? Bring the ‘speak’ block from Scratch to make the script. Now, click each sprite to activate the scripts! If you click the sprite, you will see it talking.
S C R A T C H C O D I N G Practice Using Scratch How to Make the Sprite to Follow the Pointer Did you see the two sprites talking? Change their conversation by editing the numbers of the blocks. Now, we are going to make one of the sprites follow the pointer. Erase ‘Chacha’ for this one! Refer to the picture below to organize the blocks.
CLASS 1 Practice Using Scratch How to Make the Sprite to Follow the Pointer Did you make the script? You can bring the ‘face ____’ block and choose ‘mouse pointer’ to make the script. Click the flag icon to activate the script! If the sprite is activated, ‘Celly’ will follow the pointer. Edit the numbers to change the speed. We have learned the basics by making simple scripts. Let’s start coding robots now.
S C R A T C H C O D I N G Main Cell Main Cell There are different kinds of electric cells in robotori, and below is the main cell. The main cell works like a brain that controls the robot. It connects Scratch and the user’s computer to command and move robots as well as give it feedback from the information it got from different sensors.
MainCell CLASS 1 Parts of the Main Cell Below is a picture that explains the ports. From now on, you will connect different motors and sensors with this main cell.
S C R A T C H C O D I N G Main Cell Powering the Main Cell First, we need the main cell and the battery case. Refer to the picture below to connect them with 3-pin power cable. Once the main cell and the battery case are connected, click the power button to turn on the main cell. Then, you will see the red light on the display screen.
CLASS 1 MainCell How to Set the Main Cell in Scratch Mode We have to set the main cell to scratch mode to use Scratch so that when it’s connected to the computer it can download the program from Scratch. Press the round gray button next to the power button for mode settings. You can see the number or letter change consequencially on the display screen. Keep pressing the mode switch until you see ‘J’ on the screen. Mode switch Check if you see ‘J’ on the display screen.
S C R A T C H C O D I N G Main cell How to Connect the Main Cell to the Computer. There is a gray USB cable (download driver) included in the materials of this coding class. Use this and refer to the picture below to see where to plug in. B R B W Look at the picture above. Ignoring the topmost hole, plug in black, red and white cable in order.
CLASS 1 Main cell Check that the Main Cell is Connected to Scratch Start the ‘S4A’ program once the main cell is connected to the computer. After the Scratch is activated and the main cell is connected to the computer, you will be able to see the notice, ‘Searching board…’ on the screen disappear. If the main cell is well connected, it will show analog values on Scratch. Wait! Digital values are shown as only ‘true’ or ‘false.
S C R A T C H S C R A T C H C O D I N C O D I N G G K I K I T T Logic boost DC MOTOR 1 LESSON
CLASS 1 What is DC Motor? What is DC Motor? The motors we use were also used by our ancestors. They are important in modern society; they are used in electric cars, fans, trains and even computers. DC motors are made to distribute consistant rotation movement. Electiricity gives the DC motor the ability to rotate. There is a copper wire surrounded by strong magnets inside a motor. A magnetic field is formed when electricity is given to the wire.
S C R A T C H C O D I N G How to Make a Robot Introduction We just learned how to connect your computer and the main cell. Let’s start learning how to move the DC motor by using Scratch. The user can use Scratch to move the DC motor in a clockwise or counter-clockwise motion. Knowing how to use the motor helps us to code and control robots. Let’s start with making the small windmill above.
CLASS 1 How to Make a Robot How to Make a Small Windmill Windmill Materials Diamond V8 x2 Diamond V6 x6 Rubi 8 x4 Rubi 7 x2 Rubi 6 x2 Rubi 4 x8 Rubi 2 x5 Rubi 0 x1 Mini 1 x1 Triangle x3 Motorconnector x1 A 96 x1 DC motor x1 Battery case x1 Maincell 메인보드128 메인보드128 x1 DC motor x1 Mini 2 x1
S C R A T C H C O D I N G How to Make a Robot How to Make a Small Windmill 1 2 x2 x8 x6 x1 3 4 Combine the x1 x1 x1 x1 x2 x1 x2 x1 two from 1 and 2 5 6 x4 x4 7 x3 K I T
CLASS 1 Connection How to Connect the Windmill and Main Cell Let’s learn how to connect the cable of the DC motor with the main cell. Refer to the picture below to plug in the cable to the main cell. Connect the red cable to the top pin and the black one to the bottom pin. *If you switch these two, it will rotate in the opposite way. R B It should look like this if it was built correctly.
S C R A T C H C O D I N G Intro to DC Motor Coding Activate the DC Motor Place the windmill in front of you. Click the ‘movement’ button to control the motor. Then, it will look like the picture below. Drag the blocks ‘Stop Motor8’ and ‘Rotate Motor8 clockwise’ to the script. Why does it say Motor 8? Scratch lets the user use two electric motors. If the user clicks the black arrow next to the number, you can see the numbers 8, 7 and 4.
CLASS 1 Intro to DC Motor Coding How to Control the Rotation Using Scratch Click ‘Rotate Motor4 clockwise’ and the windmill will turn clockwise. Click ‘Stop Motor4’ and stop the windmill. Now, turn the windmill counter-clockwise. Change ‘clockwise’ to ‘counter-clockwise’ in the block.
S C R A T C H C O D I N G Intro to DC Motor Coding How to Control the Rotation Using Scratch Click ‘Rotate Motor4 counter-clockwise’ to see the windmill rotate counter-clockwise. Congratulations! Now, you can start the DC motor and control its rotation direction using Scratch.
CLASS 1 Intro to DC Motor Coding ‘Wait’ Block We are going to learn about the ‘Wait’ block. Click the yellow control button in the palette toopen up the control blocks. Drag the ‘Wait 1 second’ block to the script like the picture below. ‘1 second’ represents the time it takes for the first command before moving onto the second one. Just clicking the ‘Wait 1 second’ block doesn’t do anything. The ‘Wait’ block activates only when it’s connected to other blocks.
S C R A T C H C O D I N G Intro to DC Motor Coding ‘Wait’ Block Now the windmill will stop after rotating clockwise for one second. How did the computer successfully carry out the orders? This is the ‘sequence.’ It’s when the computer does what it was told to in order from top to bottom. Rotate Motor4 clockwise Wait 1 second The user can also change how long the motor works. Edit the number of ‘Wait’ blocks just like the picture below.
CLASS 1 Intro to DC Motor Coding Wait block What will happen if you erase the ‘Wait’ block? If you activate the code, nothing will happen! Because you ordered the computer to stop the motor right after turning it on. You have to order the motor to ‘Wait’ and then stop.
S C R A T C H C O D I N G Intro to DC Motor Coding ‘Wait’ Block Lastly, let’s make a more complicating code with the windmill. We will combine at least 9 coding blocks to set each of the motors to rotate in different directions for different lengths of times and stop. Refer to the picture below.
CLASS 1 Intro to DC Motor Coding Activate a Program There are many ways to activate a program. You already learned that you can activate programs by simply clicking blocks. There are two other ways is to add the ‘Start’ block as the beginning of the program. This ‘Start’ block can be found if you click the yellow ‘Control’ button in the palette. The first way is to use the ‘When the flag icon is clicked’ block. It looks like the picture below.
S C R A T C H C O D I N G Intro to DC Motor Coding Activate a Program The second way to start a program is to use the computer keyboard. The picture below shows the ‘When spacebar is pressed’ block, which can be found when you click the ‘Control’ button of the palette. This activates the code when the user presses a specific button. Connect this to your code. Space bar Make this code so that it will start whenever the spacebar is pressed.
S C R A T C H C O D I N G K I T Logic CLASS 1 boost Lizard Robot LESSON 2
S C R A T C H C O D I N G How to Make a Robot Lizard Robot Let’s make a moving lizard robot! By using Scratch, it can move frontward or backward. We will be moving on from activating one motor to activating two motors for a more complicated movement. To use two motors at the same time, we have to carefully set their rotating directions. Let’s learn about their rotating directions. After that, we will learn to code for the lizard robot to move for some random amount of time.
How to Make a Robot CLASS 1 How to Move the Lizard Robot We will learn how to use the program to control two motors. Also, we can code for it to follow a certain route. Last time, we learned how to start a motor. This time, we will use the motors to move the wheels of the robot. First, let’s make the robot. Materials of Lizard Robot.
S C R A T C H How to Make a Robot How to Make Lizard Robot 1 2 x2 x3 x2 x1 3 4 5 x2 x1 x1 x2 C O D I N G K I T
CLASS 1 6 How to Make a Robot 7 x1 8 x1 x2 9 10 x2 x1 11 12 x2 x2 A45 x2 x2
R O B O T O R I C O D I N G How to Make a Robot 13 14 x1 x1 x1 x1 15 16 x1 x2 x2 17 x1 x2 x2 A45 x1 x2 x4 x2 x1 C L A S S
CLASS 1 Connect to the Main Cell How to Move the Lizard Robot Connect the lizard robot and the mainboard. Study the picture below! When connecting the left motor, the black cable goes into the top pin and the red cable goes into the pin below it. When connecting the right motor, the red cable goes into the top pin and the black pin goes into the pin below. Left motor Right motor (Motor 4) (Motor 7) B R R B Left Right motor motor Be careful when plugging in the cables.