www.LifeArtCabinetry.com Assembly Instruction for Framed Wall Cabinet /D\ WKH IDFH IUDPH 3DUW * RQ D ÀDW FOHDQ D surface. Run a bead of wood glue in all dado. Do B the same for the side panels (Part A and C). C 2) There are two methods to assemble the box. E A H H E a. The brackets that are supplied can be used to attach the side panels to the top and the bottom panel (Part D and F) and the face F frame. G b.
www.LifeArtCabinetry.com Assembly Instruction For Framed Base Cabinet /D\ WKH IDFH IUDPH SDUW ) RQ D ÀDW C B clean surface. Run a bead of wood F glue in all dado. Do the same for the side panels (Part A and C). 2) There are two methods to assemble E G A the box. a. The brackets that are supplied can be used to attach the side panels H E M to the face frame. b. Use a 1/4 inch crown by 5/8 inch long staples and staple the side panel/face frame joint together.
www.LifeArtCabinetry.com Assembly Instruction For Solid wood Drawer Box 1) Begin by opening the box and laying DOO WKH SLHFHV RXW RQ D FOHDQ ÀDW VXUface. Check to make sure all contents K I are in the box (hardware will be pack- J D I-1 aged separately in its own plastic bag). L 2) Wood glue should be used in all dado and dovetail connections. 3) Attach the back side of part K to part I. A rubber mallet can be used. Make sure the dado part of each piece is facing inward.
www.LifeArtCabinetry.com Assembly Instruction For Frameless Wall Cabinet 1) Begin by opening the box and laying all the pieces out on a clean, E ÀDW VXUIDFH &KHFN WR PDNH VXUH DOO B A content are in the box (hinges and F shelf pins will be packaged separately D in its own plastic bags). F C G D 2) Wood glue is to be used on each dowel and dado. 3) Lay part A on its side with dado and predrill holes facing up. 4) Attach part E and G by inserting dowels into the predrilled holes on part A.
www.LifeArtCabinetry.com Assembly Instruction For Frameless Base Cabinet 1) Begin by opening the box and laying all the pieces out on a clean, A F ÀDW VXUIDFH &KHFN WR PDNH VXUH DOO B content are in the box (hinges and F shelf pins will be packaged separately in its own plastic bags). G E C H 2) Lay the left side panel (Part A) down with dado and predrill holes E facing up. Apply wood glue to predrill M holes for dowels and dado.
www.LifeArtCabinetry.com Assembly Instruction For Plywood Drawer Box 1) Begin by opening the box and laying DOO WKH SLHFHV RXW RQ D FOHDQ ÀDW VXUIDFH A B K Check to make sure all contents are in the box (hardware will be packaged separate- I ly in its own plastic bag). J D I-1 L 2) Make note which side is the front and the back for part K and L. The side of each piece has predrilled holes for the drawer slides. The side closest to the hole is the front side.
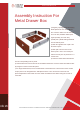
www.LifeArtCabinetry.com Assembly Instruction For Metal Drawer Box 1) Begin by opening the box and laying DOO WKH SLHFHV RXW RQ D FOHDQ ÀDW VXUface. Check to make sure all contents I K aged separately in its own box). J 7DNH SDUW - ¿QLVK VLGH XS DQG VOLGH L D are in the box (hardware will be pack- into the dado of part K. 3) Slide the opposite side of part J into the dado of part L. 4) Slide part I onto the slots on the back of part J and L.
www.LifeArtCabinetry.com &RQVWUXFWLRQ 6SHFL¿FDWLRQ )RU Frame Wall Cabinet 1) Full Overlay Door with 1/8 inch 4 reveal. (Full overlay door requires 5 the use of knobs or pulls). Doors are 4 6 5-piece construction. Top, bottom, and side rails are solid maple. Stained raise 3 1 7 3 2 panel center piece are solid maple. Painted and/or shaker style doors have MDF center panel with a wood veneer. 0DSOH LV DQ H[FHSWLRQDOO\ KDUG ¿QHO\ 4 8 JUDLQHG ZRRG VSHFLHV ZLWK D ¿QH HYHQ texture.
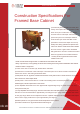
www.LifeArtCabinetry.com &RQVWUXFWLRQ 6SHFL¿FDWLRQV )RU Framed Base Cabinet 1) Full Overlay Door with 1/8 inch reveal. (Full 5 overlay door requires the use of knobs or pulls). 4 3 Doors are 5-piece construction. Top, bottom, 2 and side rails are solid maple. Stained raise panel center piece are solid maple. Painted 6 4 1 and/or shaker style doors have MDF center panel with a wood veneer. Maple is an excepWLRQDOO\ KDUG ¿QHO\ JUDLQHG ZRRG VSHFLHV ZLWK 8 D ¿QH HYHQ WH[WXUH 'DUNHU VWDLQV ZLOO
www.LifeArtCabinetry.com &RQVWUXFWLRQ 6SHFL¿FDWLRQ )RU Frameless Wall Cabinets 1) Full Overlay Door with 1/8 inch re- 2 veal. (Full overlay door requires the use of knobs or pulls). Doors are 5-piece 3 4 1 7 construction. Top, bottom, and side rails are solid maple. Stained raise panel center piece are solid maple. Painted and/ or shaker style doors have MDF center 4 panel with a wood veneer. 0DSOH LV DQ H[FHSWLRQDOO\ KDUG ¿QHO\ JUDLQHG ZRRG VSHFLHV ZLWK D ¿QH HYHQ 5 2 texture.
www.LifeArtCabinetry.com &RQVWUXFWLRQ 6SHFL¿FDWLRQ )RU Frameless Base Cabinet 1) Full Overlay Door with 1/8 inch reveal. (Full overlay door requires the use of knobs or pulls). 4 3 2 Doors are 5-piece construction. Top, bottom, and 5 6 7 side rails are solid maple. Stained raise panel center piece are solid maple. Painted and/or shaker style doors have MDF center panel with 9 1 a wood veneer. Maple is an exceptionally hard, ¿QHO\ JUDLQHG ZRRG VSHFLHV ZLWK D ¿QH HYHQ 4 texture.
www.LifeArtCabinetry.com General Dimensions - Frameless Vanity Cabinets Birmingham, Oxford, Wurzburg 21 21 5 1/8 7 7 16 1/4 10 1/8 32 20 1/4 8 1/8 10 1/8 32 16 1/4 4 1/2 4 1/2 3/4 3/4 Anchester 1-3, Cambridge, Edinburgh, Heidelberg, Kingston 21 21 5 1/8 7 7 16 1/4 10 9/16 33 33 8 1/8 21 1/4” 10 9/16 16 1/4 4 1/2 4 1/2 3/4 3/4 63(&,),&$7,21 $1' 35,&( 68%-(&7 72 &+$1*( :,7+287 127,&( ,0$*(6 $5( )25 5()(5(1&( 21/< ZZZ /LIHDUW&DELQHWU\ FRP Info21
Info22 www.LifeArtCabinetry.
www.LifeArtCabinetry.
www.LifeArtCabinetry.
www.LifeArtCabinetry.com General Dimensions - Framed Vanity Cabinets 24” 21” 6 7/8” 6 7/8” 4 1/8 9 7/8” 33” 33” 20 1/8” 6 1/8” 9 7/8” 4 1/2” 16 5/8” 4 1/2” 3/4” 3/4” Info25 63(&,),&$7,21 $1' 35,&( 68%-(&7 72 &+$1*( :,7+287 127,&( ,0$*(6 $5( )25 5()(5(1&( 21/< ZZZ /LIHDUW&DELQHWU\ FRP
www.LifeArtCabinetry.com Warranty
www.LifeArtCabinetry.com This warranty is valid only in the United States of America and Canada and is not transferable. All implied warranties are limited in duration to the shorter of the period provided by law or the period of this warranty. To the extent permitted by law, this warranty excludes special, incidental, or consequential damages.
www.LifeArtCabinetry.com DISCLAIMER 'LVFODLPHU IRU 3DLQWHG :RRG &DELQHWU\ Please be aware that wood expands and contracts. This natural process, occurring on painted cabiQHWU\ ± VXFK DV WKH 2[IRUG 3ULQFHWRQ DQG
www.LifeArtCabinetry.com All color characteristics of wood will change as it ages. This will gradually change the color of the wood and stain. The amount and rate of the change will depend on many factors, including wood type, stain color, and the amount of direct sunlight. In addition, exposure to smoke, chemicals, and man-made light may, over time, cause some materials to vary from their original color.
www.LifeArtCabinetry.com Cabinet Care *HQHUDO &DUH $ VRIW FRWWRQ FORWK GDPSHQHG ZLWK ZDUP ZDWHU LV XVXDOO\ VXI¿FLHQW WR FOHDQ \RXU FDELQHWV ,I PRUH thorough cleaning is required, use one of the following cleaning solutions: $ IUHVK VROXWLRQ RI PLOG GLVKZDVKLQJ OLTXLG PL[HG ZLWK ZDUP ZDWHU $ PLOG DOO SXUSRVH FOHDQHU WKDW GRHV QRW FRQWDLQ DPPRQLD RU VLOLFRQH 8VH WKH PLOGHVW FOHDQLQJ VROXWLRQ WKDW ZLOO VXFFHVVIXOO\ FOHDQ \RXU FDELQHWV 6WURQJHU SURGXFWV PD\ GDPDJH RU GLVFRORU \RXU FD
www.LifeArtCabinetry.com &OHDQLQJ *ODVV 'RRUV Extra care is cleaning glass doors. Spray an ammonia-free glass cleaner on a clean cotton cloth or paper towel. Do not spray cleaner directly on the glass. The spray could run or seep behind the frame or mullions and cause damage. 6FUDWFKHV *RXJHV 1LFNV A Touch-Up Kit is available to hide surface damage. Contact LifeArt Cabinetry Corp to purchase WKH FRORU PDWFKHG WRXFK XS NLW IRU \RXU VSHFL¿F FDELQHWV 8VH WKH NLW¶V WRXFK XS SHQ WR KLGH PLQRU EOHPLVKHV