
Install Instructions
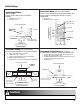
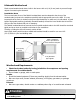
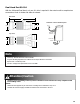
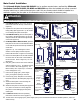
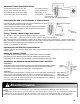
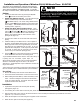
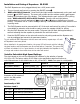
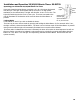
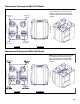
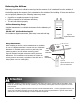
Table Of Contents

16
Installation and Operation of Wireless 20/40/60 Minute Timer: 99-DET02
BC02, BC03
or BC04
Control
NOTE: Your
control may look
different than the
one shown.
Press Simultaneously
to Initiate Pairing Mode
Figure
A
Figure
D
NOTE
The wireless Timers and Repeaters must be matched to
the main wall control of the HRV / ERV. This process is
called "Pairing". Multiple Timers and Repeaters can be
paired to a single wall control.
Figure
B
1/8 in hole for
screw and
anchor
1/8 in hole
for screw and
anchor
Break off tab
Alternate Wall Mount
1/8 in hole for
screw and anchor
Figure
C
Back Plate
Face Plate
1/8 in
hole for
screw and
anchor
Break off tab
Figure
F
Figure
E
Press Simultaneously
to Initiate Pairing
Mode
DXPL02
Control
DET02 Timer
20/40/60 Minute
Status Lights
Select Button initiates
high speed ventilation
for 20, 40 or 60 min.
Battery Indicator
Removable
Backplate
The Timers may be installed onto a flush mounted electrical
switch box or it may be surface mounted onto a wall. Multiple
Timers may be installed in a ventilation system. To increase
the range of a wireless Timer, a RX02 Repeater should be used.
Pairing:
To pair additional DET02 Timers with the same wall control, or
if pairing was not successful, repeat steps 1-6.
When paired, the DET02 Timers can be moved and installed
elsewhere. Estimated range of the Timer is 40’ with no
obstructions. A RX02 Repeater may be installed to increase the
range of the Timers.
Test if pairing was successful by pressing the Select Button and
listen for the HRV / ERV to initiate HIGH fan speed Ventilation.
Un-pairing:
1. Turn on the main wall control by pressing the ON/OFF
button and remove the battery from Timer.
2.
DET02 with DXPL02 Controls:
Press the left and right
buttons simultaneously on the main wall control
( and RESET buttons). The screen will go blank and the
wireless symbol will appear flashing on the bottom right
of the display. This indicates that the main control is now
in pairing mode. (Figure D)
3.
DET02 with BC02, BC03 or BC04 Controls:
Press
the left and right buttons simultaneously on the main wall
control ( and either or buttons, depending on the
main control). The bottom row of 3 LED's will begin
flashing. This indicates that the main control is now in
pairing mode.(Figure E)
4. Keep the Timer within 16” of the main wall control when
pairing.
5. Install the battery in the DET02 Timer. All four lights on
the Timer will immediately flash 5 times, then only the red
battery light will remain on for approximately 12 seconds
after which the "40" light flashes the rev code. 20, 40, 60
lights will flash until paired or will stop if not paired within
12 seconds. If pairing was not successful you now must
return to step 1 to restart the pairing process.
6. Press the button on the main wall control to exit pairing
mode when Timers have been successfully paired.
1. Remove the battery from the back of the DET02 Timer
2. Press and hold the Select Button on the front of the Timer
3. While holding the Select Button, reinsert the battery in the
Timer. Continue holding the select button until the LED
under "40" begins flashing. The DET02 Timer will now be
unpaired with the main wall control.
Installation:
1. Separate the face plate from the back plate by firmly
pulling apart (Figure A).
2. For mounting the control without a Decora plate, break off top and bottom tabs and refer to Figure C for mounting.
3
. Place the back plate of the control in the desired location on the wall and pencil mark the top and bottom screw holes
(Figure B or C). Drill two 1/8" holes.
4. Attach the back plate to the wall using the 2 supplied screws and anchors.
5. Attach the face plate to the back plate (Figure A).