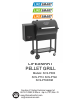
LIFESMART PELLET GRILL Models: SCS-P380 SCS-P710 SCS-P760 SCS-P760WM Questions? Contact technical support at: 657-341-0362, 9:00 a.m. - 5 p.m., PST, Mon - Fri www.lifesmartcomfort.com cs@scsources.
Contents Important Safety Information……………………………………………..3&4 Carton Contents………………………………………………………………...5 Assembling Your LIFESMART GRILL ……………..…………………............……6 to 8 Specifications………………………………………………………………….9 Initial Setup Procedure …………………………………………………10 TemperatureProbe………………………………………………………………….10 Operating your LIFESMART GRILL .......……………………………….11 &12 Performance Tips…………………………………………………….13 & 14 Maintenance and Cleaning ................................................................ ..
WARNING FOR OUTDOOR USE ONLY DO NOT SDTORE OR USE COMBUSTIABLE MATERIALS IN OR NEAR THIS APPLIANCE TO PREVENT INJURY NEVER MOVE THE GRILL WHILE HO, UPRIGHT OR WITHOUT ASSITANCE NEVER STORE ANY GRILL IN A SMALL SPACE OR TRANSPORT IN A VEHICLE UNLESS COMPLETELY COOL AND VERIFIED THAT THE FLAME IS EXTINGUISHED LEAVE A MINIMUM OF 60” CIRCUMFERENCE BETWEEN GRILL, DECKS, HOUSES OR ANY COMBUSTIABLE MATERIALS USE ON LEVEL GROUND AWAY FROM OVERHANGING ROOFS OR EAVES 3
IMPORTANT SAFETY INFORMATION For outdoor use only. Do not use in any enclosed area. Use on Level Surface, away from overhanging eaves. Keep grill 60”or more from any combustible surfaces. To prevent grease fires, clean your grill on a regular basis (especially after cooking greasy foods at lower temperatures). In the event of a grease fire, unplug the grill and leave lid closed until the fire is out. Do not put anything flammable in the storage area under the grill.
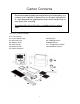
Carton Contents Please note that during shipping some movement may have taken place, so a complete visual inspection is required. Be sure to inspect entire grill after re moving the protective shipping carton. Some surfaces may be sharp, so wear gloves when assembling. Do not plug in the grill until it is fully assembled and you're ready to cook.
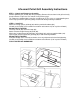
Lifesmart Pellet Grill Assembly Instructions STEP 1 – Unpack and Prepare for Assembly Remove grill body (#1) and lid (#2) from packaging. Remove all items from inside grill and verify that all contents are present. See content list on previous page. Tip: Flatten the cardboard box out and lay everything on it. This serves as a good working area and it helps prevent the grill from getting scratched or damaged during installation.
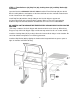
STEP 3 – Unfolding the Legs The grill should be lying on its back to unfold the legs. First unfold the non-wheeled set of legs by depressing the bar away from the notched hinge mechanism and disengaging the lock. Swing the legs to the right. Repeat for the wheeled set of legs. Ensure that the bar has locked into place in the unfolded position before standing the grill upright. NEVER ATTEMPT TO MOVE YOUR GRILL IN UPRIGHT POSITION.
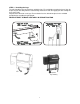
STEP 4 – Flame Deflector (#5), Drip Pan (#6), Cooking Grate (#7), and Drip Bucket (#8) Installation Open the lid of the LIFESMART PELLET GRILLInstall the Flame Deflector (#5) over the Air Box Assembly with the small notches of the flame deflector over the small tabs located at the inside front and rear of the grill body. Install Drip Pan (#6) with the short lip sitting on the left-side drip pan support and the longer lip resting on the right-side lower support.
Specifications Below is a list of features and specifications for the Lifesmart Pellet Grill Temperature and Electronic Controls Automatic Lighting Feature Automatic Shut Down Feature Digital Control Temperature Range 200 to 500 Degrees in 5º increments Proprietary PID algorithm maintains temperature precisely Single Meat Probe Full Feed Setting Exterior Digital Controls 15 lb. Hopper Spill-proof drip bucket hook Aluminum Handles Rollerblade style wheels Pull bar handle Weighs 80 lbs Interior 380 sq./ in.
Initial Setup Procedure For your first lighting, follow this Initial Setup Procedure. 1. Open the main lid and remove the cooking grate, drip pan and flame deflector. Make sure all packing material has been removed. 2. Open the pellet hopper lid found on the left side of your grill and check for any foreign objects. 3. Plug your Lifesmart Pellet Grill into the nearest 110 Volt AC GFCI outlet. (Note: If your home does not have a GFCI outlet, you should have one installed by an electrician.) 4.
OPERATING YOUR LIFESMART PELLET GRILL Press Power button I/O to turn grill on and press temp up and down buttons to desired temperature. • Turning the grill ON activates the automatic startup mode and illuminates the digital readout. • If your grill fails to light itself within 30 minutes of startup, the Smart Grill Technology™ processor will turn the grill off and display Er 3 on the screen. See page 18 for ER Codes • Pressing the power button again activates the shutdown mode of your grill.
TEST MODES AND ADJUSTMENTS Your Lifesmart Pellet Grill is already set up from the factory and ready to grill below are the test modes available and adjustments Test Mode - With grill OFF, press and hold the Temp Display and Temp Down buttons to enter the button test Mode until all digital display and LEDs turn on. Press Temp Display button it displays software version No.
Performance Tips Preheating It is important to allow your grill to preheat and achieve your desired cooking temperature before cooking. This allows the entire grill to heat up and quickly return to your desired temperature once your food is introduced. If you do not allow the grill to preheat, you will find that it takes a longer period of time to bring both the grill and the food to your desired cooking temperature.
• Always keep your cooking area clean. Avoid lifting the grill lid • Wind can cool your grill temperature. • Always preheat grill to desired temperature before use. • Wipe off steel surfaces before preheating; dirt and food stains can cook into surface. • Always check pellet hopper for debris and remove excess pellet dust as needed. (A shopvac is the preferred method) • Leave at least one inch of clearance between food for even cooks.
Maintenance & Cleaning Follow these simple steps to maintain your Lifesmart Pellet Grill • Clean your fire pot every 3-5 cooks to ensure proper airflow. • Use a grill brush to clean your cooking grate after every cook to provide years of trouble free use from them. NOTE: Make sure that no bristles have shed and remain on cooking grate. • Cover your drip tray with aluminum foil and change it frequently. This is the simplest way to maintain your drip pan.
TROUBLESHOOTING We pride ourselves on our grills, grilling accessories, and on our commitment to serve you. Please consult the chart below to help resolve issues you may encounter. Also, please don’t hesitate to contact us with any issues. Issue Potential Cause Power Fuse Grill will not light / turn on Ignitor Auger motor Control board Call our customer service at 1-706-922-0890 10am-8pm EST. Mon-Thurs; 10am-7pm EST Fri; 9am-3pm EST Sat.
Issue Potential Cause Pellet quality / age Excess ash in fire pot Grill is smoking excessively/ smoke is discolored Blower fan Pellet quality / age Grill will not heat up to or maintain proper Insufficient airflow Excess ash in fire pot Pellet quality / age Fire continues to go out Hopper obstruction Solution(s) Inspect pellets; ensure that pellets are dry and have not broken down into sawdust.
Issue Potential Cause Solution(s) Unplug grill. Remove pellets from hopper. Clean hopper of Hopper obstruction any obstructions or build up. Remove cooking grate and flame deflector plate; visually inspect auger turning in the fire pot. (Note: the auger turns Pellets are not being very slowly) If auger is not Auger failure delivered to fire turning, you may have an pot obstruction in your hopper. Clean out pellets and try again.
Manual Start Up In case of ignitor failure, you can start your Lifesmart Pellet Grill manually 1. Remove the grate, drip pan and flame deflector. 2. Clean out fire pot and place no more than 1/2 cup of pellets in the bottom. Add a small amount of solid fuel fire starter, such as those made from sawdust and wax or use wood shavings. (A paper towel, shredded cardboard, or shredded newspaper can work as a substitute.) If you have a torch lighter, a fire starter is not needed. 3. Light the fire starter. 4.
Controller Schematic TEMP PROBE *+, / %01 2)%(0 %)0 %) *9! +9! %*$ )'& '(% $%& !"# !"# IGNITER AUGER Questions? Call our customer service at 1-706-922-0890 10am-8pm EST. Mon-Thurs; 10am-7pm EST Fri; 9am-3pm EST Sat. 20 FAN -;3222 ,-.& -.
Cooking Notes It is a great idea to keep notes on your cooking experiences for future reference Operating Temperatures “SMOKING” “ROASTING / BRAISING” “BAKING” “GRILLING” “BROILING / SEARING” 21 180ºF to 275ºF 275ºF to 325ºF 325ºF to 375ºF 375ºF to 450ºF 450ºF + PQGRSD /$T 7$T 1#O+'K%U$'D ;;=
Use this chart* and a food thermometer to ensure that meat, poultry, seafood, and other cooked foods reach a safe minimum internal temperature.
LIFESMART PELLET GRILL ONE (1) Year Limited Warranty This limited warranty covers the product manufactured by LIFESMART The product carries a 1year limited warranty from the date of purchase by the original owner against defects in material and workmanship when subjected to normal residential use. Limited warranty does not apply to paint, grill cover, or damage caused from corrosion. Conditions of Limited Warranty 1.