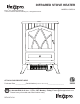
INFRARED STOVE HEATER lifepro® is a registered trademark of Source Network Sales & Marketing Inc., All Rights Reserved. MODEL #: SIRS-01 ATTACH YOUR RECEIPT HERE Purchase Date ____________Serial Number (located on back of unit) __________________ Questions, problems, missing parts? Contact technical support department at 1-866-484-2066, 8:00 a.m. - 5 p.m., CST, Monday - Friday or www.@lifecorpproducts.com Please have your model and serial number ready.
TABLE OF CONTENTS Package Contents. . . . . . . . . . . . . . . . . . . . . . . . . . . . . . . . . . . . . . . . . . . . . . . . . . . . . . . . . . . . . . 3 Safety Information . . . . . . . . . . . . . . . . . . . . . . . . . . . . . . . . . . . . . . . . . . . . . . . . . . . . . . . . . . . . . . 4 Frequently Asked Questions . . . . . . . . . . . . . . . . . . . .
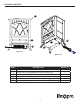
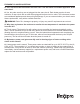
PACKAGE CONTENTS A B E D C F Front View Rear View PART A B C D E F DESCRIPTION Infrared Heater Control Panel (preassembled to Infrared Heater (A)) Heat Output Vent (preassembled to Infrared Heater (A)) Master Power Switch (preassembled to Infrared Heater (A)) Heat Shield (preassembled to Infrared Heater (A)) Heater Leg (preassembled to Infrared Heater (A)) 3 QUANTITY 1 1 1 1 1 4
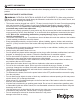
SAFETY INFORMATION Please read and understand this entire manual before attempting to assemble, operate, or install the product. IMPORTANT SAFETY INSTRUCTIONS WARNING: POTENTIAL ELECTRICAL HAZARD IF NOT ADHERED TO. When using electrical appliances, basic precautions should always be followed to reduce the risk of fire, electric shock, and injury to persons, including the following: • This heater must be plugged into a 220 V, 7.5 amp (or more) circuit of its own.
SAFETY INFORMATION Overheat Safety Feature This heater is equipped with an overheat safety feature. When the internal components of the heater reach a certain temperature that could cause overheating or possible fire, the heater will automatically shut off. WARNING: This heater has a voltage rating of 220 volts. The cord has a threeblade, grounding-type plug. An adapter is available for connecting three-blade grounding-type plugs to two-slot receptacles.
FREQUENTLY ASKED QUESTIONS Please review these frequently asked questions on the next few pages prior to using your heater. Q. My heater emits a strange odor when I first open the box and when I turn the heater on for the first time. Why is this happening? A. This is normal. This heater is treated with a special heat safe/resistant coating. This odor will sometimes be present when the box is opened.
FREQUENTLY ASKED QUESTIONS Q. Can I use more than one heater at a time? Can I use the heater and another appliance at the same time? A. Yes, but make sure they are not plugged into the same circuit. Each heater requires its own minimum 15-amp circuit with no other items plugged into that circuit or outlet. This is because heaters are considered appliances and draw out high amperage. If you are unsure whether your circuit meets these requirements, verify with a certified electrician.
PREPARATION Place the heater on a firm, level surface and plug into a grounded 120 V, 60 Hz power outlet and turn on the power switch on the bottom front of the unit. Only operate heater in upright position. Please note that infrared heaters do not heat like a traditional space heater. You should not expect infrared heaters to blow hot air like a traditional space heater. Infrared heaters heat objects not air. Infrared heaters are intended to supplement an already heated, insulated room.
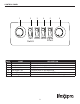
CONTROL PANEL 1 2 3 4 5 6 Fan 500W 500W Flame Effect Switch PART 1 2 3 4 5 6 NAME Thermostat Knob Fan Switch Heat Switch One Heat Switch Two Flame Effect Switch Flame Brightness Knob DESCRIPTION Increases or decreases desired temperature Engages fan for heat mode Engages power to 500 watt mode Engages power to 500 watt mode Powers the flame effect ON or OFF Increases or decreases desired flame effect brightness level 9
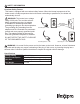
OPERATING INSTRUCTIONS 1. Turn the heater on or off by pressing the Power switch on the heat output vent assembly (C) to the I position. 1 B Master Power Switch 2. Turn the fan switch to the on position. Then select a heat setting by pressing the 500 W heat buttons on the control panel (C). 2 Power one heat mode for 500 W; power both heat modes for 1,000 W. B Fan Switch 3.
CARE AND MAINTENANCE WARNING: Before performing any maintenance task, turn off the power switch in the front of the unit, unplug the unit, and allow it to cool completely. 1. To keep the heater clean, clean the outer shell with a soft, damp cloth. Use a mild detergent if necessary. After cleaning, dry the unit with a soft cloth. CAUTION: DO NOT let liquid enter the heater. 2. DO NOT use alcohol, gasoline, abrasive powders, furniture polish, or rough brushes to clean the heater.
ONE-YEAR LIMITED WARRANTY The manufacturer warrants this heater against defects in materials and workmanship on functional parts, for a period of 1 year from the original date of purchase. Your sales receipt showing the date of purchase of the product is your proof of purchase. Keep it in a safe place for future reference. This product is made with the highest quality materials and is warranted to be free from defects in materials and workmanship at the time of purchase.
REPLACEMENT PARTS LIST For replacement parts, call our technical support department at 1-866-484-2066, 8 a.m. - 5 p.m., CST, Monday - Friday PART A B DESCRIPTION Control Panel Fan PART # C Motor RH124060 D Limit Thermostat RH124065 E Infrared Tube RH124061 F Light Bulb RH121337 A RH121348 RH124063 B C D E F PLEASE REMEMBER TO REGISTER YOUR WARRANTY: Registration@lifecorpproducts.com Printed in China lifepro® is a registered trademark of Source Network Sales & Marketing Inc.