6E /,4R8 Model No. 831.287730 Serial No. Writethe serialnumberin the space abovefor future reference. Serial Number Decal _-x ECrU H n=="R C I PM i S _: ENT TAIFIGL='I " RESISTANCE_ TIFqtAINIER USER'S MANUAL I='LPLINE! 1-800-736-6879 SEARS, ROEBUCK AND CO., HOFFMAN ESTATES, IL 60179 PUSH MODE PULL MODE.
TABLE OF CONTENTS o•,.• .... • o..o,•,_,,•*_•, IMPORTANT PRECAUTIONS • •..,••••.,•,•,, BEFORE YOU BEGIN .......................................... ASSEMBLY ............................................................................... HOWTO USE THE CARDIO FIT2 ............................................................. ,= ,•,.1,,,•••,•,•°o•,°, MAINTENANCE AND TROUBLE-SHOOTING • •,o•o°, CONDITIONING GUIDELINES• .... ...........................................................
BEFORE YOU BEGIN Thank you for selecting the SEARS UFESTYLEFP CARDIO FIT 2. The CARDIO FIT 2 offers a unique form of low-impact exercise that uses both the upper body and the lower body for greater cardiovascular benefits and increased toning.
ASSEMBLY Place all parts of the CARDIO FIT 2 in a cleared area and remove the packing matedals. Do not dispose of the pacldng materials unff assembly is completed. Read each step cemfully before you begin. Assembly requires the following tools. The Included pedal tool (_ end your own rubber mallet E)_;;:_. 1. Note: Before you attach the 3/8" Dome Caps (45) shown in this step, make sure that the Handlebar (2) Is turned as shown.
. Connect the Sensor Wire (15) to the wire on the Monitor (1). Insert all excess wire into the Frame (6). Hold the Monitor (1) with both hands, and slide it down onto the Frame (6). Refer to the inset drawing. Make sure that the side of the Monitor (1) is between the Frame (6) and the 1/2" Dome Cap (29). Push the Dome Cap against the side of the Monitor. Front View 26 Slide the Foam Pad (26) onto the end of the 1/2" x 6 1/4" Axle (39), 6.
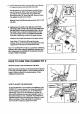
HOW TO USE THE PUSH MODE To convert the CARDIO FIT 2 to the push mode, hold the •Handfebar (2) with one hand and hold the Handle (20) with the other hand. Lift the Handle to disconnect the Link Arms (4, 7) from the Handlebar. Pivot the Handlebar toward the seat and honk the Unk Arms onto the upper Rollers (33) on the Handlebar. CAUTION: Push down on the Link Arms to make sure that both Link Arms are securely connected to the Rollers.
DESCRIPTION OF THE MONITOR MODES The CARDIO FIT 2 features one of the two monitors shown at the righL Both.monitors Ilave exactly the same modes. The modes are described below: Mode Indicators\. I, TIME Speed--Displays your speed, in repetitions per minute. Time--Displays the length of time you have exercised. Note: If you stop exercising for ten seconds or longer, the time mode will pause until you resume. DIST. CAl.
MAINTENANCE AND TROUBLE-SHOOTING Inspect and tighten all parts of the CARDIO FIT 2 regulady. Make sure that the Foam Pad (26) Is pushed all of the w .ay-'ontothe axle at the fronL The CARDIO FIT 2 can be cleaned with a soft, daml_ cloth. Keep liquids away from the monitor. Do not expose the monitor,to direct sunlight or the display may be damaged. When storing the CARDIO FIT 2, remove the batteries from the monitor.
CONDITIONING GUIDELINES The followingguidelines will help you to plan your exercise program. Remember that proper nutritionand adequate rest are essential for successful results. WARNING: Before beginning this or any exercise program, consult your physician. This Is especially important for Individuals over the age of 35 or Individuals with pre-existing health problems. WHY EXERCISE? Exercise has proven essential for good health and general well-being.
PART LIST--Model No. 831.287730 Key No. Part No. Qty. 1 2 3 4 5 6 130899 131084 130941 131940 131937 NSP 1 1 1 1 1 1 7 8 9 10 11 12 131941 109416 131942 121642 117544 126406 13 14 15 16 17 18 19 20 21 22 23 24 25 26 RO796A Key No. Part No. Qty.
EXPLODED DRAWING---Model No. 831.287730 RO796A _._20 !' 2 _ 4 .16 ::/2 o.-- = o.
SE /ARS The model number and serial number of your SEARS LIFESTYLEJ:_' CARDIO FIT 2 are listed on a decal attached to the frame. See the front cover of this manual to find the location of the decal. Model No. 831.287730 All replacement parts are available for immediate purchase or special order when you visit your nearest SEARS Service Center. To request service or to order parts by telephone, call the toll-free numbers listed at the left.