PY CO Owner’s Manual and Assembly Instructions 5’ Dome Climber with Handholds Model #101301, 102300 **U.S. and Canada customers ONLY** IF ASSISTANCE IS NEEDED, DO NOT CONTACT THE STORE! CALL OUR CUSTOMER SERVICE DEPARTMENT at 1 (800) 225-3865 HOURS: 7:00 a.m. to 5:00 p.m. Monday through Friday (Mountain Standard Time) Call or visit our Web site at www.lifetime.com for Saturday hours **For customers outside the U.S. or Canada, please contact the store for assistance.** Lifetime Products, Inc.
Before Beginning Assembly! Only adults should set up the play equipment. Do not allow children in the setup area until assembly is complete. Tools Required for Assembly Ratchet with 1/2” Socket, deep socket my be needed 2x 3/16” Allen Wrench (included) Indicates the number of people required to complete assembly step. Two Adults Required for Assembly PY Save this owner’s manual for future reference and in the event that the manufacturer has to be contacted.
**IMPORTANT SAFETY INFORMATION** PLEASE READ BEFORE BEGINNING ASSEMBLY: Installation and Ground Preparation Instructions: • Place the equipment on level, well-drained ground, not less than 6 ft. (1.8 m) from any structure or obstruction such as a fence, garage, house, overhanging branches, laundry lines, or electrical wires. • Do not install home playground equipment over concrete, asphalt, packed earth, or any other hard surface.
Maintenance Instructions: • Check surfacing material and replenish as necessary to maintain proper depth (see page 4). • Check all nuts and bolts twice monthly during the usage season for tightness and tighten as required. It is particularly important that this procedure be followed at the beginning of each season. • Replace broken handholds immediately, do not allow children to play on damaged equipment. • Remove any tripping hazards, such as exposed concrete footings, tree stumps, or rocks.
CONSUMER INFORMATION SHEET FOR PLAYGROUND SURFACING MATERIALS* The U.S. Consumer Product Safety Commission (CPSC) estimates that about 100,000 playground equipment related injuries resulting from falls to the ground surface are treated annually in U.S. hospital emergency rooms. Injuries involving this hazard pattern tend to be among the most serious of all playground injuries, and have the potential to be fatal, particularly when the injury is to the head.
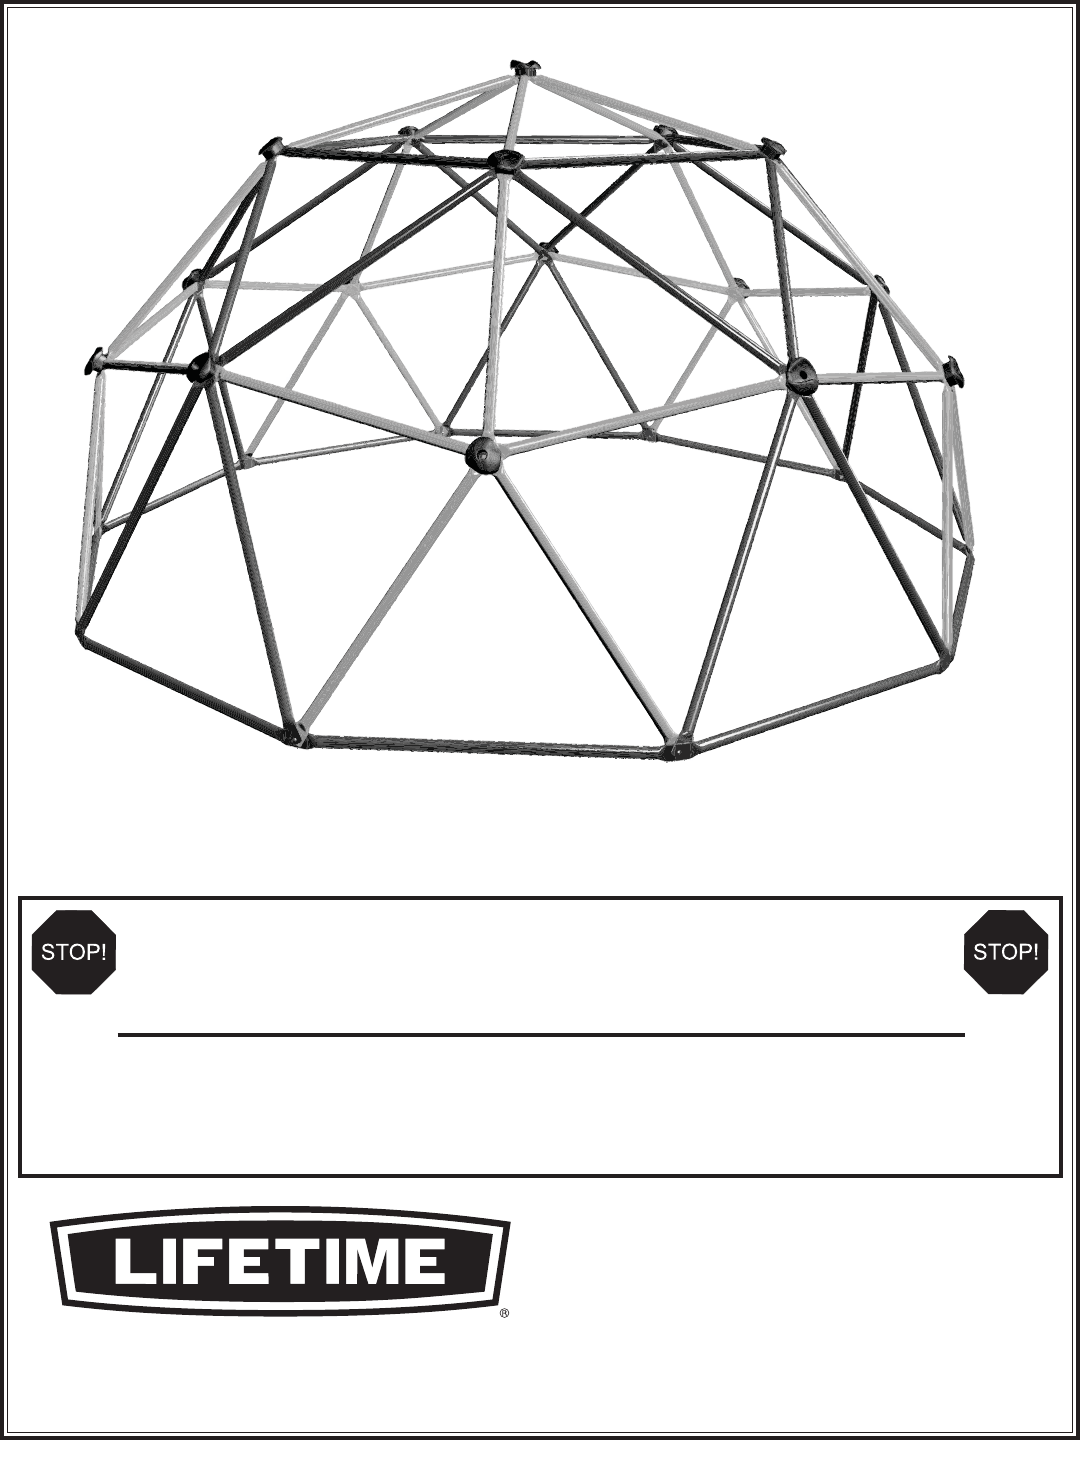
Primary Color Parts List A B A-1 B-1 C 8002153 8002151 8002886 8002890 8002067 1 1/8” x 33.875” Red Tubing 1 1/8” x 38.128” Blue Tubing 1 1/4” x 33.875” Red Tubing 1 1/4” x 38.128” Blue Tubing Handhold Dome Climber Hardware (8002389) HA 8002102 5/16” x 1 3/4” Bolt HB 8000162 5/16” x 3/4” Bolt HC 8000209 5/16” Nylock Nut HD 8001390 5/16” Standard Nut HE 8002027 1/4” Thin Washer HF 8000355 3/16” Allen Wrench HB HA 15 30 15 5 16 16 10 26 16 84 2 HC HD HE C HF There may be extra hardware.
2 Attach a Blue Tube (B) to tubes 1 and 2 at the bottom of each assembly completed in the previous step (joint a). Slide a 3/4” Bolt (HB) through a Thin Washer (HE) and the two Blue Tubes (B). Place a Washer (HE) over the 3/4” Bolt (HB) and Finger tighten Nylock Nut (HC) for removal later. Follow the same assembly for (joint b) and repeat this step on all five assemblies.
4 Add two additional Red Tubes (A) in the order indicated. Place the 1 3/4” Bolt (HA) through the Washer (HE) then through the five Red Tubes (A). Secure with Washer (HE) and Standard Nut (HD). Do not tighten completely until after step 5. 3 A 4 Two Adults Required for Assembly 5 HD A A HE 1 2 Ground Ground HE HA 5 Remove Nylock Nut (HA) and Washer (HE) from the bottom two Blue Tubes (B). Place a new Blue Tube (B) at the bottom of the red pentagon assembly.
6 Add one of the assemblies completed in step 2, to the assembly completed in step 5. Two Adults Required for Assembly Use the instructions from steps 3, 4, and 5 to attach the assemblies. Continue adding the assemblies from step 2 to complete the circle. 7 Remove the Standard Nut (HD) and Washers (HE) at (joint d) and add a Large Blue Tube (B-1). Replace the Washer and Nut, however do not completely tighten (joint d), repeat the same process for (joint e).
8 Connect five Large Red Tubes (A-1) at the top by sliding a 1 3/4” Bolt (HA) through a Washer (HE) and through the five Large Red Tubes (A-1) in the order shown. Secure with a Washer (HE) and Standard Nut (HD). Tighten completely. 5 4 A-1 A-1 A-1 HD 3 A-1 5 A-1 2 HE 4 1 3 HE 2 HA 1 Check and tighten all bolts before allowing children to play. Do not allow Children to play on the Dome Climber before the handholds are in place.
7!2.).' s !6)3/ s !6%24)33%-%.4 4HIS PRODUCT IS INTENDED FOR USE BY CHILDREN AGES TO $O NOT INSTALL OVER CONCRETE ASPHALT PACKED EARTH OR ANY OTHER HARD SURFACE ! FALL ONTO A HARD SURFACE CAN RESULT IN SERIOUS INJURY %STE PRODUCTO ES PARA NI×OS DE A A×OS DE EDAD .O LO INSTALE SOBRE CONCRETO ASFALTO TIERRA EMPAQUETADA O CUALQUIER OTRA SUPERlCIE DURA ,A CAIDA SOBRE UNA SUPERlCIE DURA PODRÓA OCASIONAR SERIAS LESIONES #E PRODUIT EST CONÎU POUR UN USAGE PAR DES ENFANTS ÉGÏS DE Ë ANS .