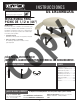
Para español, vea la página 2. Pour français, voyez la page 3. 44” (1,12 m) ROUND PICNIC TABLE ITm./ART. 956027 Co py Lifetime picnic tables are designed to be strong and durable. We strive to make assembly as easy as possible without compromising quality. If you get stuck, we have tools to help: • Level Ground Assemble the Table on level ground • Recruit Friends and Family Assembly should take 2 people about 1 hour to complete. FOR DOmESTIC USE ONLY! ImPORTANT: RETAIN FOR FUTURE REFERENCE.
INSTRUCCIONES DE ENSAMBLAJE For English, see page 1. Pour français, voyez la page 3. MESA RONDA PARA PICNIC DE 1,12 m (44”) ITm./ART. 956027 Co py Las mesas de picnic Lifetime© son diseñados para ser sólidas y durables. Nos esforzamos por hacer el ensamblaje lo más fácil posible sin comprometer la calidad. Si se atasque, tenemos las herramientas necesarias para ayudarle: • Superficie nivelada Ensamble la mesa sobre una superfice nivelada.
INSTRUCTIONS DE L’ASSEMBLAGE For English, see page 1. Para español, vea la página 2. TABLE RONDE DE PIQUENIQUE DE 1,12 m (44”) Les tables de pique-nique Lifetime© sont conçues pour être solides et durables. Nous nous efforçons de rendre l’assemblage aussi facile que possible sans compromettre la qualité. Si vous êtes coincé, nous avons les outils nécessaires pour vous aider : • Surface nivelle Assemblez la table sur une surface nivelle.
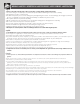
ICON LEGEND / LEYENDA DE ÍCONOS / LÉGENDE DES ICÔNES • indicates special heed should be taken when reading. • indica que uno debe prestar atención al leer. • ceci indique que l’on doit faire attention à ce que vous lisez. • indicates the parts to be used for a section. • indica las piezas requeridas para una sección. • ceci indique les pièces requises pour une section. • indicates no parts required for a specific section. • indica que ninguna pieza es requerida para una sección específica.
WARNINGS & NOTICES / ADVERTENCIAS & NOTIFICACIONES / AVERTISSEmENTS & NOTIFICATIONS English: • Failure to follow these warnings may result in serious injury or property damage and will void warranty. • To ensure safety, do not attempt to assemble this product without following the instructions carefully. • assemble the product on level ground. • Be aware that plastic pieces can be damaged by overtightening the screws. To avoid damage, we strongly recommend the use of a drill with a low torque setting.
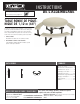
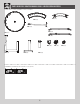
PARTS IDENTIFIER / IDENTIFICADOR DE PIEZAS / IDENTIFICATEUR DE PIÈCES LARGE PARTS / PIEZAS GRANDES / PIÈCES GRANDES BDF (x3) BAD (x3) BDE (x3) BBU (x3) BAC (x1) BBV (x3) BBW (x6) BAE (x3) BDG (x3) BBY (x3) HARDWARE / ELEMENTOS DE FIJACIÓN / ACCESSOIRES BCD BCB 6 BBX (x6) BBZ (x1)
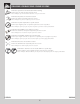
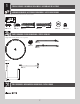
1 TABLE Assembly / ENSAMBLAJE DE LA MESA / ASSEMBLAGE DE LA TABLE HARDWARE REQUIRED / ACCESORIOS REQUERIDOS / ACCESSOIRES REQUIS Hardware Bag / Bolsa de accesorios / Sac d’accessoires BCD 35 mm BBO (x21) BBT (x6) 38 mm DER (x3) DEQ (x9) PARTS REQUIRED / PIEZAS REQUERIDAS / PIÈCES REQUISES Large Parts/ Piezas grandes / Pièces grandes BBU (x3) BBX (x6) BBV (x3) BAC (x1) BDE (x3) BAE (x3) TOOLS REQUIRED / HERRAMIENTAS REQUERIDAS / OUTILS REQUIS 7 BBQ (x3) BBP (x12)
u SECTION 1 (CONTINUED) / SECCIÓN 1 (SIGUE) / SECTION 1 (SUITE) Tools and Hardware Required / Herramientas y Accesorios Requeridos / Outils et Accessoires Requis BBO (x18) 1.1 • Turn the three Table Legs (BAE) upside down, and press two (2) Foot Caps (BBX) onto the bottom as shown. Secure with two (2) Screws (BBO) for each Foot Cap. • De vuelta las tres Patas (BAE), y empuje dos (2) Tapones (BBX) sobre la parte inferior de la Pata como se muestra.
u SECTION 1 (CONTINUED) / SECCIÓN 1 (SIGUE) / SECTION 1 (SUITE) Tools and Hardware Required / Herramientas y Accesorios Requeridos / Outils et Accessoires Requis 1.3 • There are two types of Table Top Supports (BBU & BBV). Table Top Support 1 (BBU) comes with four holes—two of which are very close to each other at one end. Table Top Support 2 (BBV) comes with four holes—two very close to each other near the center. One of each will be required for each of the three Leg Assemblies.
u SECTION 1 (CONTINUED) / SECCIÓN 1 (SIGUE) / SECTION 1 (SUITE) Tools and Hardware Required / Herramientas y Accesorios Requeridos / Outils et Accessoires Requis 35 mm DEQ (x3) BBP (x3) 1.4 • Set a Table Top Support 2 (BBV) onto a Leg. Align the hole in the Support with the hole in the Leg as shown. Insert a Bolt (DEQ) and secure with a Cap Nut (BBP) by hand only. • Coloque un Soporte para el tablero 2 (BBV) en una Pata. Alinee el agujero en el Soporte con el agujero en la Pata como se muestra.
u SECTION 1 (CONTINUED) / SECCIÓN 1 (SIGUE) / SECTION 1 (SUITE) Tools and Hardware Required / Herramientas y Accesorios Requeridos / Outils et Accessoires Requis 35 mm 38 mm DER (x3) DEQ (x3) BBP (x6) 1.5 • Set a Table Top Support 1 (BBU) onto Support 2 and the Leg. Align the holes at the end of the Support with the holes in Support 2 and the Leg as shown. Insert Bolts (DER & DEQ) and secure with a Cap Nuts (BBP) by hand only. • Coloque un Soporte para el tablero 1 (BBU) en el Soporte 2 y la Pata.
u SECTION 1 (CONTINUED) / SECCIÓN 1 (SIGUE) / SECTION 1 (SUITE) Tools and Hardware Required / Herramientas y Accesorios Requeridos / Outils et Accessoires Requis 35 mm DEQ (x3) BBQ (x3) BBP (x3) 1.6 • Set the three Assemblies onto one another so the Supports overlap as shown. Align the holes in the Supports and secure by hand only with Bolts (DEQ), Washers (BBQ), and Cap Nuts (BBP). • Coloque los tres Montajes uno encima del otro para que los Soportes solapen como se muestra.
u SECTION 1 (CONTINUED) / SECCIÓN 1 (SIGUE) / SECTION 1 (SUITE) Tools and Hardware Required / Herramientas y Accesorios Requeridos / Outils et Accessoires Requis BBO (x3) 1.7 • Align the holes in the Leg Supports as shown, and secure with Screws (BBO). • Alinee los agujeros en los Soportes de pata como se muestra, y sujételos usando Tornillos (BBO). • Alignez les trous dans les Supports du pied comme illustré, et attachez-les à l’aide des Vis (BBO).
u SECTION 1 (CONTINUED) / SECCIÓN 1 (SIGUE) / SECTION 1 (SUITE) Tools and Hardware Required / Herramientas y Accesorios Requeridos / Outils et Accessoires Requis BBT (x6) 1.8 ! • Lay the Table Top upside down on a flat surface. Turn the Table Leg Assembly upside down, and set it on the Table Top. Align the six (6) holes in the Supports with the screws bosses in the Table Top. Using a manual screwdriver, secure the Leg Assembly to the Table Top using six (6) Screws (BBT).
2 BENCH Assembly / ENSAMBLAJE DE LOS BANCOS / ASSEMBLAGE DES BANCS HARDWARE REQUIRED / ACCESORIOS REQUERIDOS / ACCESSOIRES REQUIS Hardware Bag / Bolsa de accesorios / Sac d’accessoires BCB BBO (x12) BBR (x24) BBT (x18) BBS (x24) ARH (x3) PARTS REQUIRED / PIEZAS REQUERIDAS / PIÈCES REQUISES Large Parts/ Piezas grandes / Pièces grandes BBW (x6) BBZ (x1) BDF (x3) BAD (x3) BDG (x3) BBY (x3) TOOLS REQUIRED / HERRAMIENTAS REQUERIDAS / OUTILS REQUIS 5/16” (8 mm) (x2) 15
u SECTION 2 (CONTINUED) / SECCIÓN 2 (SIGUE) / SECTION 2 (SUITE) Tools and Hardware Required / Herramientas y Accesorios Requeridos / Outils et Accessoires Requis BBO (x12) 2.1 • Turn the three Bench Legs (BDG) upside down, and press a Foot Cap (BBW) onto each end as shown. Secure with two (2) Screws (BBO) for each Foot Cap. • De vuelta las tres Patas del banco (BDG), y empuje un Tapón (BBW) sobre cada extremo como se muestra. Sujételos a la Pata usando dos (2) Tornillos (BBO) para cada Tapón.
u SECTION 2 (CONTINUED) / SECCIÓN 2 (SIGUE) / SECTION 2 (SUITE) Tools and Hardware Required / Herramientas y Accesorios Requeridos / Outils et Accessoires Requis 5/16” (8mm) BBR (x24) 2.2 ! BBS (x24) • Turn a Bench Frame (BDF) upside down as shown. Attach the Legs (BDG & BBY) to the frame using the hardware shown. • De vuelta el Armazón del banco (BDF) como se muestra. Sujete las Patas (BDG & BBY) al Armazón usando los elementos de fijación mostrados.
u SECTION 2 (CONTINUED) / SECCIÓN 2 (SIGUE) / SECTION 2 (SUITE) Tools and Hardware Required / Herramientas y Accesorios Requeridos / Outils et Accessoires Requis BBT (x18) 2.3 ! • Secure a Bench Frame to each Bench (BAD) using the hardware provided. • Sujete un Armazón de banco a cada Banco (BAD) usando los elementos de fijación provistos. • Attachez une Charpente de banc a chaque Banc (BAD) à l’aide des accessoires fournis. Note: Do this step for all three Bench Frames.
u SECTION 2 (CONTINUED) / SECCIÓN 2 (SIGUE) / SECTION 2 (SUITE) Tools and Hardware Required / Herramientas y Accesorios Requeridos / Outils et Accessoires Requis ARH (x3) 2.5 ! • Insert a Cotter Key (ARH) into the slit in the Table Leg to hold the Bench in place. • Inserte una Chaveta (ARH) dentro de la ranura en la Pata de mesa para guardar el Banco en su lugar. • Insérez une Clavette (ARH) dans la fente dans le Pied de table pour garder le Banc en place. Note: Do steps 2.4–2.5 for all three Benches.
u SECTION 2 (CONTINUED) / SECCIÓN 2 (SIGUE) / SECTION 2 (SUITE) Tools and Hardware Required / Herramientas y Accesorios Requeridos / Outils et Accessoires Requis 2.6 • If you have an umbrella, remove the Plug from the hole in the center of the Table Top and insert your umbrella. If not, leave the Plug in place. • Si tiene sombrilla, quite el Tapón del hoyo e inserte la sombrilla. Si no, deje el Tapón así. • Si vous avez un parasol, enlevez le Capuchon et insérez le parasol dans le trou.
ADDITIONAL WARNINGS / AVERTENCIAS ADICIONALES / AVERTISSEMENTS SUPPLÉMENTAIRES WARNING WARNUNG • surFace may Be HoT iF leFT in sun. • do noT Place a direcT HeaT source on or near THe surFace unless usinG a HeaT Barrier. • do noT sTand on TaBle or BencHes. • do noT siT on TaBle ToP. • do noT TiP TaBle on edGe or BencH may Fall and cause inJury. • liFT TaBle By THe TaBle ToP noT By THe BencHes. • Failure To comPly wiTH THese warninGs could resulT in serious Personal inJury.
CLEANING & CARE Congratulations on your Lifetime® product purchase. By following the instructions below, your new Lifetime product should provide you with years of service and enjoyment. The polyethylene panels are stain- and solvent-resistant. most stains can be removed using a mild soap and a soft-bristled brush. abrasive cleaning materials may scratch the plastic and are not recommended.
REGISTER YOUR PRODUCT ONLINE AT WWW.LIFETImE.COm At Lifetime®, we are committed to providing innovative and quality products. While registering, you will have the opportunity to give us your feedback. Your input is valuable to us. • you can also opt in to receive new product notifications or promotions. • in the unlikely event of a product recall or safety modification, your registration provides the information we need to notify you directly. • registration is fast, easy, and completely voluntary.
ANTY RR AN TY WA TY AN RR A W R WAR 2-YEAR LImITED FACTORY WARRANTY THE mANUFACTURER RESERVES THE RIGHT TO mAKE SUBSTITUTIONS TO WARRANTY CLAImS IF PARTS ARE UNAVAILABLE OR OBSOLETE. 1. lifetime® Picnic Tables are warranted to the original purchaser to be free from defects in material or workmanship for a period of two years from the date of original retail purchase. The word “defects” is defined as imperfections that impair the use of the product.
TÍA AN TÍ A GAR ÍA NT RA A G N GARA GARANTÍA DE FÁBRICA LImITADA POR 2 AÑOS EL FABRICANTE SE RESERVA EL DERECHO DE HACER SUSTITUCIONES EN LOS ELEmENTOS REEmPLAZADOS BAJO GARANTÍA SI LAS PIEZAS NO ESTÁN DISPONIBLES O SON OBSOLETAS. 1. el comprador original recibe la garantía de que las mesas de picnic lifetime estarán libres de defectos de material o de mano de obra por un período de 2 años a contar desde la fecha de la compra original.
TIE AN TIE GAR IE NT RA A G N GARA GARANTIE DE FABRICATION LImITÉE DE 2 ANS LE FABRICANT RÉSERVE LE DROIT DE FAIRE DES SUBSTITUTIONS EN CAS DE RECOURS EN GARANTIE SI LES PIÈCES NE SONT PAS DISPONIBLES OR SONT OBSOLÈTES 1. les tables de pique-nique lifetime sont garanties à l’acheteur d’origine contre tous défauts de matériau ou de fabrication pendant une période de deux ans à partir de la date du premier achat. le mot « défauts » signifie des imperfections qui empêchent l’utilisation du produit.
ENHANCE YOUR LIFETImE® PURCHASE BY ADDING ACCESSORIES OR OTHER GREAT PRODUCTS To purchase accessories or other Lifetime® products, visit us at: www.lifetime.com Or call: 1-800-424-3865 mEJORE SU COmPRA LIFETImE® Y AÑADA ACCESORIOS U OTROS PRODUCTOS EXCELENTES Para comprar accesorios u otros productos Lifetime® EUA, visítenos en: www.lifetime.com O llame al: 1.800.424.