
Instructions / Assembly


Model: DSQR70BNOR Page 6
For Customer Support please email support@strategicretailsolutions.com, or call (888)930-8528. Please provide the bath fan model number found
on the front of this manual when contacting Customer Support.
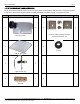
Step 7: Disconnect the power supply before
proceeding with Step 7. Run 120V 60Hz house wiring
(with ground) from wall switches to fan location.
Remove junction box cover and, using wire nuts,
connect house wires to unit wires. Refer to Wiring
Diagram on page 4.
Note: 12AWG is the minimum conductor to be used
for branch-circuit wiring.
CAUTION: If you electrical wires do not match the
colors listed, you must determine what each house
wire represents before connecting. You may need to
consult an electrical contractor to determine safely.
Wire Nuts instructions:
WARNING: Wiring must comply with all applicable
electrical codes. Turn OFF power before removing or
installing connectors. COPPER TO COPPER ONLY. Do
not use aluminum wire.
CAUTION: Accessory part (Wire nuts) should meet
installation instructions below.
NOTE: The connector in reusable on solid wires of the
same wire gage or smaller. Do not reuse the nut on
stranded wires.
Strip wires 3/8”-1/2”
Grip the wire firmly and push the stripped end of
the wire into the open port of the nut. Use only
one conductor per port.
Verify the stripped end of the wires is fully inserted
to the back of the nut.
NOTE: Important wire information. Maximum
temperature rating 105℃(221℉).600 volts maximum
for building wire and 1000 volts maximum for
building wire and 1000 volts maximum in signs and
lighting fixtures. The acceptable wire range includes:
solid 12-18 AWG.
Green wires are ground wires. House ground may
be green or bare.
White wires are neutral. They carry power back to
the service panel.
Black wires are hot. They carry power from the
panel to the fan.
Step 8: Install a circular 4 in. duct and secure it with
duct tape or clamps.
Finish ceiling work. (Ceiling hole should be aligned
with edge of fan housing.)
Step 9: Then thread Light harness plug onto screw in
fan housing as shown.
Step 10: Connect the Light harness plug into the white