Amplifier X1.1000.1D X1.2000.1D X1.400.2 X1.800.
Introduction INNOVATE OR DISINTIGRATE Thank you for purchasing the Lightning Audio Storm Amplifier. Our customers have come to expect that Lightning Audio pushes the edge in audio. Now we will push the edge in the amplifier and woofer business with high value and high performance models. If, after reading your manual, you still have questions regarding this product, we recommend that you see your Lightning Audio dealer. If you need further assistance, you can call us direct at 1888-881-8186.
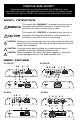
PRACTICE SAFE SOUND™ Continuous exposure to sound pressure levels over 100dB may cause permanent hearing loss. High powered auto sound systems may produce sound pressure levels well over 130dB. Use common sense and practice safe sound. Safety Instructions This symbol with “WARNING” is intended to alert the user to the presence of important instructions. Failure to heed the instructions will result in severe injury or death.
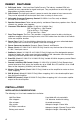
Design Features A. RCA Input Jacks – Line Level from Radio Pre-outs: The industry standard RCA jack provides an easy connection for signal level input. They are platinum to resist the signal degradation caused by corrosion. B. Gain Control: The input gain control is preset to match the output of most source units. They can be adjusted to match output levels from a variety of source units. C. Adjustable Crossover Frequency Control: 50-250Hz. Low Pass only on Models X1.1000.1D & X1.2000.1D. D.
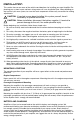
Installation This section focuses on some of the vehicle considerations for installing your new Amplifier. Preplanning your system layout and best wiring routes will save installation time. When deciding on the layout of your new system, be sure that each component will be easily accessible for making adjustments. ! CAUTION: If you feel unsure about installing this system yourself, have it installed by a qualified technician.
Installation WIRING THE SYSTEM ! CAUTION: If you do not feel comfortable with wiring your new unit, please see your local Authorized Lightning Audio Dealer for installation. ! CAUTION: Before installation, disconnect the battery negative (-) terminal to prevent damage to the unit, fire and/or possible injury. ! CAUTION: Avoid running power wires near the low level input cables, antenna, power leads, sensitive equipment or harnesses.
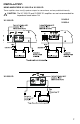
Installation MONO AMPLIFIERS X1.1000.1D & X1.2000.1D These amplifiers have two (2) speaker outputs for convenience and are paralleled internally. ! CAUTION: The X1.1000.1D and X1.2000.1D amplifiers are not recommended for impedance loads below 1Ω. X1.1000.1D X1.400.2 X1.800.4 X1.2000.
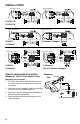
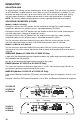
Installation From Source Unit From Source Unit X1.1000.1D X1.2000.1D From Source Unit X1.400.2 2-Channel From Source Unit 2-Channel – Bridged From Source Unit From Source Unit X1.800.4 4-Channel REMOTE LEVEL/BASS EQ CONTROL (Models X1.1000.1D & X1.2000.1D Only) Mounting and installation 1. Find a location, either under the dash or near the center console, that gives easy access to the remote. 2. Using the screws supplied, install the mounting clip with the tabs towards the back. 3.
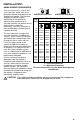
Installation USING PASSIVE CROSSOVERS A passive crossover is a circuit that uses capacitors and/or coils and is placed on speaker leads between the amplifier and speaker. The crossover delegates a specific range of frequencies to the speaker for optimum driver performance. A crossover network can perform one of three functions: High-Pass (capacitors), Low-Pass (inductors or coils) and Bandpass (combination of capacitor and coil). The most commonly used passive crossover networks are 6dB/octave systems.
Operation ADJUSTING GAIN To adjust the gain setting, turn the amplifier gains all the way down. Turn the source unit volume up until distortion is audible and then turn it down a bit until the distortion is inaudible. This will be about two thirds all the way up on most source units. Next, turn the amplifier gain setting until once again distortion is audible and then back it down until the distortion is inaudible. NOTE: For a more in depth setting procedure, contact Lightning Audio Technical Support.
Operation STRAPPING AMPLIFIERS (X1.2000.1D Only) The X1.2000.1D amplifiers have the ability to connect two together and have their outputs combined, or strapped, to power a single speaker load. ! CAUTION: Two X1.2000.1D amplifiers that are strapped together are not recommended for impedance loads below 2Ω. 1. Select which amplifier of the two will be the master. and set the Master/Slave switch in the "out" position.
Troubleshooting Symptom Diagnosis Remedy Amplifier does not turn on. B+ or REM not between 10.5 and 15.5 volts or no voltage present Check the alternator, battery, fuse, and wiring and repair as necessary Amplifier Noise Amplifier is not properly grounded.
Limited Warranty Information Lightning Audio offers a limited warranty on products on the following terms: • Length of Warranty Speakers One year parts and labor warranty. Requires proof of purchase. Amplifiers Bolt: One year parts and labor warranty. Requires proof of purchase. Strike and Storm: One year parts and labor warranty. Requires proof of purchase. Or, Two years parts and labor warranty if installed by a Authorized Dealer. Requires proof of purchase.
Introduction Français L’innovation ou la mort ! Nous vous remercions d'avoir acheté cet ampli Lightning Audio Bolt. Notre clientèle s’attend à ce que Lightning Audio pousse toujours plus loin les limites du son. C’est ce à quoi nous nous consacrons à présent dans les domaines des amplis et des hautparleurs graves grâce à des modèles hautement performants de valeur supérieure.
PRATIQUEZ UNE ÉCOUTE SANS RISQUESMD Une exposition continue à des niveaux de pression acoustique supérieurs à 100 dB peut causer une perte d'acuité auditive permanente. Les systèmes audio de forte puissance pour auto peuvent produire des niveaux de pression acoustique bien au-delà de 130 dB. Faites preuve de bon sens et pratiquez une écoute sans risque ´ ´ Consignes de securite Le symbole accompagnant le mot « AVERTISSEMENT » signale à l'utilisateur la présence d’instructions importantes.
Français ´ Particularites Techniques A. Prises d’entrée RCA – Entrées de ligne de pré-sorties radio : les prises RCA de norme industrielle permettent une connexion facile pour les entrées de signaux. Elles sont plaquées de platine pour résister à la détérioration de signal due à l'effet de la corrosion. B. Commande de gain : la commande de gain d'entrée est préréglée de manière à correspondre à la sortie de la plupart des unités source. Elle peut être réglée en fonction d'une variété d'unités source. C.
Installation Cette section traite de points concernant le véhicule dont il faut tenir compte pour l’installation de votre nouvel ampli. Vous sauverez du temps en planifiant à l’avance la disposition du système et du câblage. Assurez-vous, entre autres, que chaque composant du système est facilement accessible pour les réglages. ! MISE EN GARDE : si vous vous sentez incapable d’installer l’appareil vousmême, confiez la tâche à un technicien qualifié.
Installation Français CBLAGE DU SYSTÈME ! MISE EN GARDE : si vous ne vous sentez pas à l’aise pour effectuer vousmême le câblage de votre nouvel appareil, veuillez confier l’installation à votre concessionnaire Lightning Audio agréé. ! MISE EN GARDE : avant d'entamer l'installation, déconnectez la broche négative (-) de la batterie pour éviter tout risque de blessures, d’incendie ou de dommages à l'appareil.
Installation AMPLIFICATEURS MONO X1.1000.1D et X1.2000.1D Ces amplis ont deux (2) sorties de haut-parleur pour plus de commodité et sont en parallèle à l'intérieur. ! MISE EN GARDE : X1.1000.1D les amplificateurs X1.1000.1D et X1.2000.1D ne sont pas recommandés pour des charges d'impédance inférieures à 1Ω. X1.400.2 X1.800.4 X1.2000.
Installation Source audio Français From Source Unit Amplificateur Source audio From Source Unit Amplificateur X1.1000.1D X1.2000.1D Source audio From Source Unit Amplificateur X1.400.2 2 canaux Source audio From Source Unit X1.800.4 4 canaux TÉLÉCOMMANDE DE NIVEAU/ÉGALISATEUR DE BASSES (modèles X1.1000.1D et X1.2000.1D seulement) Montage et installation 1. Trouvez un bon emplacement, sous le tableau de bord ou près de la console centrale, offrant un accès facile à l’appareil de télécommande. 2.
Installation UTILISATION DE FILTRES PASSIFS C L Un filtre passif est un circuit utilisant des condensateurs ou bobines qui est placé sur Passe-bas 6dB/octave Passe-haut 6dB/octave les fils du haut-parleur, entre l’ampli et le haut-parleur. Le filtre délègue une gamme Impédance de haut-parleur de fréquences spécifique au haut-parleur Freq. 2 OHMS 4 OHMS 8 OHMS afin d’assurer une performance optimale de Hertz l’ampli.
Fonctionnement Français RÉGLAGE DU GAIN Pour régler le gain, tournez le bouton de gain de l’ampli vers son niveau le plus bas. Augmentez le volume de la source audio jusqu’à produire une distorsion audible, puis baissez-le jusqu’à ce que la distorsion devienne inaudible. Cela correspondant généralement aux deux tiers du volume sur la plupart des sources audio.
Fonctionnement JUMELAGE DES AMPLIS (X1.2000.1D seulement) Les amplis X1.2000.1D permettent de connecter deux amplis ensemble et de combiner, ou jumeler, leurs sorties afin constituer une même charge de haut-parleur. ! MISE EN GARDE : Deux amplis X1.2000.1D jumelés ne sont pas recommandés pour des charges d'impédance inférieures à 2Ω. 1. Sélectionnez lequel des deux amplis servira de maître et réglez l'interrupteur Master/Slave sur la position « out ».
Français ´ Depannage Symptôme Diagnostic Solution L’ampli ne s’allume Tension de B+ ou de télécom. non située pas. entre 10,5 et 15,5 V ou bien absente. Vérifiez l’alternateur, la batterie, le fusible et le câblage. Réparez au besoin. Bruit d’ampli L’ampli pas mis à la masse correctement. Vérifiez les fils. Réparez au besoin.
´ Garantie limitee Lightning Audio offre une garantie limitée sur ses produits selon les termes suivants : • Durée de la garantie Haut-parleurs Un an, pièces et main-d’œuvre. Preuve d'achat exigée. Amplis Bolt : Un an, pièces et main-d’œuvre. Preuve d'achat exigée. Strike et Storm : Un an, pièces et main-d’œuvre. Preuve d'achat exigée. Ou garantie de deux ans, pièces et main-d'œuvre, si installé par un distributeur agréé. Preuve d'achat exigée. CT-1 et PC2 Un an, pièces et main-d’œuvre.
´ Introduccion Innove o desintegrese! Gracias por comprar el Amplificador Lightning Audio Bolt. Español Nuestros clientes pueden contar con que Lightning Audio traspase los límites del audio. Ahora, traspasaremos lo límites en el negocio de amplificadores y woofers con modelos de gran valor y alto rendimiento. Si después de leer su manual tiene preguntas sobre este producto, le recomendamos que consulte a su distribuidor de Lightning Audio.
PRACTIQUE EL SONIDO SEGURO El contacto continuo con niveles de presión de sonido superiores a 100 dB puede causar la pérdida permanente de la audición. Los sistemas de sonido para automóviles de alta potencia pueden producir niveles de presión de sonido superiores a los 130 dB. Use su sentido común y practique el sonido seguro. Instrucciones de seguridad Este símbolo de "ADVERTENCIA" tiene por objeto alertar al usuario sobre la presencia de instrucciones de importancia.
´ ´ Caracteristicas de Diseeo A. Enchufes de entrada RCA – Nivel de línea de las pre-salidas de radio: El enchufe RCA, estándar de la industria, proporciona una conexión fácil para la entrada del nivel de la señal. Son de platino para resistir la degradación de la señal causada por la corrosión. B. Control de ganancia: El control de ganancia de entrada está precalibrado para que iguale la salida de la mayoría de las unidades fuente.
´ Instalacion Esta sección se concentra en algunas de las consideraciones de su vehículo para instalar el nuevo amplificador. La planificación previa del diagrama de su sistema y las mejores rutas del cableado ayudarán a ahorrar tiempo en la instalación. Cuando se decide sobre el diagrama de su nuevo sistema, asegúrese de que cada componente esté accesible para realizar ajustes. ! PRECAUCIÓN: Si no está seguro sobre cómo instalar el sistema usted mismo, pídale a un técnico calificado que lo instale.
´ Instalacion CABLEADO DEL SISTEMA PRECAUCIÓN: Si no se siente cómodo instalando el cableado de su nueva unidad, por favor consulte a su Distribuidor Autorizado Lightning Audio local sobre la instalación. ! PRECAUCIÓN: Antes de la instalación, desconecte el terminal negativo de la batería (-) para prevenir daño a la unidad, incendio o posibles lesiones.
´ Instalacion AMPLIFICADORES MONOFÓNICOS X1.1000.1D & X1.2000.1D Estos amplificadores tienen dos (2) salidas para altavoces, para conveniencia, y están conectados en paralelo internamente. ! PRECAUCIÓN: Los amplificadores X1.1000.1D y X1.2000.1D no se recomiendan para impedancia de carga inferiores a 1Ω. X1.1000.1D X1.400.2 X1.800.4 X1.2000.
´ Instalacion Español Unidad Fuente From Source Unit From SourceFuente Unit Unidad Amplificador Amplificador X1.1000.1D X1.2000.1D Unidad Fuente From Source Unit Amplificador Unidad From SourceFuente Unit X1.400.2 2 canales Unidad Fuente From Source Unit X1.800.4 4 canales CONTROL DE NIVEL REMOTO / EQ DE BAJO (Modelos X1.1000.1D & X1.2000.1D Solamente) Montaje e instalación 1. Encuentre un lugar debajo del tablero o cerca del centro de la consola, el cual permita acceder fácilmente al remoto.
´ Instalacion USANDO X-OVERS PASIVOS Un X-over pasivo es un circuito que usa condensadores y/o bobinas, el cual se coloca en los conductores de los altavoces entre el amplificador y el altavoz. El X-over delega un rango específico de frecuencias al altavoz para un funcionamiento óptimo del transductor electroacústico. Una red de X-over puede realizar una de tres funciones: Paso alto (condensadores), paso bajo (inductores o bobinas) y paso de banda (combinación de condensador y bobina).
´ Operacion AJUSTE DE LA GANANCIA Español Para ajustar el valor de la ganancia, baje la ganancia del amplificador completamente. Suba el volumen de la unidad fuente hasta que la distorsión sea audible y luego bájelo un poco hasta que la distorsión no pueda escucharse. En la mayoría de las fuentes, esto ocurrirá a aproximadamente dos tercios del volumen total. A continuación, suba la ganancia del amplificador nuevamente hasta que la distorsión sea audible y luego bájela hasta que sea inaudible.
´ Operacion PUENTEADO DE AMPLIFICADORES (Sólo X1.2000.1D) Los amplificadores X1.2000.1D tienen la capacidad de conectarse dos juntos y combinar sus salidas, o se los puede puentear, para activar una sola carga de altavoces. ! PRECAUCIÓN: No se recomienda el uso de dos amplificadores X1.2000.1D que están puenteados juntos para cargas de impedancia menores de 2Ω. 1. Seleccione cuál de los dos amplificadores será el maestro y ajuste el interruptor Maestro/Esclavo en la posición de "out".
´ Solucion de Problemas Español Síntoma Diagnóstico Solución El amplificador no enciende.
´ limitada ´ Informacion sobre la garantia Lightning Audio ofrece una garantía limitada para los productos según los siguientes términos: • Duración de la garantía Altavoces Un año de garantía sobre partes y mano de obra. Se requiere prueba de compra. Amplificadores Bolt: Un año de garantía sobre partes y mano de obra. Se requiere prueba de compra. Strike and Storm: Un año de garantía sobre partes y mano de obra. Se requiere prueba de compra.
Einleitung Innovieren oder desintegrieren! Vielen Dank für Ihren Kauf des Lightning Audio Bolt Verstärkers. Unsere Kunden sind es gewöhnt, von Lightning Audio die modernste Technologie zu erwarten. Mit unseren modernen Verstärkern und Woofern bieten wir jetzt wertvolle Hochleistungsmodelle. Deutsch Falls Sie nach der Lektüre Ihrer Gebrauchsanleitung noch Fragen hinsichtlich dieses Produkts haben, empfehlen wir, dass Sie einen Lightning Audio Vertragshändler kontaktieren.
PRAKTIZIEREN SIE SAFE SOUND Fortgesetzte Geräuschdruckpegel von über 100 dB können beim Menschen zu permanentem Hörverlust führen. Leistungsstarke Autosoundsysteme können Geräuschdruckpegel erzeugen, die weit über 130 dB liegen. Bitte wenden Sie gesunden Menschenverstand an und praktizieren Sie SAFE SOUND. Sicherheitshinweise Dieses Symbol mit dem Wort „WARNUNG“ soll den Benutzer auf wichtige Hinweise aufmerksam machen. Nichtbeachtung der Hinweise führt zu schweren Verletzungen oder Tod.
Designcharakteristiken A. RCA-Eingangsbuchsen – Leitungspegel von Radiovorausgängen: Die genormte RCA-Buchse ermöglicht den einfachen Anschluss des Signalpegeleingangs. Sie sind aus Platinum, um den durch Korrosion verursachten Signalverlust zu minimieren. B. Lautstärkeregelung: Die Eingangslautstärkeregelung ist werkseitig auf die Ausgangsleistung der meisten Sourcegeräte eingestellt. Sie kann den Ausgangspegeln einer Vielzahl von Sourcegeräten angepasst werden. C.
Einbau Dieser Abschnitt konzentriert sich auf Erwägungen hinsichtlich des Einbaus Ihres neuen Verstärkers im Fahrzeug. Vorausplanung Ihres Systemlayouts und der besten Verkabelungsrouten spart Zeit beim Einbau. Prüfen Sie bei der Wahl eines Layouts für Ihr neues System, ob alle Komponenten leicht erreichbar sind, um Einstellungen vorzunehmen. ! VORSICHT: Wenn Sie beim Einbau des Geräts unsicher sind, lassen Sie es bitte von einem qualifizierten Lightning Audio Techniker einbauen.
Einbau Deutsch VERKABELUNG DES SYSTEMS ! VORSICHT: Wenn Sie beim Einbau des Geräts unsicher sind, lassen Sie es bitte von einem qualifizierten Lightning Audio Techniker einbauen. ! VORSICHT: Entfernen Sie vor dem Einbau den negative Batteriepol, um Schäden am Gerät, Feuer bzw. mögliche Verletzungen zu vermeiden. ! VORSICHT: Vermeiden Sie es, Stromkabel in der Nähe von niedrigaktiven Eingangskabeln, der Antenne, Stromleitungen, empfindlichem Gerät oder Halterungen zu verlegen.
Einbau MONOVERSTÄRKER X1.1000.1D und X1.2000.1D Diese Verstärker haben aus praktischen Gründen zwei (2) Lautsprecherausgänge, die intern parallel geschaltet sind. ! VORSICHT: Die Verstärker X1.1000.1D und X1.2000.1D werden nicht für Impedanzlasten unter 1 Ω empfohlen. X1.1000.1D X1.400.2 X1.800.4 X1.2000.
Einbau Source-Gerät From Source Unit Source-Gerät From Source Unit Verstärker Verstärker X1.1000.1D X1.2000.1D Deutsch Source-Gerät From Source Unit Source-Gerät From Source Unit Verstärker X1.400.2 Zweikanal Zweikanal – überbrückt Source-Gerät Source-Gerät From Source Unit X1.800.4 Vierkanal From Source Unit Vierkanal – als überbrückter Dreikanal konfiguriert FERNBEDIENUNG ZUR PEGEL- BZW. BefestigungsBASS-EQ-KONTROLLE (Nur bei Modellen klemme X1.1000.1D und X1.2000.
Einbau VERWENDUNG VON PASSIVEN CROSSOVERN Ein passives Crossover ist eine Schaltung, die Kondensatoren bzw. Spulen verwendet und auf den Lautsprecherkabeln zwischen Verstärker und Lautsprecher platziert ist. Das Crossover delegiert zur optimalen Verstärkerleistung einen spezifischen Frequenzbereich an den Lautsprecher. Ein Crossover-Netzwerk kann eine von drei Funktionen haben: Hochpass (Kondensatoren), Niedrigpass (Induktoren oder Spulen) und Bandpass (Kombination von Kondensator und Spule).
Betrieb LAUTSTÄRKE (GAIN) EINSTELLEN Zur Anpassung der Lautstärkereinstellung den Verstärker abdrehen. Die Lautstärke des SourceGeräts aufdrehen, bis eine Verzerrung hörbar wird, und sie dann etwas abdrehen, bis die Verzerrung nicht mehr hörbar ist. Dies erfordert bei den meisten Source-Geräten eine ZweidrittelEinstellung. Als nächstes den Verstärker aufdrehen, bis eine Verzerrung erneut hörbar wird, und ihn dann abdrehen, bis die Verzerrung nicht mehr hörbar ist.
Betrieb ZUSAMMENSCHALTEN VON VERSTÄRKERN (nur bei Modell X1.2000.1D) Die X1.2000.1D-Verstärker können paarweise aneinander angeschlossen werden, wobei ihre Ausgänge kombiniert, d.h. zusammengeschaltet werden, um eine einzelne Lautsprecherlast zu versorgen. ! VORSICHT:Das Zusammenschalten von zwei X1.2000.1D-Verstärkern wird nicht für Impedanzlasten von weniger als 2 Ω empfohlen. 1. Entscheiden, welcher von den beiden Verstärkern der Master ist und den Master-/SlaveSchalter in die „Out“-Position bringen.
Fehlerbeseitigung Symptom Diagnose Maßnahme Lichtmaschine, Batterie, Sicherung und Verkabelung überprüfen und ggfs. reparieren Deutsch Verstärker lässt sich Spannung von B+ oder Fernbedienung liegt nicht zwischen 10,5 und 15,5 V oder nicht einschalten ist nicht vorhanden Verstärkergeräusch Verstärker ist nicht ordnungsgemäß geerde Verkabelung überprüfen und ggfs.
¨ Informationen zur beschrAnkten Garantie Lightning Audio bietet eine beschränkte Produktgarantie zu folgenden Bedingungen: • Laufzeit der Garantie Lautsprecher Ein Jahr auf Teile und Fertigung. Kaufnachweis erforderlich. Verstärker Bolt: Ein Jahr auf Teile und Fertigung. Kaufnachweis erforderlich. Streik und Sturm: Ein Jahr auf Teile und Fertigung. Kaufnachweis erforderlich. Oder zwei Jahre auf Teile und Fertigung, wenn von einem Vertragshändler eingebaut. Kaufnachweis erforderlich.
Introduzione Introdurre novità o disintegrare! Vi ringraziamo per aver acquistato l’amplificatore Bolt (Fulmine) della Lightning Audio. Ormai, i nostri clienti si aspettano che la Lightning Audio oltrepassi il traguardo nel campo audio. Adesso oltrepasseremo il traguardo anche nel campo degli amplificatori e dei woofer—con modelli ad alto valore e ad altre prestazioni.
OSSERVATE LE REGOLE DEL “SUONO SENZA PERICOLI” La costante esposizione a livelli di pressione acustica al di sopra dei 100dB possono causare la perdita permanente dell’udito. I sistemi audio ad alta potenza possono produrre livelli di pressione acustica ben superiori ai 130dB. Si consiglia il buon senso e l’osservanza delle regole del “suono senza pericoli.” Istruzioni di Sicurezza Questo simbolo con la dicitura “AVVERTIMENTO” intende avvertire l’utente alla presenza di istruzioni importanti.
Caratteristiche del Design A. Spinotti d’ingresso RCA – Livello di linea dalle pre-uscite radio: Lo spinotto RCA standard di fabbrica fornisce un collegamento facile per l’ingresso del livello di segnale. Sono in platino per resistere alla degradazione del segnale dovuta alla corrosione. B. Comando del guadagno: Il comando del guadagno d’ingresso è stato preimpostato per combaciare con l’uscita della maggior parte delle unità di fonte.
Installazione Questa sezione si concentra su alcune considerazioni a livello di veicolo inerenti all’installazione del vostro nuovo amplificatore.Programmando a priori la configurazione del vostro sistema audio nonché i migliori cablaggi, risparmierete tempo durante l’installazione. Quando avrete deciso la miglior configurazione per il vostro nuovo sistema audio, assicuratevi di poter accedere facilmente a ciascuna componente per effettuare le regolazioni necessarie.
Installazione CABLAGGIO DEL SISTEMA ! ! ! ATTENZIONE: Se aveste dei dubbi circa l’installazione, rivolgetevi ad un tecnico qualificato della Lightning Audio. ATTENZIONE: Prima dell’installazione, scollegate il terminale negativo (-) della batteria per evitare danni all’unità, pericoli d’incendio e/o potenziali lesioni personali.
Installazione AMPLIFICATORI MONO X1.1000.1D e X1.2000.1D Questi amplificatori hanno due (2) uscite convenienti per altoparlanti e sono messe in parallelo internamente. ! ATTENZIONE: Gli amplificatori X1.1000.1D e X1.2000.1D non sono raccomandabili per carichi d’impedenza al di sotto di 1Ω. X1.1000.1D X1.400.2 X1.800.4 X1.2000.
Installazione Unità di fonte From Source Unit UnitàSource di fonte From Unit Amplificatore Amplificatore X1.1000.1D X1.2000.1D From Source Unit Unità di fonte Amplificatore Italiano X1.400.2 2 canali Unità di fonte From Source Unit From Source Unit Unità di fonte 2 canali - ponti TELECOMANDO DEL LIVELLO/COMANDO DEI TONI BASSI EQ (Solamente i modelli X1.1000.1D e X1.2000.1D) 1.
Installazione COME USARE LE FREQUENZE DI INCROCIO PASSIVE C L Una frequenza di incrocio passiva è un circuito che utilizza condensatori e/o bobine 6dB/ottava passa-basso 6dB/ottava passa-alto ed è piazzata sui cavi degli altoparlanti tra l’amplificatore e l’altoparlante. La frequenza Impedenza dell’altoparlante di incrocio delega all’altoparlante una Freq. gamma specifica di frequenze per ottenere 2 OHMS 4 OHMS 8 OHMS Hertz prestazioni ottimali dello stadio pilota.
Funzionamento REGOLAZIONE DI GUADAGNO Per regolare la sintonizzazione del guadagno, abbassate completamente i guadagni dell’amplificatore. Alzate il volume dell’unità di fonte finché la distorsione non diventi udibile, e poi abbassatelo finché la distorsione non sia più udibile. Nella maggior parte delle unità di fonte, ciò avverrà a circa due terzi dell’alzata di volume.
Funzionamento COMBINAZIONE DI AMPLIFICATORI (solo per il modello X1.2000.1D) È possibile collegare insieme due amplificatori X1.2000.1D in modo che le loro uscite, combinate, siano applicate al carico di un solo altoparlante. ! ATTENZIONE: si sconsiglia di combinare le uscite di due amplificatori X1.2000.1D quando l’impedenza del carico è minore di 2Ω. 1. Selezionate quale amplificatore sarà quello master e mettete l’interruttore Master/Slave nella posizione "in fuori".
Individuazione/Riparazione Guasti Sintomo Diagnosi Rimedio Amplificatore non si accende B+ o REM non è tra 10,5 e 15,5 volt oppure non è presente alcuna tensione Controllate l’alternatore, la batteria, il fusibile ed il cablaggio ed effettuate le riparazioni del caso Rumorositànell’a mplificatore Amplificatore non è stato collegato a massa in modo corretto Controllate il cablaggio ed effettuate le riparazioni del caso (Schiocco di accensione) Un picco di tensione transitorio proveniente dall’unità
Informazioni Inerenti alla Garanzia Limitata La Lightning Audio offre una garanzia limitata sui prodotti alle seguenti condizioni: • Durata della garanzia Altoparlanti Garanzia di un anno sui pezzi di ricambio e sulla manodopera. È necessaria laricevuta. Amplificatori Bolt (Fulmine): Garanzia di un anno sui pezzi di ricambio e sulla manodopera. Ènecessaria la ricevuta. Strike and Storm (Colpire e tempestare): Garanzia di un anno sui pezzi di ricambio e sulla manodopera.È neces saria la ricevuta.
Italiano
Lightning Audio 2055 East 5th Street Tempe, Arizona 85281 U.S.A. In U.S.A., (480) 966-8278 In Europe, Fax (49) 850-3934-014 In Japan, Fax (81) 559-79-1265 07/03 B.M.