
Instruction Manual


Classified
page
11/17/2022 2
Calculite LED Gen 3 Cylinder with Remote Driver
IS-C4/C6
www.ledalite.com
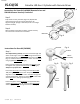
Instructions for Stem Kit (CASKXX)
Step 1
Stem Adjustment (optional): Cut Stem
to desired length and
deburr inside edge. Insert Swivel Ball casting onto the Stem
with the edge of the cut even with the back of the cast ball
(Fig. A). Install one Set Screw so that it “bites” onto the Stem
using supplied Allen Wrench (Fig. B).
Drill a 1/8” hole (drill bit not provided) in the Stem through
the tapped hole, opposite the Set Screw installed (Fig. A).
Always use eye protection.
Loosen the Set Screw
in the casting and rotate Swivel Ball
180⁰ placing the Set Screw into the newly drilled hole for
alignment. Drill a second 1/8” hole in the Stem through the
opposite tapped hole. Deburr any sharp edges on the inside
of the Stem due to drilling operation (Fig. A).
Insert and tighten second Set Screw into tapped hole with
supplied Allen Wrench (Fig. B). Pins from both Set Screws
should engage the Stem through the drilled holes (Fig. C).
DRILL BIT
(NOT SUPPLIED)
SET SCREW
STEM
SWIVEL BALL
Fig. A
ALLEN
WRENCH
Fig. B
Fig. C
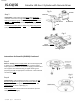
Step 3
Snap driver into the j-box door (Figure A). Repeat with
remote box and snap into remote plate fixture for
alignment (Fig B). (Image is illustrative, driver can change
between models).
Step 4
After installing remote box into plate, prepare box easy
connectors for luminaire wire connection.
JUNCTION BOX
REMOTE BOX
Fig. B
Fig. A
Instructions for Stem Kit CcASKXX (Remote Driver and
SNS441IA Sensor Version) Continued