
Instructions / Assembly

E-2
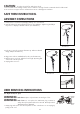
CAUTION: To reduce the risk of fire and electric shock:
1. Do not install on trees having needles, leaves or branch coverings of metal or materials which look like metal.
2. Do not mount or support wires in a manner that can cut or damage wire insulation.
SAVE THESE INSTRUCTIONS.
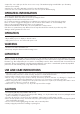
ASSEMBLY INSTRUCTIONS
1. Gently remove contents from packaging and lay out in a clear area.
2. Push the ball end of “A” through the Projection
™
ring and base. Tighten ring and adjust
Projection
™
to display in desired location. (See Illustration 1)
3. Push “B” to open the cover(See Illustration 2), and insert desired
image slide(See Illustration 3).
4. Plug power cord into standard wall socket. (See Illustration 4)
5. When picture is not clear, adjust the focal length. By turning dial
on the front of the Projection™.
6. Unplug when not in use.
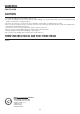
USER SERVICING INSTRUCTIONS
Fuse Replacement (Fuse: 2pcs)
WARNING: Risk of Fire: Replace only with same size and type of fuse.
WARNING: Risk of Fire: Do not replace the attachment plug. Contains a
safety device (fuse) that should not be removed. Discard product if
attachment plug is damaged.
1. Grasp plug and remove from the receptacle or other outlet device. Do not unplug by
pulling on the cord.
Illustration 1
Illustration 2 Illustration 3
Illustration 4
Working
Fuse
Replace
Fuse