
User's Manual


9
1. Overview 2. Initial Set-up 3. DaiIy Operation
4. Additional
Information
5. Maintenance &
Troubleshooting
6. Safety &
Specifications
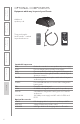
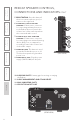
FLEXMIKE CONTROLS AND CONNECTIONS
1. POWER/MUTE SWITCH: press and hold to power on, press to mute, press
and hold to power off.
2. MIC 1 STATUS: lighted to indicate microphone is registered as MIC 1.
• Blue: solid = normal operation; flashing = linking in process.
• Red: solid = muted; flashing = muted while linking in process.
3. MIC 2 STATUS: lighted to indicate microphone is registered as MIC 2 (same
behavior as MIC 1 status light above).
4. EARBUD CONNECTION: connect the earbud for monitoring.
5. CHARGING/LOW BATTERY INDICATOR: lights red when charging, green
when fully charged. When in operation, turns red to indicate low battery.
6. MICROPHONE VOLUME UP/DOWN
7. AUDIO INPUT: connect audio source to send to whole class.
8. LANYARD INTERFACE: insert the lanyard into this hook to wear the
Flexmike.
9. BATTERY DOOR: remove the battery door to replace the rechargeable
battery pack.
10. REGISTRATION: (inside battery compartment - not shown) only used when
adding or replacing Flexmike.
1
10
9
8
7
6
5
4
3
2