LES 600 Series Listening Enhancement System tm for Sound-Field Classroom Amplification User Manual 1-800-732-8999 www.lightspeed-tek.com L i g h t S P E E D Te c h n o l o g i e s , I n c .
Table of Contents Several studies validated by the U.S. Department of Education and the Educational Audiology Association verify that poor classroom acoustics, high ambient noise, and temporary mild hearing loss among children place many students academically at risk.
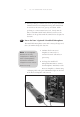
4 L E S 6 0 0 O P E R AT I N G I N S T R U C T I O N S Operating Instructions Step1 Power for Your LES 600 Receiver/Amplifier 1 Check that: • Both front panel microphone volume controls (MIC 1 VOLUME and MIC 2 VOLUME) are set to minimum (turned fully counter-clockwise). • The Receiver/Amplifier is connected to a power source: Use the enclosed AC/DC power adapter to plug into a power cord or a standard wall electrical outlet, and connect the other end to the DC POWER IN jack on the back panel.
L E S 6 0 0 O P E R AT I N G I N S T R U C T I O N S 5 Step2 Power for Your Belt-Pack Transmitter & Microphone 1 Ensure the Belt-pack Transmitter is turned OFF. 2 Your Belt-pack Transmitter has its internal rechargeable batteries already installed. Connect one end of the Charging Cable to one of the TRANSMITTER CHARGING jacks on the back panel of the Receiver/ Amplifier.
6 Note L E S 6 0 0 O P E R AT I N G I N S T R U C T I O N S 4 NiMH batteries will usually maintain their charge for a full day of normal classroom use. Always switch the Transmitter OFF when not in use (lunch hour, quiet times, etc.). Should the batteries in the Transmitter need to be changed, open the lower plastic cover by pressing the ribbed portions on both sides of the cover (located near the center of the Transmitter) towards each other.
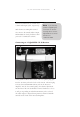
L E S 6 0 0 O P E R AT I N G I N S T R U C T I O N S 7 Step 3 Positioning Your Microphone After the microphone is connected to the belt-pack Transmitter, position the microphone as described below: 1 Lavaliere Microphone: The lavaliere microphone should be hung around the neck as illustrated, resting on your collar bone. The neck cord is adjusted by squeezing the two long ends together and then sliding the adjuster up or down the cord.
8 3 L E S 6 0 0 O P E R AT I N G I N S T R U C T I O N S When speaking at a normal voice level, the green AF INDICATOR on the Receiver/Amplifier front panel should flash on and off as the voice level goes up and down. While speaking at a conversational voice level, slowly turn the MIC 1 VOLUME control knob clockwise to increase the loudness of the speakers until the sound level is adequate for the room.
L E S 6 0 0 O P E R AT I N G I N S T R U C T I O N S 9 3 The batteries will fully charge in about 8-12 hours. 4 When in normal use, it is best to leave batteries on the charger until used, since there is a small amount of discharge after 48 hours. However, do not leave battery(ies) plugged into the charger for more than 5 days as it will significantly shorten your battery life. Note If the batteries are not going to be used for an extended period of time (Christmas, spring, summer break, etc.
10 8 L E S 6 0 0 O P E R AT I N G I N S T R U C T I O N S When speaking at a normal voice level, the green AF indicator light (on the Receiver/Amplifier front panel) should flash on and off as the voice level goes up and down. While speaking at a normal voice level, slowly turn the MIC 1 VOLUME or MIC 2 VOLUME (if applicable) control on the LES 600 clockwise to increase the loudness of the speaker(s) until the sound level is adequate for the room.
L E S 6 0 0 O P E R AT I N G I N S T R U C T I O N S and Telex transmitters use 2.5mm and 3.5mm audio input jacks, respectively. With the Receiver/Amplifier turned ON, increase the Mixed Audio Output LEVEL ADJUST slowly clockwise until you reach a comfortable volume. 11 Note If you have any questions regarding the connection of assistive listening devices contact LightSPEED for technical assistance at 1-800-732-8999. Connecting to A LightSPEED CX-50 Receiver A 1/4” phone-to-RCA cable is used.
12 L E S 6 0 0 O P E R AT I N G I N S T R U C T I O N S Tips on Using Classroom Amplification These helpful suggestions are provided to maximize the successful use of your new Classroom Amplification system: • Involve your students in this new process right from the beginning. When setting the volume, ask the students, “What is the correct volume?” (Each level will seem “louder” for them than you.
L E S 6 0 0 O P E R AT I N G I N S T R U C T I O N S 13 • Turn the body-pack Transmitter and/or the Hand-held Microphone OFF whenever leaving the classroom. • Recharge batteries each night. Operating time (actual usage) for the Transmitter when using the rechargeable batteries should be more than adequate for a typical school day. Your rechargeable batteries should last for a normal school year if properly cared for.
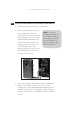
14 L E S 6 0 0 O P E R AT I N G I N S T R U C T I O N S Reference Guide to Controls Power Power RF RF 5 1 2 6 AF Aux1 Volume AF 7 3 8 Mic1 Volume Aux2 Volume Mic2 Volume 9 4 10 11 Charging 12 LES-600 T e c h n o l o g i e s 1 & 5 Power Indicator: When power is switched on, the red POWER light will come on. 2 & 6 Radio Frequency Indicator: The RF Indicator displays that the LES 600 is receiving a radio signal from the instructor’s body-pack Transmitter (or Handheld Microphone).
L E S 6 0 0 O P E R AT I N G I N S T R U C T I O N S 15 4 & 9 Power and Volume Switch for Microphones: Rotating the Mic 1 Volume control or Mic 2 Volume control clockwise past the first “click” turns the LES 600 on. Continuing to rotate this knob clockwise will increase the volume of the wireless microphone through the speaker system.
16 L E S 6 0 0 O P E R AT I N G I N S T R U C T I O N S 23 EQ Q Hi 22 21 24 Mid Mic 2 Antenna Mic 1 Antenna Low w 20 19 Aux 1 Input Aux 2 Input 25 18 17 16 15 Output 1 Mi Mixed Audio u Level Adjust Speaker Zone Switch Output 2 1 26 2 27 3 28 Level Adjust F1 14 Speaker Ouputs Transmitter Charging F2 F3 13 4 DC Power In 29 30 13 DC Power Connector: The Receiver/Amplifier requires a 15-volt, 2.4 Amp DC power supply. The center conductor is positive (+) polarity.
L E S 6 0 0 O P E R AT I N G I N S T R U C T I O N S 17 20 & 21 Aux1 and Aux2 Input Jacks: The AUXILIARY INPUT jack is used to connect to an external audio source (for example, a CD or tape player to add background music) to mix with your voice audio from the wireless microphone. AUX1 level is adjusted by using the AUX1 VOLUME on the front; AUX2 is adjusted by AUX2 VOLUME. 22 & 24 Antenna Connector: The chrome antenna is connected to the Antenna Connector on back of the Receiver/Amplifier.
18 L E S 6 0 0 O P E R AT I N G I N S T R U C T I O N S Trouble Shooting Guide Please go through this checklist before calling LightSPEED Technologies Service Department. Battery Check • Transmitters are charged via a jumper cable from the back of the Amplifier. Make sure plugs are secured, and in the proper jacks. • Confirm the CHARGING light located on the front panel of the amplifier is on while charging.
L E S 6 0 0 O P E R AT I N G I N S T R U C T I O N S 19 Low Volume • Check volume level on Receiver and adjust as necessary. • If volume is too low, check the “MT” adjustment inside the battery compartment of the belt-pack Transmitter. Clockwise adjustment of the “MT pot” will increase volume. Sound Fades In and Out (Drop Out) • Confirm Amplifier antenna is securely attached and visible from all areas of the room where the Transmitter is operating. • Test transmitter with fully charged batteries.
20 • L E S 6 0 0 O P E R AT I N G I N S T R U C T I O N S Check to confirm speaker wires are in the correct wire terminals on the back of the Receiver/Amplifier and confirm that the speaker switch for that speaker output is in the ON position. Black (or black stripe) to black terminal. White or gray wire to red terminal. Transmitter Care • Cleaning the microphone jack and battery contacts will help ensure that your system gives you years of reliable service.
L E S 6 0 0 O P E R AT I N G I N S T R U C T I O N S 21 FCC Notice This device complies with part 15 of the FCC Rules. Operation is subject to the following two conditions: (1) This device may not cause harmful interference, and (2) this device must accept any interference received, including interference that may cause undesired operation. Changes or modifications not expressly approved by the party responsible for compliance could void the user’s authority to operate this equipment.
22 L E S 6 0 0 O P E R AT I N G I N S T R U C T I O N S Warranty Five Year Limited Warranty to Original Purchaser LightSPEED 600-series Classroom Amplification Systems are guaranteed against malfunction due to defects in materials and workmanship for a period of five years, beginning at the date of the purchase invoice.