
User Manual


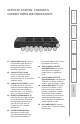

Table Of Contents
- U s e r M a n u a l
- SYSTEM COMPONENTS AND UNPACKING
- OPTIONAL COMPONENTS
- POD CONTROLS AND CONNECTIONS
- ACTIVATE STATION: CONTROLS, CONNECTIONS AND INDICATORS
- ACTIVATE STATION: CONTROLS, CONNECTIONS AND INDICATORS
- 2. PLUG IN THE ACTIVATE STATION
- 3. PLACE THE COMPONENTS IN THE ACTIVATE STATION
- 5. REGISTER ANY NEW ACTIVATE SYSTEM COMPONENTS
- 6. DOWNLOAD THE MOBILE APP
- 7. PAIR YOUR MOBILE DEVICE TO ACTIVATE STATION
- 8. SET UP THE FLEXMIKE + EARBUD
- 9. SET THE PODS OUT IN THE CLASSROOM
- 10. TEST GENERAL SYSTEM OPERATION
- 9. SETTING SYSTEM VOLUME LEVELS
- DAILY OPERATION INSTRUCTIONS
- ADDITIONAL OPERATION INFORMATION
- MAINTENANCE & TROUBLESHOOTING
- WARRANTY, SAFETY & SPECIFICATIONS

POD CONTROLS AND CONNECTIONS
1.
CHARGING INDICATOR: this
light t
urns red when charging,
green to i
ndicate charging
complete. D
uring operation, this
light w
ill turn green when the call
button is pre
ssed.
2.
POWER/LOW BATTERY
INDICATOR: this light blinks
blue w
hen powered on, turns
solid blue w
hen ready for
operation and
turns red when
the battery is low.
3.
POD NUMBER: the number will
light as a clear visual indicator
for the teacher to determine
which pod represents which
group nu
mber.
4.
VOLUME: up/down buttons
adjust the volume of the pod
speaker. T
he volume level (-5
to 5) will be shown in the LED
window.
5.
CALL BUTTON: students can
press this button to notify the
teacher they need assistance.
6.
LOUDSPEAKER:
the internal
l
oudspeaker distributes the
teacher’s voice.
7.
MICROPHONES: the internal
microphones that picks up the
student’s voice are located at
each end of the pod.
8.
HEADPHONE OUT: connect
headphones for private listening.
The pod speaker is muted when
headphones are c
onnected.
9.
USB CHARGING/POWER
INPUT: to charge pods in
addition to those in the charging
station, pl
ug the charging cable
from the Activate station or
other US
B power source into
this j
ack.
10.
POWER: press to power on.
Press and hold for 3 seconds to
power o
ff.
7
6
2
3
1
5
4
8
9
7
10
6.
Safety
&
Specifications
5.
Maintenance
&
T
r
oubleshooting
4.
Additional
Information
3.
DaiIy
Operation
2.
Initial
Set-up
1.
Overview