
User's Manual


8
1. Overview 2. Initial Set-up 3. DaiIy Operation
4. Additional
Information
5. Maintenance &
Troubleshooting
6. Safety &
Specifications
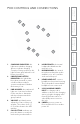
ACTIVATE STATION: CONTROLS,
CONNECTIONS AND INDICATORS
1. POWER/SLEEP: press to
place the Activate Station
and classroom audio system
into sleep mode. The Activate
Station will continue to charge
devices when in sleep mode.
2. POWER INDICATOR: the light
will turn blue when powered
on, amber when placed in sleep
mode.
3. LINK INDICATOR: this light is
solid green to indicate Activate
is connected to the audio system
and ready for operation. It will
blink green for several seconds
when initially plugged into
power.
4. MICROPHONE VOLUME:
adjusts the volume level of
the classroom speaker for all
connected microphones. The
indicator lights to the right
change to show volume level.
5. AUDIO INPUT VOLUME:
adjusts the level of multimedia
devices plugged into the 3.5mm
audio input ports.
6. AUDIO OUTPUT VOLUME:
adjusts the level of ALD or
recording devices plugged into
the 3.5mm audio output ports.
7. VOLUME LEVEL INDICATORS:
shows the volume level of the
last source that was adjusted
(Microphone, Input, Output).
The source level will be updated
once a new volume button is
pressed.
8. FLEXMIKE CHARGING SLOTS
(2): place your Flexmike(s) in
these slots for nightly charging.
9. POD CHARGING SLOTS (8):
place your pods in these slots for
nightly charging
10. CHARGING COVERS: covers
are included to protect unused
pod charging slots from dust
and debris
5
41
2
3
6
7
8 9 10