
User's Manual


19
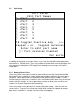
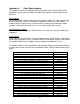
The Port SetupPort Setup menu allows users to change several options for each port. To
change the server port name, use the up and down arrow keys to move the highlight bar
to the desired server port, and press <ENTER><ENTER> to select that server port for change.
The user may enter the new server port name once the highlight bar changes to show
only the server port name. The new server port name overwrites the old server port
name; if the new server port name is shorter than the old name, then the user must
erase the remaining characters by pressing delete. Press the <ENTER><ENTER> key after typing
the new server port name to change the name, or press <ESC><ESC> to discard the change
and exit back to the Port SetupPort Setup menu.
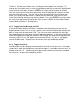
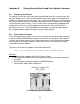
3.5.2 Toggle Inactive Message on LCD
If the ServerSwitch detects that there is no power from the attached servers on the
keyboard/mouse lines, or if no server is present, then the ServerSwitch will indicate that
port as inactive on the front panel LCD. The user may want to prevent this message
from appearing on the front panel to reduce possible confusion. In the port setup menu,
move the highlight bar to the port and press F8F8 to toggle the inactive message on or off.
If the message is on, a ++ will appear next to the port name; if it is off, a –– will appear
next to the port name. All ports have the inactive message enabled by default.
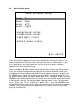
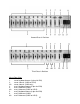
3.5.3 Toggle Auto Scan
Individual port may be selected or deselected for inclusion in the auto scan. In the port
setup menu, move the highlight bar to the port and press + to enable auto scan and – to
disable auto scan. A symbol next to the port name indicates that the port is enabled
for auto scan. All ports are enabled by default.