PRO-CUT ®60 (Single Phase) IM399-D May, 1999 PLASMA CUTTING SYSTEM For use with all code number machines thru 10394 RETURN TO MAIN INDEX Safety Depends on You Lincoln arc welding and cutting equipment is designed and built with safety in mind. However, your overall safety can be increased by proper installation ... and thoughtful operation on your part. DO NOT INSTALL, OPERATE OR REPAIR THIS EQUIPMENT WITHOUT READING THIS MANUAL AND THE SAFETY PRECAUTIONS CONTAINED THROUGHOUT.
WARNING PLASMA CUTTING or GOUGING can be hazardous. PROTECT YOURSELF AND OTHERS FROM POSSIBLE SERIOUS INJURY OR DEATH. KEEP CHILDREN AWAY. PACEMAKER WEARERS SHOULD CONSULT WITH THEIR DOCTOR BEFORE OPERATING. Read and understand the following safety highlights. For additional safety information it is strongly recommended that you purchase a copy of “Safety in Welding & Cutting - ANSI Standard Z49.1” from the American Welding Society, P.O. Box 351040, Miami, Florida 33135 or CSA Standard W117.2.
4.g. Sparks and spatter are thrown from the plasma arc. Wear safety glasses, ear protection and oil free protective garments such as leather gloves, heavy shirt, cuffless trousers, high shoes and a cap over your hair. Wear ear plugs when cutting or gouging out of position or in confined places. Always wear safety glasses with side shields when in a cutting or gouging area. PLASMA ARC can injure. 7.a. Keep your body away from nozzle and plasma arc. 7.b. Operate the pilot arc with caution.
zones où l’on pique le laitier. PRÉCAUTIONS DE SÛRETÉ 6. Eloigner les matériaux inflammables ou les recouvrir afin de prévenir tout risque d’incendie dû aux étincelles. Pour votre propre protection lire et observer toutes les instructions et les précautions de sûreté specifiques qui parraissent dans ce manuel aussi bien que les précautions de sûreté générales suivantes: 7. Quand on ne soude pas, poser la pince à une endroit isolé de la masse.
TABLE OF CONTENTS Page Safety Precautions .............................................................................................................2-4 Introductory Information .......................................................................................................6 Specifications.......................................................................................................................7 Product Description.........................................................................
Thank You for selecting a QUALITY product by Lincoln Electric. We want you to take pride in operating this Lincoln Electric Company product ••• as much pride as we have in bringing this product to you! Please Examine Carton and Equipment For Damage Immediately When this equipment is shipped, title passes to the purchaser upon receipt by the carrier. Consequently, Claims for material damaged in shipment must be made by the purchaser against the transportation company at the time the shipment is received.
SPECIFICATIONS Type 208/230/460/1/60 K1362-1 Handheld Torch with 25 ft. (7.6m) Cable K1362-2 Handheld Torch with 50 ft. (15.2m) Cable 230/460/1/60 K1361-1 Handheld Torch with 25 ft. (7.6m) Cable K1361-2 Handheld Torch with 50 ft. (15.2m) Cable 460/575/1/60 K1362-3 Handheld Torch with 25 ft. (7.6m) Cable K1362-4 Handheld Torch with 50 ft. (15.2m) Cable K1362-5 Robotic Torch with 50 ft. (15.2m) Cable K1362-6 Machine Torch with 50 ft. (15.2m) Cable K1362-7 Robotic Torch with 50 ft. (15.
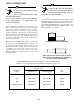
PRODUCT DESCRIPTION PREHEAT TEMPERATURE FOR PLASMA CUTTING The PRO-CUT® 60 is a constant current, single range, continuous control plasma cutting system. It provides excellent starting characteristics, cutting visibility and arc stability. The torch has a patented safety mechanism which insures that the consumables are in place before cutting or gouging. This is extremely important due to the high voltages involved.
INSTALLATION HIGH FREQUENCY INTERFERENCE PROTECTION SAFETY PRECAUTIONS ● ● ● ● Since the spark gap oscillator in the high frequency generator in the machine is similar to a radio transmitter, improper machine installation can result in radio and TV interference or problems with nearby electronic equipment. Read the safety precautions at the beginning of this Operator's Manual before proceeding.
INPUT CONNECTIONS WARNING WARNING ELECTRIC SHOCK can kill. • Make certain that the input power is electrically disconnected before removing the screws that hold the removable rear panel in place. ------------------------------------------------------------ ELECTRIC SHOCK can kill. • Disconnect input power before proceeding. • Have a qualified electrician make the input connections. • Be sure the voltage, phase and frequency of the input power is as specified on the machine nameplate.
(6.3 mm) NPT thread. Tighten the air fitting to prevent leakage but do not overtighten. The use of Teflon tape to seal the connection is recommended. CAUTION The frame of the machine must be grounded. A ground terminal marked with the symbol located at the left side of the input box is provided for this purpose. See the U.S. National Electrical Code for details on proper grounding methods. Follow other grounding instructions per the paragraph under “High Frequency Interference Protection”.
-The fan should start. • After the problem is found, reset the machine by pressing the “Safety Reset” button. (It is possible for electrical noise to trip the safety circuit on rare occasions. This should not be a regular occurrence.) -If the “Safety” LED is glowing, push the “Safety Reset” button. If there is no problem, the LED will go off. If there is a problem, refer to Step F and the Troubleshooting Guide. • If the machine does not reset or continues to trip, consult the Troubleshooting Section. D.
• The .035” (0.8mm) nozzle may be used for a fine cut. Larger nozzles will work and provide longer life at the expense of a larger cut. the output control is in the blue or red regions is in special tight corners. Always hold at least a 1/8” (3.2mm) standoff in those situations and use the S18817 shield cup. • Do not allow the torch cable or body to contact hot surface. • Set the current to the minimum necessary to make the cut.
In All Cases: • Do not drag the nozzle above the mid-range setting. Always hold a standoff of 1/8” above mid-range. • The PRO-CUT will cut with consumables that are worn considerably. Many competitive systems require replacement consumables long before a PRO-CUT system does. This is because of the solid state current regulation that the PRO-CUT has. Also, the safety reset circuit provides a means of extending nozzle life.
MAINTENANCE PROCEDURE TROUBLESHOOTING PROCEDURES ROUTINE MAINTENANCE WARNING WARNING ELECTRIC SHOCK CAN KILL. ELECTRIC SHOCK CAN KILL. BEFORE PERFORMING ANY MAINTENANCE THAT REQUIRES OPENING THE CASE OF THE POWER SOURCE: BEFORE PERFORMING ANY MAINTENANCE THAT REQUIRES OPENING THE CASE OF THE POWER SOURCE: • Disconnect input power to this machine at the Disconnect switch. • Disconnect input power to this machine at the Disconnect switch. • Do not touch electrically live parts or internal wiring.
SYMPTOM CHECK No LED’s light when the power switch is turned on. TORCH WILL NOT LIGHT The “MACHINE ON” LED is lit, but there is no response when the trigger is pulled. The air begins to flow, the “OUTPUT ON” LED lights for a brief period, but no arc is established. – 16 – 1. Check the input power to be sure it is on. 2. Check the power line fuses and machine connection. 3. Replace line switch. 1. Low air pressure results in a "no start" condition.
SYMPTOM CHECK The arc starts but sputters badly. 1. Check the torch consumables to be sure they are tight, not dirty or greasy and in good shape. Replace if necessary. 2. Check air supply for oil or a great deal of water. If there is oil or a great deal of water, the air must be filtered or the machine switched to nitrogen or bottled air. 3. Check the air pressure. The pressure must be 60 psi (413 kPa) minimum while air is flowing. The "Air Pressure" LED must be lit. The “THERMAL” LED is lit.
SYMPTOM The “SAFETY” LED is lit. CHECK 1. The machine will not operate. The machine senses that the nozzle is not in place, or the operator could be exposed to dangerous volt ages if the machine were allowed to operate. 2. Check the nozzle to be sure it is tightly in place. 3. Check the torch consumables to see if they are melted together or are simply touching each other. Tighten, clean or replace. See “Suggestion for Extra Utility from the Pro-Cut System”. 4.
PRO-CUT 60 STATUS LIGHTS OPERATING MODES STATUS LIGHTS CONDITION SUGGESTIONS MACHINE ON Should always be on when machine is on. Normal OUTPUT ON On when there is voltage potential at the torch (cutting or pilot). Normal OUTPUT ON is blinking alternately with AIR PRESSURE when power is first applied to machine. There is a problem with the microprocessor, replace the Control PC board. If OUTPUT ON is blinking alternately with FAULT, the pilot arc duty cycle is exceeded.
STATUS LIGHTS SAFETY CONDITION SUGGESTIONS It is possible that this light could turn on when power is first applied to machine. If machine can be reset, it is OK to continue operation. The nozzle is not in place. Securely fasten nozzle in place. While cutting or gouging if the voltage between the nozzle and the work is too high, it will put the machine into SAFETY. By pressing reset, the machine will be functional. This occurs most often when the consumables are wearing out.
PROCEDURE FOR REPLACING PC BOARDS WARNING ELECTRIC SHOCK CAN KILL. BEFORE PERFORMING ANY MAINTENANCE THAT REQUIRES OPENING THE CASE OF THE POWER SOURCE: • Disconnect input power to this machine at the Disconnect switch. • Do not touch electrically live parts or internal wiring. • Only qualified personnel should service this machine.
324D 77D 76D 212D 1 7 8 10 11 2 9 12 J25 J23 J19 BOARD OPTION PURGE/RUN SWITCH (PURGE IS OPEN) SWITCH 2 3 MAIN TRANSFORMER BOTTOM PRI. ELECTRICAL SYMBOLS PER E1537 GENERAL INFORMATION 460/575V 2 4 7 CENTER PRI. 6 8 4 24 VAC 115 VAC 24 VAC H6-C2 31-32 C1-32 32 H2 24VAC 24VAC 12VAC (PILOT LEAD AT THE TORCH).
INPUT SUPPLY CONNECTION DIAGRAM FOR DUAL VOLTAGE MACHINE. NOTE: LINK POSITIONS LINK 575 V., 60HZ. MACHINES ARE SHIPPED FROM FACTORY CONNECTED FOR 575 VOLTS GND. L1 L2 USE FERRULE #10 AWG ONLY HIGH VOLTAGE can kill LINK POSITIONS LINK 460 V., 60HZ. 1. CONNECT L1 & L2 INPUT SUPPLY LINES TO INPUT SIDE TORQUE TO 16 IN.-LBS. OF THE TERMINAL BLOCK AS SHOWN. 2. CONNECT TERMINAL MARKED NATIONAL ELECTRICAL CODE. 3. REMOVE HEX NUTS AND POSITION LINKS AS SHOWN. REPLACE AND TIGHTEN ALL HEX NUTS.
Do not operate with covers removed CUTTING TORCH CONNECTION DIAGRAM Disconnect input power before servicing TM FOR MAGNUM PCT 60 Do not touch electrically live parts Only qualified persons should install, PLASMA TORCH use or service this equipment AMPHENOL ADAPTER CONNECTOR 1. DISCONNECT INPUT POWER TO THE PRO-CUT AND TURN MACHINE POWER SWITCH OFF. GAS LINE 2. INSERT TORCH CABLE THROUGH CABLE BOOT. PILOT STRAIN RELIEF CLAMP TURN AND LOCK STRAIN RELIEF CLAMP ONTO LEAD BOLT. 3.
NOTES
LINCOLN ELECTRIC SERVICE MANUALS Now Available ...The following Service Manuals These are comprehensive single sources of information relative to Installation, Operation, Maintenance, Accessories, Theory of Operation, Replacement Parts, Electrical Diagrams and Extensive Troubleshooting. ORDER FROM: Technical Service Group-Customer Service Dept. Lincoln Electric Company 22801 St. Clair Ave. Cleveland, Ohio 44117-1199 All orders must be pre-paid (US Funds Only): Please allow up to 4 weeks for delivery.
Now Available...12th Edition The Procedure Handbook of Arc Welding New Lessons in Arc Welding This printing will go fast so don’t delay. Place your order now using the coupon below. Lessons, simply written, cover manipulatory techniques; machine and electrode characteristics; related subjects, such as distortion; and supplemental information on arc welding applications, speeds and costs. Practice materials, exercises, questions and answers are suggested for each lesson.
● Do not touch electrically live parts or WARNING Spanish AVISO DE PRECAUCION French ATTENTION German WARNUNG Portuguese ATENÇÃO ● Keep flammable materials away. ● Wear eye, ear and body protection. ● Mantenga el material combustible ● Protéjase los ojos, los oídos y el electrode with skin or wet clothing. ● Insulate yourself from work and ground. ● No toque las partes o los electrodos bajo carga con la piel o ropa mojada. ● Aislese del trabajo y de la tierra.
● Keep your head out of fumes. ● Use ventilation or exhaust to ● Turn power off before servicing. ● Do not operate with panel open or guards off. remove fumes from breathing zone. piración. ● Mantenga la cabeza fuera de los humos. Utilice ventilación o aspiración para gases. ● Desconectar el cable de ali- mentación de poder de la máquina antes de iniciar cualquier servicio. ● Débranchez le courant avant l’entre- tien. teur pour ôter les fumées des zones de travail.