
Operating Instructions

11
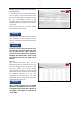
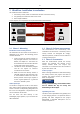
Entering the fleet data and assigning the
activity trackers
In this dialogue you can enter the fleet data.
You can assign a name for the vehicle. Then
enter the 4-digit code of the Activity Tracker
for the corresponding vehicle. In the
Workflow chapter, we present you with tools
and descriptions for integration into the set-
up process.
On the same page, you can enter further
information from the vehicle.
The entry of break times is mandatory for the
later evaluation of the workload. If break
times are unknown or not present, please fill
in a "0".
For the first vehicle, take the time to enter
the operating and break times correctly.
You can then use the "Copy" button to
process the next vehicle more quickly by
adopting the configuration. Errors in the
input will then cost twice as much time in
the end.
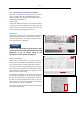
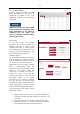
Fleet list
After entering the fleet data, you are
automatically taken to the fleet list. Here you
can make changes to your configuration and
add more vehicles. You can still change
project-specific information using the Edit
Information button. Use the arrow to expand
the detailed information to see the
connection to the sensor data. The "View
Dashboard" button automatically opens the
linked Power BI Dashboard
After creating the project, you can upload
the data via the gateway. As soon as data
is assigned to the project, this is shown via
the display „This project is connected to
sensor data“.
NOTICE
NOTICE
NOTICE