802.11g – 54Mbps Wireless Projector Server User Manual English LINDY No. 32500 www.lindy.
Wireless Projector Server User Manual Contents INTRODUCTION................................................................................................2 OVERVIEW ........................................................................................................4 USING THE WIRELESS PROJECTOR SERVER .............................................5 CONNECTING THE PROJECTOR SERVER ....................................................7 INSTALLING THE PLAYER UTILITY ......................................
Wireless Projector Server User Manual Introduction Thank you for purchasing the LINDY Wireless Projector Server. This innovative product allows you to connect to your projector for presentations via a Wireless LAN, Ethernet network or directly, using a built-in image viewer. The LINDY Wireless Projector Server features both an IEEE 802.11g 54Mbps WLAN and a 10/100Mb Ethernet LAN connection for maximum versatility.
Wireless Projector Server User Manual Specifications Network Standards: IEEE 802.11g (DSSS) 2.4GHz WLAN; IEEE 802.3u (100Base-TX), 802.3 (10Base-T) LAN Supports AP/Client/Ad-Hoc modes Security: 64/128-Bit WEP Encryption Channels: 11 (US, Canada), 13 (Europe), 14 (Japan) Range: Up to 25 metres (82 feet) Antenna: Built-in Interfaces VGA: 15 Way HD Female LAN: 100/100Mbps, RJ-45 USB 1.1: Type A Female General Internal Storage: 32MB Power: 5V, 2.
Wireless Projector Server User Manual Overview Rear Panel DC-IN RESET POWER VGA LAN USB Connect the power adapter here Resets the Projector Server to factory defaults Power ON/OFF switch Connect the projector’s video cable here Ethernet connection For connecting a USB keyboard or mouse LED Indicators USB WLAN LAN READY POWER Illuminates when a mouse or keyboard is connected Illuminates when the WLAN is active; blinks when there is traffic Lights up when the LAN port is connected; blinks when there is
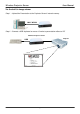
Wireless Projector Server User Manual Using the Wireless Projector Server There are three ways of using the Wireless Projector Server: Via a WLAN Via an Ethernet network Via the built-in image viewer Via a WLAN Wireless Projector Server Projector WLAN Via an Ethernet network LAN Projector Wireless Projector Server 5
Wireless Projector Server User Manual Via the built in image viewer Step 1 – Upload the Presentation to the Projector Server’s internal memory LAN / WLAN Step 2 – Connect a USB keyboard or mouse.
Wireless Projector Server User Manual Connecting the Projector Server Connecting to an Ethernet network: 1. Connect one end of a standard CAT5 or higher UTP Ethernet cable to the Projector Server’s LAN port. 2. Connect the other end of the Ethernet cable into a network hub or switch. (The maximum distance between the Projector Server and hub/switch is 100m) Connecting the power: 1. Plug the power adapter jack into the DC-IN socket on the Projector Server 2.
Wireless Projector Server User Manual Installing the Player Utility (Meeting Gateway) Each PC which needs to access the Projector Server (either wirelessly or over a wired LAN) needs to have the Projector Server’s utility, called Meeting Gateway, installed. Please follow the instructions below to install the software. Repeat for each required PC. 1. Insert the supplied utility CD into your CD-ROM drive 2. The setup utility should run automatically.
Wireless Projector Server User Manual 5. Select the component from the list and click Next: 6. Once the installation has completed click Finish: 7.
Wireless Projector Server User Manual Using the Player Utility Launch the Meeting Gateway Player Utility by double clicking the icon on the desktop. Note: Some personal firewall software may block connection of the Player Utility to the Projector Server. Disable the personal firewall software when using the Player Utility, or configure the firewall to allow connections on ports 4000, 4001 and 5900.
Wireless Projector Server User Manual Searching and Connecting to a Projector Server 1. Click Search to begin searching for available Projector Servers. (You can also type the Projector Servers IP address in the drop down box). If no Projector Servers are initially found, continue clicking Search until the dialog box below appears: 2. When a Projector Server has been found it will appear in the drop down list: 3. Click Connect to connect to the Projector server: 4.
Wireless Projector Server User Manual Uploading a presentation to the Projector Server The Projector Server provides the option of console based ‘PC-less’ presentations. The Player Utility’s UPLOAD function converts your PowerPoint presentations into a series of jpeg files which are then transferred to the Projector Server’s built-in memory. You will need either a USB mouse (with scroll wheel) or USB keyboard to conduct the Slide Show.
Wireless Projector Server User Manual Projector Server Console Operation Note: For Console operation you must use a mouse (with scroll wheel) or keyboard attached to the USB port at the rear of the Projector Server.
Wireless Projector Server User Manual Using the Projector Server Console There are three menus within the Projector Server Console: Console Screen, Slide Show Menu, and Slide Show Listing. All of these menus are made up of the following operating components: Bulletin Board: Used to display items for menu operations. “More” Indicator: Eight items can be displayed in the bulletin board area at one time.
Wireless Projector Server User Manual Keyboard/Mouse Operation Keyboard/Mouse operation within the Slide Show Menu and Show Listing Function Switch between Bulletin Board and Command Button Areas Move between items Select Keyboard Action Mouse Action TAB or Î Ï and Ð or Í ENTER Exit Right-click Scroll-wheel Forward/backward Left-click Press the Scroll-wheel ESC Keyboard/Mouse operation during Slide Show playback Function Next/Previous Slide Next Slide Return to Slide Show Listing
Wireless Projector Server User Manual The Slide Show Menu The Slide Show Menu allows for simple ‘PC-less’ presentations using just a USB keyboard or mouse. When a PowerPoint file is uploaded to the Projector Server, each slide is converted into a jpeg image and stored in the Projector Server’s internal memory.
Wireless Projector Server User Manual Slide Show Listing The Slide Show Listing screen serves as the control panel during slide show playback. The Bulletin Board displays all of the slides in the selected file. Each slide is numbered and is represented by its thumbnail view. You can move to a selected slide and start slide playback from that point by pressing the ENTER key or clicking the LEFT BUTTON on the mouse.
Wireless Projector Server User Manual Conducting a Slide Show There are three Slide Show modes: Slide Show Menu, Slide Show Listing and Slide Show Play. Their relationship is illustrated below: Press ESCAPE Select a file and activate Play Select a slide and activate Play Press ESCAPE Note: See Page 15 for keyboard and mouse controls 1. From the Slide Show Menu select the desired file. 2. Activate the Play button in the command bar to display slide by slide images. 3.
Wireless Projector Server User Manual The Administrator Utility The Projector Server’s Administrator Utility is a browser based utility which allows you to modify or change the password, network and encryption settings. To configure the network and encryption settings, some basic knowledge of Ethernet and TCP/IP protocols is essential. Accessing the Administrator Utility Note: It is recommended that you disable the proxy server in your browser.
Wireless Projector Server User Manual Using the Administrator Utility The Administrator Utility consists of four sections that allow you to configure different settings. After making changes you need to click on the Save button within each section and then click Re-boot to reboot the Projector Server and make the changes effective.
Wireless Projector Server User Manual Networking: You can modify various network settings here. Click Save and Re-boot to save changes. IP - The Projector Server’s IP address can be set here Mask – The Subnet Mask can be set here Gateway – The Gateway address can be input here Network Name (ESSID) – The network name (ESSID) allows other wireless devices to identify and connect to the Projector Server. If there are multiple Projector Servers nearby, a unique name for each is necessary.
Wireless Projector Server User Manual Troubleshooting Common Problems and Solutions Some personal firewall software may block connection of the Player Utility to the Projector Server. Disable the personal firewall software when using the Player Utility, or configure the firewall to allow connections on ports 4000, 4001 and 5900.
Wireless Projector Server Radio Frequency Energy, Certifications FCC Warning This equipment has been tested and found to comply with the limits for a Class B Digital device, pursuant to part 15 of the FCC Rules. These limits are designed to provide reasonable protection against harmful interference in a residential installation.