
User manual


User Manual English
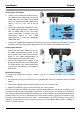
Operation
1. Starting with the Extender is in Standby mode (The Power button LED of the Transmitter and
Receiver will be lit red), press the Power button on the Transmitter, Receiver or remote control to turn
on both the Transmitter and the Receiver.
2. If the Transmitter’s HDMI Out display is on (Transmitter Power button LED is lit purple) and the
Receiver stays in Standby mode (Receiver Power button LED is lit red), press the Power button on
the Receiver or Transmitter to wake up the system and make a wireless connection automatically
between the Transmitter and Receiver.
3. During initialisation, the Power button LED will blink blue until the signal link between the Transmitter
and Receiver is established. It will take 15 - 20 seconds for the system to boot up successfully.
4. Ensure your HDMI display/projector has the correct HDMI Input selected, and is powered on.
5. Press the Source button on the Transmitter, Receiver or the Extender’s remote control to select the
input which you want to use.
6. If operation is normal, the Power button LED and Channel LED will light in solid blue on the
Transmitter and Receiver. Please refer to the following table containing descriptions of the various
LED indicator and OSD status and their meaning:
Item / Mode
Status Description
Power LED
(on RX)
Status LED
(on RX)
OSD Display
(on RX)
Standby
For power saving mode.
Static Red
Off
Initial Boot
up / Warm
up
It will take 15 - 20 seconds
for system boot up.
Blinking
Blue
Blinking
Searching
available
channels
Continuing search for
available channels. If the
Extender can’t establish a
link within 80secs of
initialization. (Note A & D)
Blinking
Blue
Blinking
Wireless
linked Mode
No input from selected
source (Note B)
Static Blue
Blinking
(Quickly)
Video format not
recognized (Note C)
Static Blue
Blinking
(Slowly)
Video format is recognized
Static Blue
Static Blue
-
Looping
4 level, looping