
User manual


User Manual English
Overview & Operation
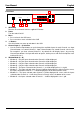
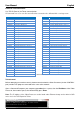
Front Panel
1. IR Window
Receives IR commands from the supplied IR Remote
2. Power
Turn the Switch On/Off
3. Menu
Press to launch the OSD menu
Press to make a menu selection in the OSD
4. -/+ Buttons
Use these buttons to move up and down in the OSD
5. Channel Input (1 – 4) Selection
Use the Channel Input buttons to cycle through the available Inputs for each Channel; use Input
Channel button 1 to control Channel 1, Input Channel button 2 to control Channel 2 and so on.
For example if you have selected Channel 1, by default this will display Input 1, by pressing
Channel Input button 1 the Input will switch to Input 2, further presses will move the Input to 3 to 4
and then back to 1.
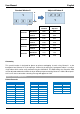
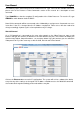
6. Window Mode (A – H)
Window A – Only the Input selected under Channel 1 will be displayed.
Window B – Only the Input selected under Channel 2 will be displayed.
Window C – Only the Input selected under Channel 3 will be displayed.
Window D – Only the Input selected under Channel 4 will be displayed.
Window E – The Inputs selected under Channels 1 – 4 will be displayed in a 2 x 2 grid.
Window F – The Input selected under Channel 4 will be displayed on the right half of the screen,
the Inputs selected for Channels 1 – 3 will be displayed in on the left half of the screen.
Window G – The Input selected under Channel 1 will be displayed full screen, with the Inputs
selected under Channels 2 – 4 will show (Picture in Picture) across the bottom of the screen.
Window H – the Inputs selected under Channels 1 – 4 will be displayed in a 4 x 1 grid.
POWER
MENU
-
+
CHANNEL
INPUT
1
2
3
4
G/
H/
WINDOW
A/1
B/2
C/3
D/4
E/
F/
1
2
3
5
6
4