
User manual


User Manual English
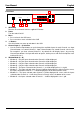
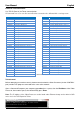
Rear Panel
1. HDMI In 1 – 4
Connect your HDMI sources devices such as PC, Blu-ray etc to these ports
2. HDMI Out
Connect your HDMI display to this port
3. Control
Connect to an Ethernet network for Telnet control
4. USB Service Only
Reserved for Factory use only
5. RS-232
For connection to a PC/Notebook or Remote Control Processing unit
6. DC 12V
Connect the supplied 12V power supply here
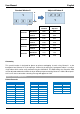
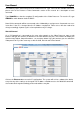
Remote Control
1. Power
Turn the Switch on/off
2. Info
Press to display the Switch’s current output setting
3. Window Mode (A – H)
Provides the same function as the front panel buttons
4. Channel Input (1 – 4)
Provides the same function as the front panel buttons
5. Mute
Press to Mute audio playback
6. Navigation/Selection Buttons
Press to navigate the OSD and make selections
7. Menu
Press to enter the OSD menu
8. Exit
Press to exit the OSD menu
9. FAV. (1 – 4)
Recalls the settings saved to the corresponding save location
10. Audio Selection
Press to select audio from Inputs 1 – 4
11. Fade In/Out
Press this button to switch the Fade-in-out function on/off
12. Chromakey*
Press to enter Chroma mode, where CH1 is the background and CH2 is the top image
13. Mirror*
Press to display a mirror image of the selected input
14. Rotate*
Press to rotate the input: 90
0
Right, 90
0
Left and 180
0
(Flip)
*These features are only available in Window modes A – D
Input
INFO
POWER
WA
WE
CH 1
WF
CH 2
WG
CH 3
WH
CH 4
Mute
OK
Exit
Menu
Audio 1
Fade In/Out
FAV.1
Audio 2
Chromakey
FAV.2
Audio 3
Mirror
FAV.3
FAV.4
Rotation
Audio 4
WB
WC
WD
10
9
1
2
3
4
5
6
8
7
11
12
13
14
HDMI IN
1
2
3
4
HDMI OUT
CONTROL
RS232
DC 12V
USB
SERVICE
ONLY
2
3
4
5
6
1