
User manual


User Manual English
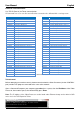
Window G – The Input selected under Channel 1 will be displayed full
screen, with the Inputs selected under Channels 2 – 4 will show (Picture
in Picture) across the bottom of the screen.
Window H – the Inputs selected under Channels 1 – 4 will be displayed in
a 4 x 1 grid.
Multi-Window Adjustment
In each of the multi-window options (E-H) above it is possible to adjust the size and position of each
window, and even to switch windows off. To begin select the window option which is closest to your
desired layout and then enter the menu using the remote control. Now select Windows Setup and you
will be presented with the choice to adjust each Channel 1-4 and the option to Store or Recall Favourites
configurations.
To adjust the layout begin by selecting a channel, by highlighting one of the channels and pressing OK.
You can then adjust the vertical and horizontal size and position of the window using the Size and
Position menu options, whilst you can turn the channel on or off using the Image Output menu.
Adjustments can be made in single pixel, ten pixel and one hundred pixel blocks giving you absolute
control of the window; if you make an error you can quickly return to the default value for the window by
selecting Window Reset.
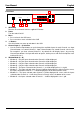
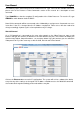
As an example using a 1080p display starting with Window E selected, by adjusting the size of channels
1 and 3 to 1920 pixels wide by 540 pixels high and turning off the output of channels 2 and 4 you would
achieve the layout below.
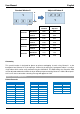
When adjusting the position of a channel the horizontal position is from left to right of the display, starting
from the left edge of the channel. The vertical position is from top to bottom of the display, starting at the
top edge of the channel. The following example shows the default layout for each channel in Window G
and an adjusted version made by changing the values of each channel.
Standard Window E
Adjusted Window E