USB 3.0 KVM & Data Transfer Cable User Manual Benutzerhandbuch Manuel Utilisateur Manuale English Deutsch Français Italiano No. 42624 www.lindy.
User Manual English Introduction Thank you for purchasing the LINDY USB 3.0 KVM & Data Transfer Cable. This cable gives you the ability to share Video, Keyboards & Mouse resources and transfer files between two Windows® computers, via USB 3.0. Use Drag & Drop or Copy & Paste functionality via an easy to use GUI to quickly move pictures, music, video and other files between computers at speeds of up to 5Gbps. Control one computer from the other by simply moving your cursor from one screen to the other.
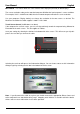
User Manual English Installation !!! IMPORTANT!!! DO NOT connect the LINDY USB 3.0 KVM & Data Transfer Cable to either computer until after installing the included software and restarting both machines. Installing the device driver from the Software Disc allows your computers to recognize the LINDY USB 3.0 KVM & Data Transfer Cable. Please check your OS and refer to the appropriate installation procedure below to begin installing the device drivers. Windows 8.
User Manual English Click “Continue Anyway” when the Microsoft Software warning dialogue box appears, then, click “Finish” to complete the Hardware Wizard. A Pop Up will appear on both computers. When this completes the LINDY USB 3.0 KVM & Data Transfer Cable is ready for use. Uninstalling the Drivers To uninstall the drivers, go to the Windows Control Panel and use the ‘Uninstall a Program’ feature. • Locate the “MCT Dual System Swap (D.S.S.) 13.xx. Xxxx. 0186” (driver version may vary).
User Manual English Selecting the next icon on the first dialogue screen will open the ‘Display Share’ dialogue. Here you can set the position of the second computer display; Left, Right, Above or Below. Selecting the next icon will open the next ‘Display Share’ dialogue. Here you can select the display mode (Extended or Mirror Mode) Extended Mode - This feature allows you to use the connected computer's screen as an extended display.
User Manual English Mirror Mode - This feature allows the same contents to be displayed (mirrored) on both displays. The screen resolution setting on the attached computer will follow the lead computer’s screen resolution. For example, if this is 1024x768 at 32bit, then the mirrored computer will retain the same resolution. Use your computers ‘Display Setting’s to change the resolution of the two screens as desired.
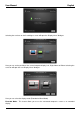
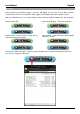
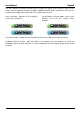
User Manual English Operation After finishing the Connection Setup, a new icon will appear in the System Tray of both machines. Selecting this launches the Control Bar, which appears at the bottom right corner of both screens. With the Control Bar you can control Display & Data Sharing Settings between the two computers. Default Control Bar Stop sharing displays – Select the Stop Icon. Display Share - Select the Blue / Green icon to view and control that computer.
User Manual English The GUI supports File/Folder and Data transfer through the generic Drag & Drop or Copy & Paste actions from the opposite computer at 5Gbps. Clipboard Sharing allows selected texts from the first computer to be simply and easily pasted on the second, and vice versa. Close Control Bar – Select the ‘X’ in the top right corner of the Control Bar. Reset Positions & Display Mode – Reset screen positions and re-run the ‘Display Share’ dialogue.
User Manual English Troubleshooting Known Issues • • Direct 3D is not supported under XP/Vista Some display utility and drivers that shipped with certain AGP and built-in display adapters may prevent you setting the 2nd display as the main screen when display sharing General Recommendation if you have a problem • • • • • • Check your USB port it active the device is plugged in correctly to the host system Unplug the USB 3.
Benutzerhandbuch Deutsch Einführung Vielen Dank für den Kauf des LINDY USB 3.0 Datentransfer- & KVM-Kabels. Dieses Kabel ermöglicht es Ihnen, mit einem Monitor, einer Tastatur und einer Maus an zwei Windows® Computern zu arbeiten und Daten via USB 3.0 auszutauschen.
Benutzerhandbuch Deutsch Installation ! ACHTUNG ! Verbinden Sie das LINDY USB 3.0 Datentransfer- & KVM-Kabel erst mit einem Computer, nachdem Sie die beiliegende Software installiert haben und beide Computer neu gestartet wurden. Durch die Installation der Gerätetreiber von der Software-CD können die Computer das LINDY USB 3.0 Datentransfer- & KVM-Kabel erkennen. Unten finden Sie das korrekte Installationsprozedere für Ihr Betriebssystem. Windows 7 Vergewissern Sie sich, dass das LINDY USB 3.
Benutzerhandbuch Deutsch Windows XP Wenn der Hardwareassistent erscheint und eine Auswahl anbietet, klicken Sie auf “Nein, diesmal nicht” und “Weiter”. Klicken Sie auf “Installation fortsetzen” wenn die Microsoft Softwarewarnung erscheint und danach auf “Fertigstellen” zum Beenden des Hardwareassistenten. Dann erscheint ein Popup-Fenster auf beiden Computern. Wenn dieses schließt, kann das LINDY USB 3.0 Datentransfer- & KVM-Kabel verwendet werden.
Benutzerhandbuch Deutsch Wenn Sie das folgende Icon im ersten Dialog auswählen wird der Dialog „Display Share“ geöffnet. Hier können Sie die Position des zweiten Computerdisplays einstellen: links, rechts, oben oder unten. Wenn sie das nächste Icon auswählen öffnet sich das nächste „Display Share“ Dialogfenster. Hier können Sie den Displaymodus auswählen (erweitert oder gespiegelt). Erweiterter Modus: Erlaubt die Nutzung des angeschlossenen Bildschirms als erweitertes Display.
Benutzerhandbuch Deutsch Gespiegelter Modus: Erlaubt es, dieselben Inhalte auf beiden Displays anzuzeigen (Spiegelung). Die Bildschirmauflösung auf dem gespiegelten Display wird vom ersten Computer übernommen. Sind es z.B. 1024x768 bei 32Bit, so wird diese Einstellung beim gespiegelten Display beibehalten. In den Anzeigeeinstellungen können Sie die Auflösung beider Bildschirme nach Belieben ändern. Die maximal unterstützte Auflösung beträgt 2048 x 1152 / 32Bit.
Benutzerhandbuch Deutsch Betrieb Nach dem Verbindungsaufbau sehen Sie ein neues Icon in der Taskleiste beider Computer. Wenn Sie darauf klicken, erscheint die Steuerungsleiste rechts unten auf beiden Bildschirmen. Mit dieser können Sie die Einstellungen des Displays und des Datenaustauschs beider Computer steuern. Steuerungsleiste – Standardeinstellung: Auswahl des Icons „Stop“ um die Nutzung zweier Bildschirme zu beenden: Teilen des Displays: Wählen Sie das grüne bzw.
Benutzerhandbuch Deutsch Die grafische Benutzeroberfläche unterstützt den Austausch von Dateien/Ordnern und Daten von einem zum anderen Computer durch Drag-and-Drop oder Copy & Paste mit Geschwindigkeiten bis zu 5Gbit/s. Die gemeinsame Nutzung der Zwischenablage erlaubt es, ausgewählte Texte von einem zum anderen Computer zu kopieren.
Benutzerhandbuch Deutsch Fehlersuche Bekannte Probleme • • Unter Windows XP/Vista wird “Direct 3D” nicht unterstützt Grafikkartentreiber und Dienstprogramme einzelner AGPs und eingebauter Displayadapter können die Einrichtung eines zweiten Displays als Hauptbildschirm verhindern Allgemeine Empfehlungen bei Problemen • • • • • • Prüfen Sie, ob Ihr USB Port aktiv ist und ob das USB 3.0 Datentransfer- & KVM-Kabel korrekt an den USB Host angeschlossen ist Entfernen Sie das USB 3.
Manuel Utilisateur Français Introduction Merci d’avoir choisi le câble KVM & Data Transfer USB 3.0 LINDY. Ce câble vous donne la possibilité de partager la vidéo, claviers & souris et de transférer des fichiers entre deux ordinateurs Windows®, via USB 3.0.
Manuel Utilisateur Français Installation !!! IMPORTANT!!! NE PAS connecter le câble KVM & Data Transfer USB 3.0 LINDY à l’un des ordinateurs avant d’avoir installé le logiciel fourni et redémarrer les deux machines. L’installation du pilote à partir du CD-ROM fourni permet aux ordinateurs de reconnaître le câble KVM & Data Transfer USB 3.0 LINDY. Merci de vérifier votre version d’OS et de vous référez à la procédure d’installation appropriée ci-dessous pour démarrer l’installation des pilotes. Windows 8.
Manuel Utilisateur Français Windows XP La fenêtre de dialogue d’assistant d’installation matériel s’affichera, sélectionnez “No, not this time” (pas cette fois-ci) et cliquez sur “Next” pour continuer. Cliquez sur “Continue Anyway” (continuer) lorsque la fenêtre d’avertissement Microsoft apparait, cliquez ensuite sur “Finish” (terminer) pour compléter l’assistant d’installation. Un Pop-Up apparaitra sur les deux ordinateurs. Une fois cette étape terminée le câble KVM & Data Transfer USB 3.
Manuel Utilisateur Français En sélectionnant l’icône ‘’Suivant’’ sur le premier écran de dialogue, la fenêtre de dialogue ‘Display Share’ s’ouvrira. Ici vous pouvez paramétrer la position d’affichage du second ordinateur; gauche, droite, au-dessus ou en-dessous. Sélectionnez l’icône ‘’Suivant’’ pour ouvrir la fenêtre de dialogue ‘Display Share’ suivante.
Manuel Utilisateur Français Mirror Mode – Cette fonction permet d’afficher le même contenu sur les deux écrans (miroir ou clone). La résolution de l’écran de l’ordinateur raccordé sera identique à la résolution de l’écran de l’ordinateur principal. Par exemple, si la résolution est en 1024x768 en 32bit, alors l’ordinateur cloné aura la même résolution. Utilisez les paramètres de résolution d’écran de votre ordinateur pour changer la résolution des deux écrans comme souhaité.
Manuel Utilisateur Français Utilisation Après avoir configure la connexion, une nouvelle icône apparaitra dans la barre des tâches des deux machines. En sélectionnant cette icône, la barre de contrôle se lancera et s’affichera dans le coin inférieur droit des deux écrans. Avec la barre de contrôle, vous pouvez contrôler l’affichage & le partage des données entre les deux ordinateurs.
Manuel Utilisateur Français La GUI prend en charge le transfert de fichier/répertoire et de données via les fonctions génériques Glisser & Déposer ou Copier & Coller à partir de l’ordinateur opposé à jusqu’à 5Gbit/s. Le partage du contenu du presse-papier permet au texte sélectionné sur le premier ordinateur d’être simplement et facilement coller sur le second, et vice versa. Fermeture barre de contrôle – Sélectionnez la croix ‘X’ dans le coin supérieur droit de la barre de contrôle.
Manuel Utilisateur Français Dépannage Problèmes connus • • Direct 3D n’est pas pris en charge sous XP/Vista Certains utilitaires d’affichage et pilotes fournis avec certaines cartes graphiques et certains Chipsets graphiques intégrés peuvent vous empêcher de paramétrer le second écran comme écran principal lors de partage d’affichage.
Manuel Utilisateur Français Introduzione Grazie per aver acquistato il cavo USB 3.0 KVM & Data transfer. Questo cavo vi permetterà di condividere i segnali video, di tastiere e mouse e trasferire i file tra due computer Windows®, tramite un cavo USB 3.0. Sarà possibile utilizzare le funzionalità Drag & Drop, copia ed incolla interagendo con l'interfaccia grafica per un veloce utilizzo di immagini, musica e video con una velocità di 5Gbps.
Manuel Utilisateur Français Installare il driver fornito, il quale consentirà ai computer di riconoscere il cavo USB 3.0 KVM & Data Transfer. Si prega di controllare il sistema operativo e fare riferimento alla procedura di installazione appropriata per iniziare a installare i driver di periferica. Windows 8.1 / 8 / 7 / XP Questa sezione descrive la procedura di installazione del driver su un computer con sistema operativo Windows 7. Assicurarsi che il cavo USB 3.
Manuel Utilisateur Français Disinstallazione dei Driver Per disinstallare il driver, andare sul pannello di controllo Windows e usare "programmi e funzionalità". • Cercare “MCT Dual System Swap (D.S.S.) 13.xx. Xxxx. 0186” (la versione del driver potrebbe cambiare). • Clicca “Disinstalla”. • Scollegare il cavo USB 3.0 KVM & Data Transfer e cliccare “OK” per continuare. • Selezionare “Si, voglio riavviare il computer ora” e cliccare “Fine” per concludere. disinstallazione è stata completata.
Manuel Utilisateur Français Selezionando l'icona avanti, sulla prima finestra di dialogo, comparirà la seguente finestra. Qui sarà possibile impostare la posizione del monitor del secondo; Sinistra, Destra, Sopra o Sotto. Selezionando la successiva icona, apparirà la finestra di dialogo. Ora si potrà selezionare la modalità di visualizzazione (modalità Estesa o Specchio) Modalità estesa – Questa modalità consente di utilizzare i monitor dei computer connessi come un'estensione di uno.
Manuel Utilisateur Français Salvare le impostazioni selezionando la casella in basso a sinistra dello schermo. Questo permetterà di salvare le impostazioni la prossima volta che si collega il cavo. Selezionando la seguente icona comparirà una finestra di dialogo. E' possibile non visualizzare più questa finestra selezionando la casella in basso a sinistra dello schermo.
Manuel Utilisateur Français Funzionamento Una volta terminate le impostazioni di connessione, comparirà una nuova icona nella barra delle applicazioni di entrambi i computer. Selezionando questa icona verrà lanciata una barra di controllo, che apparirà in basso a destra di entrambi i monitor. Con la barra di controllo è possibile controllare i monitor e le impostazioni di condivisione dei dati tra i due computer.
Manuel Utilisateur Français L'interfaccia grafica supporta file/cartelle e il trasferimento dati tramite Drag & Drop generico o Copia & Incolla a 5Gbps. Il Clipboard Sharing consente di selezionare testi sul primo computer ed di incollarli sul secondo e viceversa.
Manuale Restart Barra di controllo – Fare doppio click sull'icona barra di controllo applicazioni per riavviare. Italiano posta sulla barra delle Condivisione di tastiera e mouse – Spostare il cursore del mouse tra i due computer per attivare l'utilizzo della tastiera su un altro computer. Utilizzare la tastiera del primo computer per digitare sul secondo.
CE/FCC Statement CE Certification This equipment complies with the requirements relating to Electromagnetic Compatibility Standards EN55022/EN55024 and the further standards cited therein. It must be used with shielded cables only. It has been manufactured under the scope of RoHS compliance. CE Konformitätserklärung Dieses Produkt entspricht den einschlägigen EMV Richtlinien der EU für IT-Equipment und darf nur zusammen mit abgeschirmten Kabeln verwendet werden.
Recycling Information WEEE (Waste of Electrical and Electronic Equipment), Recycling of Electronic Products Europe, United Kingdom In 2006 the European Union introduced regulations (WEEE) for the collection and recycling of all waste electrical and electronic equipment. It is no longer allowable to simply throw away electrical and electronic equipment. Instead, these products must enter the recycling process.