
User manual


User Manual English
Installation
!!! IMPORTANT!!!
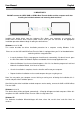
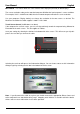
DO NOT connect the LINDY USB 3.0 KVM & Data Transfer Cable to either computer until after
installing the included software and restarting both machines.
Installing the device driver from the Software Disc allows your computers to recognize the
LINDY USB 3.0 KVM & Data Transfer Cable. Please check your OS and refer to the appropriate
installation procedure below to begin installing the device drivers.
Windows 8.1 / 8 / 7 / XP
This section describes the driver installation procedure for a computer running Windows 7 OS.
Please ensure the USB 3.0 KVM & Data Transfer Cable is unplugged from your PC or Notebook before
continuing with the setup procedure.
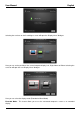
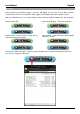
• Insert the Software CD; the setup program should launch automatically, if it doesn’t launch, open
the Disc Drive folder via Windows Explorer and double click the Setup Application Icon.
• When the Windows User Account Control appears, click “Yes” to allow the program to install and
follow the Installation Wizard, click “Next” to continue.
• Once the installation is complete, close the Installer and Restart your computer.
• Repeat the driver installation on the second computer that you are going to use.
Note: You may notice your computer screens flashing or turning on & off during the installation; this is
normal and part of the installation process.
After finishing the driver installation on both computers and restarting, connect the USB 3.0 KVM & Data
Transfer Cable.
Windows 8.1 / 8 / 7
The device driver will be configured automatically. A Pop Up will appear on both computers. When this
completes the USB 3.0 KVM & Data Transfer Cable is ready to be used.
Windows XP
The Hardware Installation Wizard dialogue will show, select “No, not this time” and click “Next” to
continue.