USB MiniCam LINDY No’s 42803 & 42804 www.lindy.
Introduction Thank you for purchasing the LINDY USB MiniCam. This MiniCam is a high-resolution camera with a builtin microphone. A single USB cable connects the camera to your computer for audio and video, so there’s no need for a separate untidy microphone cable.
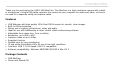
Product Information Snapshot button Lens Microphone White LED on/off button Infra red LEDs White LEDs
Installation Important! You must install the drivers BEFORE connecting the camera to your PC. 1. Insert the driver CD, the installation application will automatically launch. 2. Click Install and follow the on-screen instructions to install the MiniCam driver software. 3. When the installation software has installed, connect the MiniCam to a USB port on your PC. 4. Windows will automatically detect the MiniCam and display a Found New Hardware Wizard window.
Configuration Initial Operation To use the MiniCam, you must launch the AMCap application. Select: Start > All Programs > USB PC Camera Plus > AMCap The AMCap window will open and display the output from the MiniCam. Rotate the lens to focus. If you don’t see anything in the AMCap window, ensure that ‘USB PC Camera with Mic’ is selected in the Devices drop down menu. The lower part of the drop-down menu allows you to select the audio input device. Ensure that ‘USB Camera’ is ticked.
Configuration Setting up the microphone For correct microphone operation you must follow the procedure below. Open the windows Sound Recorder application: Start > Control Panel > Sounds and Audio Devices 1. Click on the Audio tab; make sure that USB Camera is set as the default sound recording device. 2. Click the Volume button. In the window that appears, you can raise the volume control for the MiniCam’s built-in microphone. For most purposes a setting of about ¾ of the way up will suffice. 3.
Configuration 4. In the AMCap program’s Capture menu, ensure that Capture Audio is ticked. 5. Open the Options > Audio Capture Filter… menu. In the Properties window, check that Microphone is selected from the Pin Line drop-down list, and then click OK.
Configuration Video Capture Pin To change video compression, output size and frame rate settings, select Video Capture Pin… from the Options menu. Here you can increase or decrease the video capture frame rate (the higher the frame rate, the smoother the captured video) Choose the display output size from this drop-down menu Select the Color Space / Compression setting here, you can choose from ‘RGB 24’ or ‘I420’.
Configuration Video Capture Filter The Video Capture Filter menus allow you to change various settings and apply special effects. To open, select Video Capture Filter... from the Options menu and click the Settings tab. The Image Control section allows you to make various changes to the image settings; please experiment with the controls to see the effect they make.
Configuration Click the Effects tab to view and change the special effects settings. Select different video effects here. You can choose a frame to apply to your captured video. You can use your own customised frame. It must be a VGA size 24 Bit bitmap. Select ‘Auto Change’ to automatically cycle through the various Effects and Frames.
Configuration Click the Zoom tab to use the digital zoom and pan controls.
Recording & Capture Creating a Capture File Before capturing video and audio, you should create a capture file. 1. Select File > Set Capture File... Choose a name and location for the capture file. Be sure to add the .avi extension to the file name. As an example you could name the file: Capture.avi 2. Choose File > Allocate File Space... to set aside the amount of disk space for the capture file. 3.
Recording & Capture Capturing Video & Audio 1. If you want to capture audio as well as video, ensure that Capture Audio is ticked under the Capture menu. 2. Select Capture > Start Capture and click OK or press the Enter key. 3. To stop capture, press the Esc key or click Capture > Stop Capture. 4. The captured file can be accessed from the location you have previously selected. Double-click the file to launch Windows Media Player to view the captured video.
Recording & Capture Snapshot Function 1. Press the button on the side of the MiniCam to take a photo snapshot. 2. A new window will appear showing the photo. Click Press this button to take a snapshot on the Rotate menus to rotate the image in various ways; select File > Save As... to save the image.
Recording & Capture Using the MiniCam with NetMeeting Note: For more information about installing and using NetMeeting on your PC, please use Windows Help. Click to place a call to the computer identified in the IP address field. Type the IP address of the computer you want to contact in this box. From the NetMeeting menu bar, select Tools > Options and then click the Video tab. Ensure that the MiniCam is selected here.
WEEE (Waste of Electrical and Electronic Equipment), Recycling of Electronic Products United Kingdom In 2006 the European Union introduced regulations (WEEE) for the collection and recycling of all waste electrical and electronic equipment. It is no longer allowable to simply throw away electrical and electronic equipment. Instead, these products must enter the recycling process. Each individual EU member state has implemented the WEEE regulations into national law in slightly different ways.
CE Statement This device complies with the European Regulations for Electromagnetic Compatibility (EMC) of the European Union and it is equipped with the CE mark. This unit has to be used with high quality shielded connection cables. Only if these high quality shielded cables are used can it be sure that the EMC compatibility is not adversely influenced.