
Computer Drive User Manual

USB 2.0 Hard Drive Enclosure
Installation Guide English
Installationsanleitung Deutsch
Manuel Utilisateur Français
Manuale d’uso Italiano
For 2.5” HDD’s of up to 9.5mm in height only!
LINDY No. 42907
www.LINDY.com
© LINDY ELECTRONICS LIMITED & LINDY-ELEKTRONIK GMBH - FIRST EDITION (NOV 2005)
INSTALLATION
ENGLISH
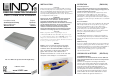
Remove the plastic end cover (with the USB connection)
from the housing. If present, set the jumper on your hard
drive to the MASTER setting. Attach the drive to the 44-way
connector as illustrated below. Slide the drive into the
housing carefully and tighten the two screws. Be careful not
to overtighten the small screws!
Deutsch
Entfernen Sie die Plastikkappe mit dem integrierten
USB Anschluss vom Gehäuse. Jumpern Sie Ihre
Festplatte als MASTER sofern die Platte diese
Möglichkeit anbietet. Stecken Sie die Platte vorsichtig
auf die 44polige Steckleiste wie in untenstehendem
Bild und schieben Sie beides vorsichtig in das
Gehäuse. Verwenden Sie bitte den beiliegenden
kleinen Schraubendreher und schrauben die kleinen
Schrauben vorsichtig ein ohne sie zu überdrehen!
Français
Retirez la partie arrière en plastique avec le
connecteur USB
du reste du boîtier
. Si présent, réglez
le cavalier du disque dur en mode MASTER. Connectez le
disque au connecteur 44 broches comme illustré ci-
dessous. Insérez doucement le disque dur dans le boîtier et
ne forcez pas sur les petites vis!
Italiano
Rimuovete la copertura in plastica più grande
dall’astuccio. Se presente, impostate il Jumper
dell’hard disk in modalità MASTER. Collegate il
drive al connettore a 44 poli come indicato in
figura. Fate scivolare con cautela il disco
all’interno dell’astuccio e serrate le due viti. Fate
attenzione a non stringere eccessivamente!
OPERATION (ENGLISH)
Power Requirement
Do not connect this enclosure to a non self-powered
USB hub or port - they cannot supply enough power to
operate the hard drive properly!
Modern 2.5” drives with low power requirements can be
powered from a single USB port only. This product is
supplied with a special dual USB connector cable. If the
drive draws a current greater than 0.5A from the USB port,
or operation is erratic, then you should use the second USB
connector.
Driver Installation
Modern operating systems such as Windows XP, 2000 and
ME already include the necessary drivers (as long as the
drivers for your USB 2.0 ports are up to date!). If the
external hard drive is recognized correctly as a USB 2.0
device then please do not install any drivers again!
Otherwise, obtain updated drivers for your USB controller
from your computer manufacturer’s web site.
LED Indicator
The LED indicator illuminates red when the hard drive is
connected and powered up. The LED flashes during data
transfer. Do not disconnect the enclosure while the LED is
flashing!
HDD Partitioning
If you use a brand new hard drive it may not be partitioned
and your operating system will not show the drive. Use the
partitioning program from your operating system (FDISK or
similar). Find Information on this topic from the HELP
section of your operating system, or get help from an
experienced technician.
ANSCHLUSS & BETRIEB (DEUTSCH)
STROMVERSORGUNG
Schließen Sie das Gehäuse NICHT an einen USB Hub
ohne eigenes Netzteil oder an einen non-self-powered
USB Port an!
Moderne 2,5“ Festplatten mit niedrigen Strombedarf
können in den meisten Fällen über einen einzigen USB-
Port mit Strom versorgt werden. Dieses Produkt wird mit
einem besonderen DUAL-USB-Kabel geliefert. Sie
benötigen den zweiten flachen USB-Stecker nur, wenn
Ihre Festplatte einen höheren Strombedarf als 0,5A hat
oder falls die Platte nicht korrekt funktioniert. In diesem
Falle schließen Sie den zweiten USB-Stecker an einen
weiteren USB-Port des gleichen Rechners an!
For Home and Office Use
Tested to Comply with FCC Standards