IPower Control 2x6 User Guide English LINDY No. 32656 www.lindy.co.
IPower 2x6 User Guide Introduction Thank you for purchasing the LINDY IPower Control 2x6 Switch. This Switch allows you to control the supply of power for up to 12 devices via a TCP/IP network. The Switch access is password protected through a web interface connected by serial or SNMP and is powered by two separate 16A phases, each powering 6 IEC C14 sockets.
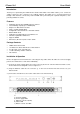
IPower 2x6 f) g) h) i) User Guide Temperature connector RS232 connector 2 x Power Socket (IEC C20, max. 16A) 2 x 6 Power Ports (IEC C13, max.
IPower 2x6 User Guide Configuration - Power Ports Label: A name with a maximum of 15 characters can be entered here for each Power Port. After power-up switch: The Power Port’s switching state after a power-on can be defined as on, off, or remember last state. If switching on after power-up, wait...: A switching delay of a Power Port can be defined with a wait of up to 8191 seconds. Combine A-B Ports: The Power Ports of Source Bank A and its equivalent of Bank B (Example A2 B2) can be switch synchronized.
IPower 2x6 User Guide Configuration - HTTP HTTP Port: You can manually enter the HTTP port number, if necessary. Numbers range from 1 ... 65534 (standard: 80). To get access to the switch, you have to enter the port number behind the IP address: http://192.168.0.2:1720 Require HTTP Password: Password protected access can be activated here. In this case, a user and an admin password have to be defined. Passwords have maximum lengths of 15 characters.
IPower 2x6 User Guide Configuration - Syslog Enable Syslog: You can select to have the syslog enabled or disabled. Syslog Server IP: If you enable the syslog you will need to enter the IP address of the Syslog server. Syslog Port: If syslog is enabled you will need to enter the port number that your Syslog server uses to receive syslog information. IP Access Control List The IP Access Control List (IP ACL) acts as an IP filter for your switch.
IPower 2x6 User Guide Switching via the push buttons The front of the Switch has two buttons, “select” and “ok”. Select: Pushing “select” once make the LED of Power Port 1 start to blink, which means that it is selected. Pushing the button again will select the next port. OK: To change the switching state of the selected Power Port, press “ok” for two seconds. You can check the status of the Power Ports by the Colour of the Power Port status LED: Green = Enabled / Red = Disabled.
IPower 2x6 User Guide Now the Power Ports can be switched on and off using number keys. By pressing c you can check the network configuration and by pressing Esc you can log out. Temperature sensor Connect the temperature sensor with the TEMP (f) connector on the front of the device. When the connector is correctly instered the recent temperature is displayed in the login window also in the switching window and can be requested via SNMP.
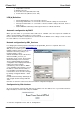
IPower 2x6 Default settings In order to restore the default settings, the IPower 2x6 must be started in bootloader mode. The you will need to run the GBL_Conf.exe program. When you run Run GBL_Conf.exe, select the IPower 2x6 device which you would like to restore the settings on and click on the Program Deviceg → Reset to Fab default. Please note that all current settings will be deleted. The default settings will be loaded when IPower 2x6 is restarted.
CE, FCC & WEEE Statements CE Statement This device complies with the European Regulations for Electromagnetic Compatibility (EMC) of the European Union and it is equipped with the CE mark. This unit has to be used with high quality shielded connection cables. Only if such high quality shielded cables are used can you be sure that the EMC compatibility is not adversely influenced.