The serial number can be found on the back of the amp, near the power switch. Please note it in the space provided below for future reference. SERIAL NUMBER CAUTION: This equipment has been tested and found to comply with the limits for a Class B digital device pursuant to Part 15 of FCC Rules.
Contents CONTENTS Chapter 1: Quick Start ............................................................................ 5 Chapter 2: The Guided Tour ................................................................. 6 Overview ........................................................................................................... 6 Unpacking ......................................................................................................... 6 Power Hookup...............................................
Contents Introduction WELCOME TO THE AXSYS 212 DIGITAL GUITAR SYSTEM! The AxSys 212 is the first of its kind Ð a new generation of guitar amp. In the past, searching for the right ÒtoneÓ meant trying out dozens of amps Ð each having its own unique, signature sound. If you wanted more than one sound, you needed more than one amp to cover all the bases. Now, many of the classic guitar amp sounds are yours at the touch of a button.
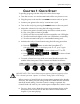
Quick Start: Chapter 1 CHAPTER 1: QUICK START To quickly get going with the AxSys 212, follow these steps: 1 Turn the GUITAR, AUX and MASTER knobs all the way down to zero. 2 Plug the power cord into the rear POWER connector and AC power. 3 Connect your guitar to the AxSysÕ GUITAR INPUT jack. 4 Turn on the AxSys by pressing the POWER button on the rear panel. 5 Adjust the volume levels using the following procedure: a) b) c) d) e) 6 Select your guitarÕs loudest pickup and set its volume to max.
Chapter 2: The Guided Tour CHAPTER 2: THE GUIDED TOUR Overview This chapter is meant to provide a detailed guide in the setup and use of the AxSys 212 Digital Guitar System. Important Things To Know There are two very important things you will learn about in this chapter: ¥ Setting input levels. This is something uncommon with analog guitar amplifiers. However, achieving the best possible tone relies heavily on input level settings. See page 9 for more information. ¥ Control Knobs.
The Guided Tour: Chapter 2 Connections Plugging in Your Guitar Connect your guitar to the AxSysÕ GUITAR INPUT jack. Auxiliary Input The AUX INPUT jack is designed for a second audio source, like a microphone, drum machine, tape player, or acoustic guitar, separate from the main Guitar input. Footpedals The rear panel of the AxSys provides two separate foot pedal jacks labeled PEDAL 1 (VOLUME) and PEDAL 2 (WAH). These accept a Roland model EV5 (or equivalent type) volume control pedal.
Chapter 2: The Guided Tour Stereo Line Out If you want to connect the AxSysÕ output to another amp, or into a mixing board, connect a stereo TRS (tip-ring-sleeve) cable to the HEADPHONE / STEREO LINE OUT jack on the rear panel. This jack provides a stereo line level output. If you want to use the STEREO LINE OUT without the internal speakers playing as well, disconnect the speakers.
The Guided Tour: Chapter 2 Example: If, when power was last turned off, the selected mode was Preset and the selected Sound was 28B, the LED display would now read P28, and the LED pointer above the SOUND B button would be lit.
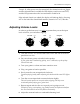
Chapter 2: The Guided Tour Tuning Up Before you start checking out the incredible sounds of the AxSys 212, you may want to tune up your guitar with the on-board tuner. To use the Digital Tuner: TUNER 1 Press the TAP TEMPO button; its LED will light. The six LEDs located above the six Control Knobs in the middle section of the front panel will switch to tuner mode, first displaying the tuning reference (usually 440), and then the displaying ---. 2 Play a single string on your guitar and let it sustain.
The Guided Tour: Chapter 2 Auditioning Sounds A Sound is a stored setup that instantly recalls a defined tone. The AxSys 212 includes 64 Sound Banks, divided into two sets of 32 (Preset and User). Each Bank has four Sounds, which adds up to 256 killer tones to choose from!! The first 32 Sound Banks are called ÒPresetÓ. These are programmed at the factory and canÕt be erased. The second set of 32 Sound Banks are called ÒUserÓ. These are completely modifiable, movable and erasable.
Chapter 2: The Guided Tour Main Controls ▲ The six Control Knobs (in the middle of the front panel) allow you to tweak any Sound by giving you instant access to the most needed controls. These knobs are used to adjust all parameters depending on the Edit Row you select. The Edit Row is indicated by an LED pointer . The MAIN Row is automatically selected whenever a new Sound is called up.
The Guided Tour: Chapter 2 revert back to the currently selected Sound Bank number; notice an E will appear (instead of a P or U) to indicate that the Sound has been ÒeditedÓ. IMPORTANT: Since each Control knob is used for lots of parameters, turning one will not have an instant affect until it Òpasses throughÓ the current setting of the parameter being edited.
Chapter 2: The Guided Tour Quick Editing Primer Aside from the six Main Controls (see page 12), many other parameters are available to you that provide for greater control over your tone. If you want more detail, check out chapter 3. For now, weÕll give you a quick way to navigate through the Edit Rows to get to various parameters.
The Guided Tour: Chapter 2 To Edit a Parameter: 1 Locate the Parameter in the chart located above the six Control Knobs. 2 Select that ParameterÕs Edit Row by pressing one of the five Row Select buttons. If the incorrect Edit Row was selected, press the same Row Select button a second time. The LED pointer for that Row will light to indicate it has been selected. 3 Turn the associated Control Knob for that parameter. The LED above the knob will change in brightness to reflect its setting.
Chapter 2: The Guided Tour Comparing an Edited Sound to the Original If a Sound has been edited (the display reads E), it may be compared to the original version. In other words, without losing the edited version of a Sound, you can go into Compare mode and listen to the SoundÕs original, stored version, then exit Compare mode to listen to the edited version. To toggle between Edited and Compare modes: 1 Press the COMPARE button.
The Guided Tour: Chapter 2 To Store an Edited Sound into a different Sound location: 1 Press STORE SOUND , and the display will begin to flash: U32 The Sound Bank and Sound will be identical to the last Sound selected. ▲ SOUND BANK ▼ 2 Use the SOUND BANK / from 01 to 32. 3 Press either SOUND Sound location. 4 Press STORE SOUND again to complete the operation. The display will briefly read Std...to indicate the Sound has been stored.
Chapter 2: The Guided Tour example, you could use the Wah pedal to control the level of reverb or the delay speed. See page 25 for more info. Both the Volume pedal and Wah pedal effects may be controlled via MIDI using controllers 7 (for Volume) and 3 (for Wah). Likewise, the pedals connected to the PEDAL 1 (VOLUME) and PEDAL 2 (WAH) jacks will transmit the same MIDI controller messages when used.
Description of Features: Chapter 3 CHAPTER 3: DESCRIPTION OF FEATURES What is TubeTone™? TubeTone is the groundbreaking tube emulation technology at the heart of the AxSys 212. By intricately modeling the subtle characteristics of vintage tube guitar amplifier circuitry, TubeTone gives you complete control over a wide range of classic guitar amp tones integrated into a single combo amp (just look at the list on page 27). We spent a lot of time in the studio and the lab dissecting amps.
Chapter 3: Description of Features Sound are called ÒGlobalÓ parameters. These parameters control how the AxSys will function regardless of which Sound is currently selected. The AxSysÕ memory is retained by an internal backup battery when power is turned off. This battery should last approximately 5 years under normal conditions. After some time, it may become necessary to replace this battery in order to retain the Sounds in the User Bank. Contact your local Line 6 Authorized Repair Center for service.
Description of Features: Chapter 3 version and the new edited version). If the original Sound resides in the Preset Bank, you must store it somewhere in the User Bank (which means you will be replacing an existing Sound with this edited Sound). It is a good idea to go through all the Sounds in the user Bank and write down which Sound memory locations you feel you can sacrifice for your own edited Sounds. If you edit a Sound and turn off the amp the AxSys retains its memory.
Chapter 3: Description of Features LED next to the GUITAR knob will light. When the Guitar Input level is set correctly, the Guitar CLIP LED will light only occasionally. CLIP The best way to set the Guitar Input level to the right setting is to turn up the GUITAR knob while playing your guitar loudly. Once you have raised the GUITAR level enough so that the Guitar CLIP LED lights steadily, turn down the GUITAR knob until the Guitar CLIP LED lights only occasionally.
Description of Features: Chapter 3 The Noise Gate and Hum Canceller settings can be stored with each Sound. However, sometimes you may want to use the same settings for all Sounds. To do this, set the GATE/HUM PER SOUND parameter to ALL(see page 38). The Noise Gate parameters are disabled when the Acoustic Sim Preamp type is selected (see page 28). If you attempt to modify them, the display will temporarily read ---.
Chapter 3: Description of Features If the DISTORTION BOX ON/OFF parameter is turned off, the Distortion Box effect will not be heard (see page 35). If you adjust the DISTORTION BOX parameter, the display will flash OFF twice to indicate it is turned off. The DISTORTION BOX parameter is disabled when the Acoustic Sim Preamp type is selected (see page 28). If you attempt to modify it, the display will temporarily read ---.
Description of Features: Chapter 3 The following parameters are available for modulating: Display 5-0 5-1 5-2 5-3 5-4 5-5 5-6 5-7 Parameter Display Preamp Bass 5-8 5-9 510 511 512 513 514 515 Preamp Middle Preamp Treble EQ 80Hz EQ 240Hz EQ 750Hz EQ 2200Hz EQ 6600Hz Parameter Display Parameter Presence 516 517 518 519 520 521 522 523 Reverb Decay Tremolo Speed Tremolo Depth Delay Feedback Delay Level Chorus Speed Chorus Feedback Chorus Level Reverb Level Drive Bass Mid Treble Gain Delay/Reverb
Chapter 3: Description of Features Auto Volume Attack The Auto Volume effect automatically Òramps upÓ the signal level. It simulates the ÒbowedÓ playing technique in which the volume is turned down at the beginning of each note so that the attack portion of the signal is not heard, and then the volume is gradually raised. Parameter Range Description Auto-Volume Adjusts the rate of the ramping of volume.
Description of Features: Chapter 3 The PREAMP BASS, PREAMP MIDDLE and PREAMP TREBLE controls are disabled when the Acoustic Sim Preamp type is selected. If you attempt to modify these parameters, the display will temporarily read ---.
Chapter 3: Description of Features Acoustic Simulator The AxSys provides two different Acoustic Simulator Preamp types. These simulate the sound of an acoustic guitar with a pickup or a piezo transducer in the saddle. TIP For the best simulation, always select the pickup closest to the guitarÕs neck. Single coil pickups tend to sound better because of their bright tone; and a bright, stringy sound is the signature of an acoustic guitar.
Description of Features: Chapter 3 If the EQ ON/OFF parameter is turned off, the Graphic EQ will not have any effect on the Sound (see page 35). If you adjust any of the Graphic EQ parameters, the display will flash OFF twice to indicate it is turned off. Tremolo Mono Tremolo2 fluctuates loudness, and Stereo Tremolo alternates loudness in opposite channels. On slow speeds with a soft shape, stereo tremolo provides continuous panning.
Chapter 3: Description of Features Delay Delay provides repetition, or echo, of a signal. By adding feedback, the delayed signal can repeat many times, with each successive repetition softer than its predecessor. Parameter Range Description Delay Type Main Delay Time Delay Time Offset Delay Feedback Dynamic Delay Delay Level 1 to 4 00 to 99 00 to 99 00 to 99 00 to 99 00 to 99 Selects the type of Delay (see below). Controls the speed of the delay (see chart on next page).
Description of Features: Chapter 3 numbers take bigger steps. The following table shows the equivalent to each setting of the delay time in milliseconds when using the Mono Delay: Display mS Display mS Display mS Display mS 0 1 2 3 4 5 6 7 8 9 10 11 12 13 14 15 16 17 18 19 20 21 22 23 24 0017.0 0021.9 0026.8 0031.7 0036.6 0041.5 0046.4 0051.3 0056.2 0061.1 0066.0 0074.4 0082.8 0091.2 0099.6 0108.0 0116.4 0124.8 0133.2 0141.6 0150.0 0167.3 0184.7 0202.1 0219.
Chapter 3: Description of Features Delay Type DELAY TIME OFFSET Mono Delay Offsets the panning of the input signal from the delayed signal between the left and right channels. When set to 0, both signals are centered between the left and right channels, creating a mono image; when set to 99, the direct signal is routed to the right channel, while the delayed signal goes to the left channel. Offsets the right channelÕs delay signal from the left channel.
Description of Features: Chapter 3 causing the detuned signal to be re-detuned. CHORUS SHAPE selects between a sine wave, for smooth sweeping pitch, or a square wave, for a more abrupt shift in pitch. In the case of a Stereo Chorus, the left channel is detuned sharp, the right is detuned flat, and vice versa. This causes the effect to become more pronounced and dramatic. Flange. Flanging3 produces a Òjet airplaneÓ-like sound.
Chapter 3: Description of Features Reverb Parameter Range Description Reverb Type Predelay 1 to 5 00 to 99 Reverb Decay Reverb Tone Reverb Diffusion Reverb Level 00 to 99 00 to 99 00 to 99 00 to 99 Selects the type of Reverb (see below). Controls the delay of the first instance of reverberation, so that the dry signal stands out from the Reverb effect. Controls how long it takes for the Reverb to die away. Controls the ReverbÕs tone. Determines the ÒthicknessÓ of the reverb (see below).
Description of Features: Chapter 3 Cabinet Type This effect simulates various types of speaker enclosures. You may choose among the following enclosure simulators: # in Display OFF 1-0 1-1 1-2 2-0 2-1 2-2 3-0 3-1 3-2 4-0 4-1 4-2 Modeled after...
Chapter 3: Description of Features If an effect doesnÕt seem to be working, be sure to check if the effect is turned on in the FX ON/OFF Edit Row. If you adjust any parameter of an effect that is turned off, the display will flash OFF twice to indicate it is turned off. TIP Since all of these parameters are the Òon/offÓ type, itÕs easy to see at a glance what all 6 settings are (i.e. which effects are on or off), since each Control KnobÕs LED will either be on or off.
Description of Features: Chapter 3 Aux Input Reverb This controls the amount of reverb that is added to the Aux Input signal. When set to 0, no reverb is added and the Aux Input signal is ÒdryÓ. When set to 99, the reverb is added at its maximum level and the Aux Input signal is ÒwetÓ. Global Controls The following four controls are found on the far right end of the first top two Edit Rows. As their name ÒGlobalÓ implies, these four parameters are set once for all Sounds; i.e.
Chapter 3: Description of Features Gate/Hum Per Sound This function determines whether the Noise Gate and Hum Canceller parameters will change when a new Sound is selected. These parameters include: NOISE GATE ON/OFF, NOISE GATE THRESHOLD, NOISE GATE DECAY, and HUM CANCELLER. If you want to use the same settings for these parameters, regardless of which Sound you use, set this parameter to ALL.
Appendices APPENDICES Appendix I: Troubleshooting If you are experience problems while operating the AxSys 212, please use the following table to locate possible causes and solutions before contacting Line 6 customer service for assistance. Symptom The display does not light when the POWER switch is turned on. No sound. Control Knobs wonÕt change parameter settings. Cause No power. Solution Check that the power cable is plugged in properly. Speakers are not connected to amp.
Appendices Obtaining Repair Service Before contacting Line 6, check over all your connections, and make sure youÕve read the manual. Customers in the USA: If the problem persists, call Line 6 at (310) 390-5956 and request the Product Support department. Talk the problem over with one of our technicians; if necessary, you will be given a Return Authorization (RA) number and instructions on how to return the unit. All units must be shipped prepaid and COD shipments will not be accepted.
Appendices Appendix III: Tube Replacement Schedule Yeah, right!! You gotta be kidding!!! Appendix IV: About Audio Cables The connection between your electric guitar and the AxSys are your musicÕs lifeline, so use only high quality cables. These should be lowcapacitance shielded cables with a stranded (not solid) internal conductor and a low-resistance shield. Although quality cables cost more, they do make a difference.
Appendices Appendix VI: Specifications 42 Guitar Input Effects: Noise Gate; Hum Canceller; Compressor; Wah; Auto-Wah; Rando-Wah; Sample/Hold Wah; Volume Pedal; Distortion Box Type Preamp: Bright Switch; 3-Band Pre EQ; Drive; Preamp Type Select (Clean, Tweed, British, Hybrid, Acoustic Simulator); Preamp Model Select; 5Band Graphic EQ; Bass/Middle/Treble Tone Controls; Presence Effects Processor: Auto-Volume; Mono/Stereo Chorus; Mono/Stereo Flange; Phasor; Stereo Rotary Speaker; Mono/Stereo Tremolo; M
Appendices Appendix VII: MIDI Implementation Chart Function Basic Channel Mode Note Number Velocity Default Changed Default Messages Altered Transmitted 1 Ñ 16 ******** ******** X X ******** X True Voice Note On Note Off KeyÕs ChÕs After Touch Pitch Bender Control Change Prog Change True # System Exclusive System Song Pos Common Song Sel Tune System Clock Realtime Commands Aux Local On/Off Messages All Notes Off Active Sense Reset GM On Notes ******** X X X X X O 0 Ñ 127 ******** O X X X X X X
Appendices Appendix VIII: MIDI Program Change Chart The following chart can be used to identify the exact Sound that will be recalled for any of the 128 different MIDI program change numbers that can be received by the AxSys 212. The Sound that is recalled will be from either the Preset Bank or the User Bank, depending on which is selected at the time.
Index INDEX AC ........................................................ 6, 22 Acoustic Simulator ................................ 28 Audio Cables .......................................... 41 Auto Volume .......................................... 26 Aux ............................................................ 9 Aux Input ........................................... 7, 18 Bass .................................................... 36 Level .................................................. 22 Mix .........
Index Phase ....................................................... 33 Power ........................................................ 5 Preamp ..................................................... 26 Bass .................................................... 26 Bright Switch .............................. 26, 28 Drive .................................................. 26 Middle ............................................... 26 Output Level .................................... 26 Presence ..................
LINE 6 LIMITED WARRANTY INFORMATION It’s important to LINE 6 that we take care of our customers. Sending in your warranty allows us to register key information so that we may handle problems faster and inform you of advance information, upgrades, and applications. Thank you in advance for filling out your warranty card and sending it to us. Good luck in your music! LINE 6, a division of Fast Forward Designs, Inc.
AUX INPUT TREBLE MIDI CHANNEL Sound Name: AUX INPUT REVERB (NOT SAVED) GATE/HUM PER SOUND TRANSMIT SOUNDS (NOT SAVED) AUX PER SOUND VOLUME PEDAL ON/OFF PREAMP MIDDLE DISTORTION BOX 2200Hz PREAMP TREBLE WAH TYPE CABINET TYPE 6600Hz BRIGHT SWITCH WAH DEPTH DELAY LEVEL CABINET STEREO SPREAD PRESENCE PREAMP OUTPUT LEVEL AUTO-VOLUME ATTACK HUM CANCELLER PREAMP BASS 750Hz TREMOLO SHAPE DYNAMIC DELAY CHORUS LEVEL NOISE GATE DECAY 240Hz TREMOLO DEPTH DELAY FEEDBACK CHORUS SHAPE REVE