Pilot’s Handbook for version 2.0 software An in-depth exploration of the revolutionary technologies and pulsing tonal pleasures of POD, plus the insider info on the optional Line 6 foot controllers: the Floor Board and FB4. An electrophonic version is available on the included CD-Rom and at www.line6.com. Revision F. This equipment has been tested and found to comply with the limits for a Class B digital device pursuant to Part 15 of FCC Rules.
10 3 OUTPUT LEVEL 0 24 23 11 0 27 10 A B C D PEDAL 0 10 TREBLE U 6 10 0 16 REVERB 0 15 MI INDI 10 25 28 17 2 ROTARY DELAY/COMPRESSOR EFFECT 2x12 FLANGER 2 DELAY/TREMOLO TWEAK FLANGER 1 DELAY/CHORUS 1 CHORUS 2 DELAY/CHORUS 2 CHORUS 1 DELAY/FLANGER 1 TREMOLO 1x8 DELAY/FLANGER 2 O FF COMPRESSOR DELAY/SWELL BYPASS DELAY EFFECTS (CAB SELECT) 19 20 18 TAP (HOLD) SAVE 21 NOISE GATE MIDI MANUAL 10 8 CHAN VOL 0 14 MI I OUD T TUNER 22 9 THE ULTIMATE GUITAR DIRECT BOX
BANK 1 A B C D More great sounds for your POD are at www.line6.
CHAPTER 1: QUICK START GUIDE MANUAL? I DON’T NEED NO STINKING MANUAL! . . . . . . . . . . . . . . . . . . . . . . . . . . . . . . . . . . . . 1•1 Register and Get Great Free Stuff . . . . . . . . . . . . . . . . . . . . . . . . . . . . . . . . . . . . . . . . . . . . . . . . . . . . . . . 1•1 Get On-line: Line 6 Internet Resources . . . . . . . . . . . . . . . . . . . . . . . . . . . . . . . . . . . . . . . . . . . . . . . . . . 1•2 INTRODUCTION: WELCOME THE POD... Modeling . . . . . . . . . . . . . . . .
CHAPTER 5: POD EFFECTS Deep Editing: Where to Look for More Info . . . . . . . . . . . . . . . . . . . . . . . . . . . . . . . . . . . . . . . . . . . . . . . . 5•1 POD Onboard Effects . . . . . . . . . . . . . . . . . . . . . . . . . . . . . . . . . . . . . . . . . . . . . . . . . . . . . . . . . . . . . . . . . 5•1 Reverbs . . . . . . . . . . . . . . . . . . . . . . . . . . . . . . . . . . . . . . . . . . . . . . . . . . . . . . . . . . . . . . . . . . . . . . . . . 5•2 Compressor . . . . . . . . . . . .
CHAPTER 8: DEEP EDITING & MIDI CONTROL MIDI Basics . . . . . . . . . . . . . . . . . . . . . . . . . . . . . . . . . . . . . . . . . . . . . . . . . . . . . . . . . . . . . . . . . . . . . . . . What’s MIDI?. . . . . . . . . . . . . . . . . . . . . . . . . . . . . . . . . . . . . . . . . . . . . . . . . . . . . . . . . . . . . . . . . . . MIDI In/Out . . . . . . . . . . . . . . . . . . . . . . . . . . . . . . . . . . . . . . . . . . . . . . . . . . . . . . . . . . . . . . . . . . . MIDI Channel . . . . . .
QUICK START GUIDE: “MANUAL? I DON’T NEED NO STINKING MANUAL!” QUICK START GUIDE or: “MANUAL? I DON’T NEED NO STINKING MANUAL!” 1. 2. 2. 3. 4. 5. 6. 7. 8. 9. 10. Turn the POD OUTPUT LEVEL control all the way down to zero. Plug the POD LEFT and RIGHT OUTPUTS into your recorder or mixer’s input, or plug the left output into your guitar amplifier’s input. Or connect headphones to the PHONES jack on your POD. If you’re plugged into a guitar amp, set A.I.R. switch to ‘AMP.’ Otherwise, set it to ‘DIRECT.
QUICK START GUIDE: 1•2 GET ON-LINE that you fill that registration card out right now, and send it to us in the mail or jump on the internet and register at the Line 6 Support Center – www.line6.com. How come? Well, for one thing, it gets you all set up for warranty service should you ever have a problem with your POD. (Warranty info is at the end of this manual.
INTRODUCTION: WELCOME THE POD... INTRODUCTION WELCOME THE POD... Thank you for inviting POD home with you. Whether you use your POD as a direct recording miracle, a stomp box on steroids, for practice, or as a creative digital signal processing tool – and heck, why should it be just one? – we think you’ll agree that POD is about the most amazing thing to happen to electric guitar since – well, since the guitar amplifier itself.
INTRODUCTION: 1•4 WELCOME THE POD... signal, how the signal is colored and shaped, at what point it begins to distort, the quality and characteristic of the distortion – complicated stuff, but all analyzable as electronic data. A guitar pickup output, after all, is an electronic signal, and tubes are really just a complex form of signal processing.
INTRODUCTION: WELCOME THE POD... setting of one knob changes the way that another knob on the amp behaves. All in an effort to make our Amp and Cab Models as much like the amps and cabs we modeled as possible. The resulting Amp and Cab Models are the foundation of POD. Now, then – here are a couple of things we want to be completely crystal clear on: 1. The Line 6 modeling process is a patented, 100% digital software-based technology exclusive to Line 6. 2.
INTRODUCTION: 1•6 WELCOME THE POD... and speaker cabinet: • The effect of the guitar amplifier electronics is emulated by the Amp Model you choose. Each model was developed from extensive study of a classic amplifier treasured as a tone classic. • In a guitar amp, once the guitar signal passes through the electronics, it is output to one or more speakers in a speaker cabinet.
INTRODUCTION: WELCOME THE POD... up sound. The included SoundDiver MIDI-control software lets you use a Macintosh or Windows computer to do “deep editing” of these and other POD parameters. With it, you can design your own custom rig, making new combinations of Amp Model and cabinet/microphone emulation, and adjusting the contribution of the “spread” of the sound as well. The A.I.R. direct recording output is exclusive to Line 6.
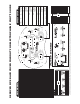
CONTROLS & CONNECTIONS CONTROLS & CONNECTIONS 2•1 If you haven’t already done so, turn to the inside back cover of this manual and notice that it folds out. Ooh, pretty pictures! The idea is to have this essential pictorial reference always opened out while you’re thumbing through the manual. And if you photocopy the back of it, you’ll have a handy template for making a note of your favorite settings.
CONTROLS & CONNECTIONS 2•2 be sure you are plugging POD’s outputs into line level, not microphone or guitar level inputs. Line level inputs should allow you to turn POD’s Output Level up all the way (or close to it) and thereby get the best sound possible. If your gear has inputs that function as mic/line level inputs, try to set the trim for those inputs to the minimum level, and POD’s Output Level to maximum, when setting levels. 5 Left & Right Output - Top left of POD illustration.
CONTROLS & CONNECTIONS 8 MIDI In & Out - Top right of POD illustration. Connect POD to your MIDI equipment to select channel memories (via Program Change messages) or automate POD settings (via controllers and/or Sysex). Emagic SoundDiver software is included on the POD Tools CD for sound editing/storage on a computer. The POD MIDI OUT connects to another device’s MIDI IN; its MIDI IN goes to another device’s MIDI OUT.
CONTROLS & CONNECTIONS 11 2•4 Amp Models - Bottom left knob on the POD with words all round it. When you spin this knob, it’s essentially like changing what electronic “circuitry” is running inside POD to make your amp sound. (Also see Modeled Amps and Cabs in Chapter 4.) We’ve arranged the Amp Models around the knob so you get Line 6’s four custom sounds first. From there, the models go clockwise from “cleanest” (Small Tweed) to “dirtiest” (Fuzz Box).
CONTROLS & CONNECTIONS the response and interactivity of the controls changes, too – to act like the tone controls of the original amp that inspired the Amp Model you’ve selected. POD also has a Presence bump that can be switched on and off when you hold the Tap button and turn the Treble knob. The detail is in the Tap (HOLD) Functions section that begins in another couple pages or so. 14 Chan Vol - This knob controls the relative volume level of the “channel” you are playing through.
CONTROLS & CONNECTIONS 2•6 17 Effects/Cabs - This knob selects which effect or combination of effects you get (once again, all the details on effects are in the POD Effects chapter). New with Version 2.0 software, this knob also allows you to choose Cabinet Models, and mix ’n’ match them with the Amp Models. To choose a Cabinet Model, hold the TAP button and turn this knob; the available cabinets are labeled in gray around the knob.
CONTROLS & CONNECTIONS 19 Noise Gate - Turns on and off the POD’s built in Noise Gate. More Noise Gate details in the POD Effects chapter. 2•7 20 Tap - This control sets and displays the current tempo or speed of delay or tremolo/chorus/flange/rotary speaker. To use the Tap control, just tap the button at the tempo you want.
CONTROLS & CONNECTIONS 2•8 control set low and the output control set high. It boosts your guitar signal before it reaches the Amp Model, so that you hit the model harder and get a dirtier sound. This is just the same as kicking on the Distortion at the Floor Board (details in Chapter 7). As you do this, the Channel A light comes on if you turn the Distortion on.
CONTROLS & CONNECTIONS 2•9 Hold the TAP button to access these features 21 Save - When you want to store your own tweaked up sounds in your POD, this button is the key. Exactly how it works is detailed in Chapter 6: Creating & Storing Sounds.
CONTROLS & CONNECTIONS 2 • 10 and that you should save it if you want the memory to remember the tweak. To save your changes, press the Save button 21 . The button will start to flash. Press the Up and Down 10 buttons and you will see that you are switching through memory locations A, B, C, and D in each of POD’s nine numbered banks. Pick one to store your sound in, and press that Save button a second time.
GETTING SET UP: SCENARIO ONE – IN THE STUDIO GETTING SET UP The numbers in black boxes below refer to the back cover foldout’s POD illustration. 3•1 ALL PURPOSE BASICS Plug POD’s power supply into the wall, and connect it to the power input on the right edge 1 of your POD. Plug the output of your guitar to the POD Input 2 . If you want to listen to POD with headphones, plug them into the Phones 3 jack. If you’re gonna be PODding in a recording studio, you’ll want to check out Scenario One below.
GETTING SET UP: SCENARIO ONE – IN THE STUDIO Gimme Some A.I.R. 3•2 If you’re plugging POD’s output into anything other than a guitar amplifier’s input, flip the 6 A.I.R. switch to its DIRECT position. In this mode, the A.I.R. DSP is active, and you are getting a virtual version of the speaker-cabinet-airmicrophone experience that’s so good you may never use a regular guitar amplifier and microphone set up again.
GETTING SET UP: SCENARIO ONE – IN THE STUDIO BOOM BOXES & SMALL PORTABLE STUDIOS Connect the output of the POD 5 to the input of your system. Ideally, you want to connect both right and left outputs to your gear and run stereo. Make sure the A.I.R. switch 6 is set to DIRECT, plug your guitar into 2 the guitar input, and away you go. Set your POD Output Level 4 so that you’re getting plenty of signal feeding into your gear, but not so loud that it’s overdriving your system and distorting.
GETTING SET UP: SCENARIO ONE – IN THE STUDIO BIG TIME CONNECTIONS 3•4 With bigger setups including a mixer and a multi-track recorder, or with new fangled setups like computer-based and stand-alone Digital Audio Workstations, you’ve got a couple choices.
GETTING SET UP: SCENARIO ONE – IN THE STUDIO Direct Injection First thing to do to play the send/return game is get your guitar to deliver a direct input to your recorder or mixer, or the input of your computer-based audio system. How about just plugging the guitar’s output into a mixer channel? Guitar pickups like to feed into a high impedance load – at least 300 KOhms impedance; 1 MOhm is ideal for the best results.
GETTING SET UP: SCENARIO ONE – IN THE STUDIO 3•6 Return To Sender Illustration Hooking up POD to a mixer send/return Plug the guitar into your DI. Plug the DI into a mixer channel with a direct out. Set the trim on your channel so your input levels look good. Plug the direct output from the mixer channel into one of your recorder’s track inputs, and set the recorder to monitor the input to that track. Connect the recorder’s track output to another mixer channel input that has a direct output.
GETTING SET UP: SCENARIO ONE – IN THE STUDIO channel inputs. Make sure the POD A.I.R. switch 6 is set to DIRECT. You should be all ready to play your guitar and hear it POD-processed, and lay down a track on your recorder.
GETTING SET UP: SCENARIO ONE – IN THE STUDIO Pedal Power 3•8 POD has a couple of foot control options: the Line 6 Floor Board and FB4. While we’ll go into all the details in a later chapter, for now, it’s good to know that the FB4 is a four-button foot switch that allows you to select between four POD channels and Tap your effect speeds/tempos.
GETTING SET UP: SCENARIO ONE – IN THE STUDIO NOT SO BIG TIME CONNECTIONS You can run your POD in a send/return type configuration even with a reasonably sophisticated four (or more)-track recorder or a “native” computer audio system. (You’ll ideally want more than two channels out and in on your computer system if you want to mix guitar with other instruments.) Computer users: Plug your guitar into the computer’s input (preferably using a DI to get the signal level right). Make sure the POD A.I.R.
GETTING SET UP: SCENARIO ONE – IN THE STUDIO stomp boxes just before or after POD – most anything might work depending on the specific gear you’re working with and the sound you’re trying to achieve. When setting your levels, be sure to try your loudest strumming, hottest pick-up combination, and your maximum volume boost from the stomp box(es) at the same time to make sure the resulting clamor gets through the signal chain cleanly.
GETTING SET UP: SCENARIO TWO – POD PLAYS LIVE SCENARIO TWO – POD PLAYS LIVE If you’re going to be using your POD in a live situation, as either the “front end” for a guitar amplifier, or for its direct output to a sound system, here’s what you need to know to get set up: 3 • 11 Mount Up If you perform live, you’ll probably want to have the POD in a handy spot on stage.
GETTING SET UP: SCENARIO TWO – POD PLAYS LIVE POD Takes Over 3 • 12 If your POD is running into a power amp or speakers, or into the front end of a guitar amplifier, you generally want to switch the 6 A.I.R. switch to the AMP position.
GETTING SET UP: SCENARIO TWO – POD PLAYS LIVE POD Output Level: A Word of Caution POD’s Output Level control is setup with enough gain available to drive into almost any piece of equipment. Consequently, it also has plenty of power available to overdrive the input of your guitar amp, which you don’t want since it will add extra distortion that will color the sound so you don’t hear the “true” POD tones. So, set it pretty low at first, then you can experiment with higher settings.
GETTING SET UP: SCENARIO TWO – POD PLAYS LIVE POD Live Hook-up Illustrations Pictures are handy. Here are a few you may appreciate. In all cases, plug the left output of your POD into your amp’s input for mono operation. Experiment to get the best from your setup; try the A.I.R.
GETTING SET UP: SCENARIO TWO – POD PLAYS LIVE POD Into a Power Amplifier Driving Speaker Cabinets 3 • 15 Stomp Boxes, Live Setups, & You If you’ve been playing guitar for a while, you probably have some favorite pedals that you dig. And even though POD has now graced your life with some pretty hip digital effects, you probably still want to have the option of keeping those old pedals in your arsenal.
GETTING SET UP: SCENARIO TWO – POD PLAYS LIVE Pedal Power 3 • 16 POD has a couple of foot control options: the Line 6 Floor Board and FB4. While we’ll go into all the details in a later chapter, for now it’s good to know that the FB4 is a four-button foot switch that allows you to select between four POD memories and Tap your effect speeds and tempos.
MODELED AMPS & CABS: WHICH AMPS AND CABS ARE MODELED? MODELED AMPS & CABS WHICH AMPS AND CABS ARE MODELED? Note: For the following description of the Line 6 Amp Models, and other references that you will find throughout this manual, please be aware that Fender, Marshall, Vox, Boogie, Soldano, Peavey, Roland, Matchless, Arbiter, ADA, Leslie, and other amplifier model designations, and the names of musical artists and groups, and effects, are all trademarks of their respective owners, which are in no way as
MODELED AMPS & CABS: WHICH AMPS AND CABS ARE MODELED? Line 6 Crunch - Our “boutique” sound. Not too clean, but not too raging. We spent some time with a rare Dumble combo, and picked up a few tricks from it to put together this tone. Great for modern blues or jazz, this sound should be like a fine cognac, smooth and warm going down, but with a nice kick. The Mid control is located before the Amp Model’s Drive, but the Bass and Treble controls are placed after the Drive for maximum range.
MODELED AMPS & CABS: WHICH AMPS AND CABS ARE MODELED? Middle knobs just sitting there. That just didn’t seem right, so we figured out a way to put those knobs to work without mucking about with the authenticity of this Amp Model’s treble tone control. We set up the Bass and Middle as postAmp Model controls, which essentially lets you EQ up your tone as you would do on a mixing console after recording your amp.
MODELED AMPS & CABS: WHICH AMPS AND CABS ARE MODELED? this Amp Model’s Drive is changed; clean settings are crisp and present, while more driven settings will mellow the high end. This is typical of what you get from a Deluxe, and is nicely captured here. 4•4 The Deluxe itself has only Bass and Treble controls. Leaving us, once again, with the prospect of a knob with nothing to say for itself.
MODELED AMPS & CABS: WHICH AMPS AND CABS ARE MODELED? Brit Blues - This Amp Model is based on a circa 1964-65 JTM-45 head with block logo (predates the “scrolled” Marshall logo), complete with a gold Plexiglas (Plexi) front panel, although the sound normally associated with Plexi amps comes from the late 60’s, 50-watt version that was the inspiration for the next in POD’s line up of Amp Models.
MODELED AMPS & CABS: WHICH AMPS AND CABS ARE MODELED? many people play Marshalls clean, it’s a great tone, so you should also be sure to check out this model with a low Drive setting, too. Of course, you can always pump up the drive and rage.... 4•6 Rectified - This model is modeled after a 1994 Mesa Boogie Dual Rectifier Tremoverb. You can use this Amp Model to get that tight, high gain sound used by bands like Dream Theater or Metallica.
MODELED AMPS & CABS: WHICH AMPS AND CABS ARE MODELED? Who. Liberal use of the Bass, Middle, and Treble controls will let you go beyond the tones that the Fuzz Face could deliver, enabling you to discover your own unique recipe for those elusive fuzz tones in your head. Just a note: when recording Purple Haze, Jimi didn’t even use an amp – he just went straight from a Fuzz Face to an Orange power amp to a 4x12 cabinet. Which is the same sort of tone you find here....
MODELED AMPS & CABS: WHICH AMPS AND CABS ARE MODELED? Amp Model provides more wide-ranging tone controls. With the Plexi, once you’re overdriven, the tone controls really don’t do much, but POD will allow you to scoop out the mids even at the highest Drive settings. Line 6 Blues (Hold Tap + Line 6 Drive) - This tone is based on the '65 4•8 Marshall JTM-45 Bluesbreaker but incorporates wider range tone controls.
MODELED AMPS & CABS: WHICH AMPS AND CABS ARE MODELED? Boutique #3 (Hold Tap + Tweed Blues) - This model is based on a Budda Twinmaster head. The Budda has a great, warm, Class A, sound. This was Budda’s first offering. The Budda philosophy is all about power tube distortion. Simplicity is the key. With relatively low front end gain, highly interactive tone controls, and tube rectifier “sag” it’s great at getting a classic cranked sound for small gigs and recording.
MODELED AMPS & CABS: 4 • 10 WHICH AMPS AND CABS ARE MODELED? to the Vox AC 30 Top Boost, the early Vox amps were the first designed especially for electric guitar (Hey, some early amps from other manufacturers have Accordion inputs! Polka, anyone?), and used Class A power amp designs, rather than the much more common Class AB type. We were lucky enough to find what we are told was one of Bryan Adams’ favorite AC 30s for recording. Lenny Kravitz happened to be using it the week before we began testing.
MODELED AMPS & CABS: WHICH AMPS AND CABS ARE MODELED? responsive, and the drive channel has a thick, liquid, singing sustain that doesn’t lose string definition when driven hard. POD’s tone controls on this Amp Model are quite subtle, like those of the Dumble itself. Rectified #2 (Hold Tap + Rectified) - This Amp Model is modeled after a 1995 Mesa Boogie Dual Rectifier head.
MODELED AMPS & CABS: WHICH AMPS AND CABS ARE MODELED? Cabinet Models - The following Cabinet Models are available on POD, and are accessed by holding the Tap button and turning the Effects knob: 1x8 1960 Fender Tweed Champ 1x12s 1952 Fender Tweed Deluxe 1960 Vox AC-15 1964 Fender Blackface Deluxe 4 • 12 Line 6 1x12 2x12s 1965 Fender Blackface Twin 1967 Vox AC-30 1995 Matchless Chieftain Line 6 2x12 4x10s 1959 Fender Bassman Line 6 4x10 4x12s 1996 Marshall with Vintage 30s 1978 Marshall with stoc
POD EFFECTS: DEEP EDITING POD EFFECTS DEEP EDITING For tweak heads and MIDI-philes, we’ve included a handy MIDI editor/librarian program which is made by emagic, and called SoundDiver. The program runs on Macintosh and Windows computers, and can turn your computer into a POD command station.
POD EFFECTS: POD ONBOARD EFFECTS Reverbs - Reverb 15 is the effect that makes it sound like something is in a room. It’s basically a whole bunch of echoes smeared together to give you a sense of sound in an ambient space. With POD, reverb is always available. You control how much with the Reverb knob. You can also set the Reverb Decay Time by holding the TAP button and turning the Reverb knob; this allows you to adjust the apparent size of the reverberant space.
POD EFFECTS: POD ONBOARD EFFECTS Tremolo - Modeled after the classic Fender tremolo. The Effect Tweak knob controls the depth; Tap controls the speed. The tremolo speed will be twice as fast as you tap (and twice as fast as the Tap light flashes), allowing you to set fast tremolos without having to tap like a madman. Chorus - You’ll find two different chorus sounds in POD. Chorus 1 is modulated by a square wave, so it sounds more like a “rackmount effect” type chorus.
POD EFFECTS: POD ONBOARD EFFECTS Rotary - This effect simulates the effect of a mic’d, rotating high frequency speaker horn, like on a Leslie. Listening to this effect in stereo through headphones could cause motion sickness. Rotary speakers have two speeds: slow and fast. We’ve set up POD’s Rotary Speaker emulation to select a fixed slow speed if you tap slowly, and a fixed fast speed if you tap quickly.
POD EFFECTS: POD ONBOARD EFFECTS Noise Gate - POD includes a built-in noise gate, intended to reduce the hiss and noise guitar systems tend to put out when you’re not playing, especially at high gain settings (since high gain means that noise is turned up along with your guitar sound). The Noise Gate is on when its button 19 is lit. Any time you want to disable the noise gate, press the button so that the light turns off. Turn it on again, and notice how the hiss magically disappears....
POD EFFECTS: COMBINED EFFECTS COMBINED EFFECTS The rest of the effects are combinations of Delay and one other effect. They should be fairly self-explanatory. Tap sets the delay speed for all these effects. Remember that the Delay Repeats (Tap + Bass knob) and Delay Level (Tap + Middle knob) controls are also available with all these effects. (Details are in the Tap (HOLD) description in Chapter 2). Delay/Compressor - Tweak controls Compression Ratio.
CREATING & STORING SOUNDS: USING THE CHANNEL PROGRAM MEMORIES CREATING & STORING SOUNDS USING THE MANUAL MODE FEATURES When you are using your POD in Manual Mode, all of the controls are active and the sound of POD always reflects the knob settings. Sounds just like any ordinary guitar amp or pedal, doesn’t it? Who says technology is threatening? You know you’re in Manual Mode, by the way, whenever the Manual button 9 is lit (but you probably already figured out that part).
CREATING & STORING SOUNDS: TONETRANSFER buttons will abandon the save. (Save mode will also be canceled if you don’t press any buttons for 5 seconds after having pressed Save.) TONETRANSFER POD Sounds on the Web 6•2 Your POD gives you access to a constantly-expanding world of sounds. Visit the ToneTransfer Web Library at www.line6.com and you’ll find a growing collection of sounds for your POD, created by Line 6 users around the world.
CREATING & STORING SOUNDS: advance. We provided you with a way to get those settings. Just press and keep holding the Save button on your friend’s POD and turn any one of the POD’s knobs (except the Output Level knob – that one’s not saved into programs). Don’t worry, holding down the Save button won’t cause your settings to be altered or cause Save Mode to be entered. Instead, you’ll notice one of the little arrows below the Tuner button will light up.
CREATING & STORING SOUNDS: CUSTOMIZING AMP MODELS & EFFECTS better that way) you should use the Save button to save it. This is what’s called Edit Mode since you’ve done just that: edited a stored channel. To commit your edit to POD’s memory, press Save and it will start to flash. Press it a second time, and the sound will be stored into the currently selected memory.
CREATING & STORING SOUNDS: CUSTOMIZING AMP MODELS & EFFECTS Controls affected by the Amp Models Knob Amp Model Cabinet Model Drive Drive 2 (if Amp Model is Line 6 Layer) * Bass Middle Treble Bright Switch (if available on Amp Model) * Channel Volume Distortion On/Off (Hold Tap, turn Drive to set) Volume Boost On/Off (Hold Tap, Turn Channel Volume to set) Presence Bump On/Off (Hold Tap, Turn Treble to set) Noise Gate On/Off (Hold Tap, Turn Reverb to set) Noise Gate Decay Time * Reverb Type * Reverb Decay *
CREATING & STORING SOUNDS: CUSTOMIZING AMP MODELS & EFFECTS knobs. This way, when you turn the Amp Models knob to the Rectifier position, you’ll get your personal Rectifier, with all the controls in the list above set for your very own version of the Rectifier. Same thing for the Effects – your Chorus, Tremolo, etc. is always just one knob click away.
CREATING & STORING SOUNDS: MEMORY RESET Activating Customization Mode The first thing to do is get an Amp or Effect setting that you really like and want to store to the Amp Models or Effects knob. This amp or effect setting can come from a factory preset, one of your own edits, a sound you downloaded off the web, or a sound you’ve tweaked up in SoundDiver. Whatever its source, all you have to do is get that sound into your POD so it’s active and you’re playing though it.
THAT’S USING YOUR FEET: FLOOR BOARD: THE FULL-FEATURED FOOT THAT’S USING YOUR FEET You really get the most out of your POD with a foot controller. Two different foot controllers can be used: Line 6’s Floor Board and FB4. FLOOR BOARD: THE FULL-FEATURED FOOT CONTROLLER FOR POD Using the Floor Board with POD lets you access many features that are not available otherwise. This all-steel chassis, oh-so-stylish foot control wonder gives you plenty of stuff: A volume pedal.
THAT’S USING YOUR FEET: FLOOR BOARD: THE FULL-FEATURED FOOT TWO MODES The first thing to know is that the Floor Board has two modes of operation: Channel Select Mode, and Effect On/Off Mode. The Mode Select switch 23 chooses which mode you’re in. Mine Looks Funny: Your Floor Board may look a little different than the one illustrated on the POD manual’s fold out back cover. Older Floor Boards have the label Select Sound instead of Channel Select.
THAT’S USING YOUR FEET: FLOOR BOARD: THE FULL-FEATURED FOOT Channel Select So, now that we’ve got this whole Bank thing down, let’s move onto the other four switches on the bottom row. These let you pick which of the four channels – A, B, C, or D – you want to use in the bank you’ve selected. Pick your Bank 24 , hit one of the Channel Select switches 28 , and you’re ready to roll. Manual Mode Hey, what about Manual Mode? Don’t worry – you can get there any time.
THAT’S USING YOUR FEET: FLOOR BOARD: THE FULL-FEATURED FOOT Tap Tempo Now, then, how about that handy Tap Tempo thing on your POD? Sure would be nice to be able to change the speed of your effects without taking your hands off your guitar, wouldn’t it? That’s what the Tap Tempo 27 foot switch is for. The light to the left of it (you’ve already probably been entranced by it as it pulses away), flashes just like the Tap Tempo button on your POD to let you know the speed of your effect.
THAT’S USING YOUR FEET: FLOOR BOARD: THE FULL-FEATURED FOOT Wah Pedal So how about that wah pedal? It’s the one on the left 26 . Get yourself planted with your foot on there nice and comfortable. Now, press down with your toes, let go, and do it again. You should see a little light turning on and off to the left of the wah pedal. When the light’s on, the wah’s on. When the light’s off, the wah’s off. Neat.
THAT’S USING YOUR FEET: FLOOR BOARD: THE FULL-FEATURED FOOT 2. EFFECT ON/OFF MODE Alright. So that wah pedal was pretty fun, but now you want to get down to some business with the rest of your POD effects. This is where we get to light up that top arrow of the pair that the Mode Select switch points to. Press the Mode Select switch 23 to get that arrow lit. Now, notice that the six stomp switches that we were using for the Channel Select Mode also have an alternative set of labels.
THAT’S USING YOUR FEET: FLOOR BOARD: THE FULL-FEATURED FOOT want to drop your volume back a bit – like when you switch from lead to rhythm parts. With Drive/Boost on (the light is lit at the Floor Board), you’re getting the full, boosted volume. With Drive/Boost off, your volume is backed off a bit. In light of all this good stuff, newer Floor Boards label this control Drive/Boost. Of course, we fully expect that those “vintage” Floor Boards will be highly prized in the future because of this.
THAT’S USING YOUR FEET: FLOOR BOARD: THE FULL-FEATURED FOOT Effect On/Off Settings Stored With Programmed Channels 7•8 OK, this part’s mostly for the people who fret about all the little details that make other people think, “Wow, you’re way too concerned about all the little details!” What happens if you turn some of these handy effects off and on and then you save your sound into one of your POD memories? The effect on/off status gets stored, too. Cool.
THAT’S USING YOUR FEET: FB4: SIMPLE FOOT CONTROL FOR POD FB4: SIMPLE FOOT CONTROL FOR POD The FB4 gives you basic control over channel switching with POD. We tried to make it as simple as possible. Turn off your POD. Connect the FB4 to your POD with the thoughtfully-included connection cable. Turn on your POD. Select Channel A, B, C, or D by pressing the appropriate button on the FB4. The channel’s light will be lit to indicate that the channel is selected.
Deep Editing & MIDI Control: MIDI BASICS DEEP EDITING & MIDI CONTROL MIDI BASICS What’s MIDI? MIDI (Musical Instrument Digital Interface) is a communications protocol designed to let various music-making machines exchange information. It allows one device to control another, and several devices to all be used together in coordination. In/Out POD has two MIDI connections: In & Out. You connect POD to other MIDI devices by connecting MIDI cables to these connections.
Deep Editing & MIDI Control: MIDI BASICS MIDI Channel MIDI allows 16 different channels of information to be transmitted and received through one MIDI cable. The MIDI channel is independent of, and has nothing to do with, POD’s channels for storing individual sound programs. You tune POD in to listen to a particular MIDI channel (like choosing a channel on a TV or a station on a radio), and make sure the device that you want POD to listen to is transmitting on that same MIDI Channel.
Deep Editing & MIDI Control: MIDI BASICS volume pedals of the Floor Board also transmit MIDI controller messages via MIDI when used with your POD. To minimize “zipper” noise when controlling parameter changes via MIDI, try making gradual, rather than sudden changes to POD settings. MIDI Sysex Commands - Sysex stands for “System Exclusive.
Deep Editing & MIDI Control: POD / POD PRO / FLEXTONE II TONETRANSFER VIA MIDI POD / POD PRO / FLEXTONE II TONETRANSFER VIA MIDI If you just want to transfer sounds directly from POD to POD, or between a POD and a Flextone II or POD Pro, follow the directions below. You’ll need a standard MIDI cable to do the deed. Connect the MIDI OUT of the transmitting device (POD, POD Pro, or Flextone II) to the MIDI IN of the receiving device.
Deep Editing & MIDI Control: POD / POD PRO / FLEXTONE II TONETRANSFER VIA MIDI which means you only want to transfer ONE sound to the receiving POD. Press Save again to make the transfer, or press anything else to abort. One last important step: the receiving POD/POD Pro will now have its Edited light lit, or if its a Flextone, its Save light will be flashing. In either case, the sound you transferred is waiting to be stored into a memory location.
Deep Editing & MIDI Control: BACKING UP POD PROGRAMS TO OTHER DEVICES BACKING UP POD PROGRAMS TO OTHER DEVICES It’s recommended that you backup the sounds programmed into your POD so that you can restore them in case of some future disaster. If you want to transfer sounds from POD to some other MIDI device for backup (like say a MIDI file player or a hardware sequencer or keyboard workstation), things work pretty much the same way as they do for POD-to-POD transfers. But we’ll spell it out anyway.
Deep Editing & MIDI Control: EMAGIC SOUNDDIVER SOFTWARE EMAGIC SOUNDDIVER SOFTWARE The Emagic SoundDiver software included on your POD Tools CD is an editor/ librarian program that turns your computer into a POD control station. Check http://www.line6.com for the latest update for this software. SoundDiver lets you store POD sounds on your computer and edit POD sounds on-screen, with access to extra parameters not available when using POD on its own.
Deep Editing & MIDI Control: OTHER THINGS YOU CAN DO WITH MIDI OTHER THINGS YOU CAN DO WITH MIDI In addition to using the Emagic SoundDiver software on the POD Tools CD to edit and store POD sounds, or using a MIDI connection for ToneTransfer between a POD, POD Pro, and Flextone II, MIDI also gives you what you need for: Changing POD Channels with MIDI Program Changes The most basic thing to do with POD via MIDI is change channels.
Deep Editing & MIDI Control: OTHER THINGS YOU CAN DO WITH MIDI The POD front panel knobs all send out appropriate MIDI controllers (as do the wah and volume pedals of the optional Floor Board foot controller) that you can record into a MIDI track as you play through your POD along with a MIDI sequence. Follow the Return to Sender hook up instructions in Chapter 3 to set up your audio. Hook your POD’s MIDI OUT to a MIDI IN on your sequencing setup.
Deep Editing & MIDI Control: STEP-BY-STEP WITH SOUNDDIVER STEP-BY-STEP WITH SOUNDDIVER Step 1 - Hook your POD up to your computer’s MIDI interface. Use both the MIDI IN and MIDI OUT connections for bi-directional communication (so POD can talk to your computer, and the computer can talk to POD). Remember that POD’s OUT connects to the computer’s IN, and the computer’s OUT connects to POD’s IN. Make sure POD is powered on. Step 2 - Install the SoundDiver software on your computer.
Deep Editing & MIDI Control: STEP-BY-STEP WITH SOUNDDIVER Step 5 - SoundDiver should now establish communication with your POD (like we said above, make sure you have both MIDI In and MIDI Out connected to allow this), and will give you a dialogue box asking if you’d like to “Request Device’s Memories?” OK this dialogue, and SoundDiver sucks all the sounds out of your POD, and opens them in a window titled “POD” or something similarly inventive.
Deep Editing & MIDI Control: STEP-BY-STEP WITH SOUNDDIVER SoundDiver will give you a standard Save File dialogue box. A pop-up menu at the top of the dialogue box will say “Libraries,” letting you know you are about to save your library to the SoundDiver Libraries folder. You can click on this “Libraries” pop-up menu to navigate to another place if you want to save this library file some place else.
Deep Editing & MIDI Control: STEP-BY-STEP WITH SOUNDDIVER Step 8 - As a final check to make sure everything went as it should, choose Open from the File menu, and open the library you just saved. You should see a window similar to the one at the left, listing all 36 of your POD’s memories.
Deep Editing & MIDI Control: STEP-BY-STEP WITH SOUNDDIVER A Few Other SoundDiver Tips We’re done with the tutorial on how to save your sounds to the computer, but we figured we should give you one or two other tips: Editing a Channel Memory/Program The SoundDiver window shown on the left shows you the contents of your POD’s memory (a Bass POD, actually, but let’s not be picky).
Deep Editing & MIDI Control: SOUNDDIVER SETUP TROUBLE-SHOOTING SOUNDDIVER SETUP TROUBLE-SHOOTING There are a couple of considerations with SoundDiver and Windows sound card systems. Here are some troubleshooting hints, courtesy of Line 6’s own product support hero, George Van Wagner: 1. SoundBlaster type cards have more than one MIDI driver. The system will usually default to the driver for the built-in synth on the card, rather than the external MIDI port.
Deep Editing & MIDI Control: SOUNDDIVER SETUP TROUBLE-SHOOTING 3. Make sure that the Device ID is set to 1. 4. On the right hand side of the Memory Manager, click on the title bar that says User Programs. This will highlight all 36 of the user preset locations that are currently blank. 5. Now click on the left-most icon in the upper left of the Memory Manager. It should look like a little keyboard with an arrow coming out of it and a small question mark. This requests the current programs from the POD.
APPENDIX A: AMP MODELS Please note that Fender, Marshall, Vox, Boogie, Soldano, Roland, Matchless, Budda, Arbiter, and other amplifier model designations, and effects, are all trademarks of their respective owners, which are in no way associated or affiliated with Line 6. These marks and names are used solely for the purpose of describing certain amplifier tones produced using Line 6’s modeling technology.
APPENDIX B: EFFECT PARAMETERS Effect Tap Tweak Notes Bypass n/a n/a Turns off the effects. Compressor n/a Ratio There are 5 Compressor ratios: 1.4:1, 2:1, 3:1, 6:1, and Higher settings “squeeze” your volume more. Tremolo Tremolo Speed Depth The tremolo was designed with the characteristic Fender tremolo shape. Chorus 1 Chorus Speed Range of Choruses Square wave LFO, “rack” type chorus setup; subtler than Chorus 2.
APPENDIX C: MIDI PROGRAM CHANGES POD channels can be selected via MIDI program changes. Some devices number programs starting at zero. Some start at one.
APPENDIX D: MIDI CONTROLS Sound Diver Parameters (1 of 3 pages) Transmitted MIDI Range Control # Selects Amp Model 0-15 transmitted from Amp Model knob 12 0 = Tube Preamp, 1-32 = Other Amp Models >32 treated as 32 Drive - 0-127 13 0-127 Drive 2 (only if Amp Type = Layer) - NO TRANSMIT 20 0-127 Bass - 0-127 14 0-127 Mid - 0-127 15 0-127 Treble - 0-127 16 0-127 On/Off Trans: Off=0/On=127 73 Rcv: 0-63=OFF, 64-127=ON Presence - On/Off (Hold TAP, turn TREBLE) 21 0-127 Ch
APPENDIX D: MIDI CONTROLS Sound Diver Parameters Delay (always available) (2 of 3 pages) Notes Transmitted MIDI Range Control # Received MIDI Range On/Off FB SWITCH ON=127 28 Rcv: 0-63=OFF, 64-127=ON Delay Time 0-3150 mS, 128 equal steps NO TRANSMIT 30 0-127 Double-precision control for Delay Time with Delay Time, gives 14 bit precision NO TRANSMIT 62 0-127 - 0-127 32 0-127 Delay Repeats Delay Level Reverb (always available) Reverb Type - 0-127 34 0-127 On/Off FB SWITCH ON=127
APPENDIX D: MIDI CONTROLS Sound Diver Parameters (3 of 3 pages) Notes Transmitted MIDI Range Control # Received MIDI Range On/Off FB SWITCH ON=127 50 Rcv: 0-63=OFF, 64-127=ON Chorus/Flange Speed - NO TRANSMIT 51 0-127 Chorus/Flange Depth - NO TRANSMIT 52 0-127 Chorus/Flange Feedback - NO TRANSMIT 53 0-63 negative, 64-127 positive Chorus PreDelay (if type = Chorus) - NO TRANSMIT 54 0-127 Slow/Fast NO TRANSMIT 55 0-63=SLOW, 64-127=FAST Rotary Max Speed - NO TRANSMIT 56 0-
APPENDIX E: LINE 6 CONTACT CUSTOMER SERVICE Hope you enjoy your POD. If you have any questions or comments, our diligent support staff can be contacted at (805) 379-8900 (weekdays, 8am-6pm Pacific Time), via our website (www.line6.com,) or via email (support@line6.com). To ensure that your support experience is a pleasant one, we recommend taking some notes for yourself before you call. That way, you’ll remember to ask everything you want to ask the first time, and be able to get back to POD-ing ASAP.
APPENDIX F: WARRANTY INFO Line 6 Limited Warranty Information Sending in your registration card allows us to register key information so that we may handle problems faster and inform you of advance information, upgrades, and other news. Thanks in advance for filling out your registration card and sending it to us. And good luck in your music! Line 6, Inc.