Version 1.
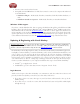
Table of Contents Start Here.................................................................................................1•1 About Line 6 Hardware & Software............................................................................... 1•1 System Requirements - POD Farm Plug-In & Standalone Operation........................... 1•1 Updating & Registering with Line 6 Monkey................................................................. 1•2 Product Activation & Authorization.............................
Plug-In Parameter Automation....................................................................................... 4•2 Supported Plug-In Formats.............................................................................................. 4•3 Activating the Plug-In..................................................................................................... 4•3 Plug-In User Interface Overview..................................................................................... 4•4 Main Control Bar...
Line 6 POD Farm 1.01 – Start Here Start Here About Line 6 Hardware & Software OK, you’ve got your guitar, a computer and a head full of songs and cool licks, so how do you get this all going? You’re just a few steps away from turning your computer into a serious tone, jamming and recording machine. First, here is some valuable information on getting started, and to ensure you have all the latest and greatest updates…. System Requirements - POD Farm Plug-In & Standalone Operation Windows® • Pentium 4 -1.
Line 6 POD Farm 1.01 – Start Here • Internet connection for online features • Compatible Line 6 USB hardware or iLok (device must be connected to computer & authorized to use POD Farm): • POD Farm Plug-In - POD Studio, TonePort, GuitarPort, POD X3, PODxt hardware, or iLok • POD Farm Standalone Operation - POD Studio, TonePort, or GuitarPort hardware Windows 64 Bit support If you have a 64 bit Windows PC, then no worries! POD Farm 1.
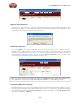
Line 6 POD Farm 1.01 – Start Here Register Your Hardware If you have not already done so, you’ll be prompted to Register your connected Line 6 hardware. It’s a painless process really, so click that Register Now button and fill in the blanks on the Web page. This page will list all your registered Line 6 gear in one place. Grab Those Updates Go to the Updates tab in Line 6 Monkey.
Line 6 POD Farm 1.01 – Start Here You will be taken to the Line 6 Store, where you can purchase a license for the plug-in. Follow the instructions on the resulting page to receive your activation key. Or, just head on over to the Line 6 site any time and see what is “in Store” for you. Product Activation & Authorization Some features of POD Farm and your Line 6 hardware require “Activation” using Line 6 Monkey and a live Internet connection.
Line 6 POD Farm 1.01 – Start Here • Activation turns the Add-On features “on” in your POD Farm-compatible hardware, so they can operate in the POD Farm stand-alone application and/or POD Farm Plug-in. When using your Line 6 USB hardware on a new computer for the first time, you may also see the following message at the top of the Add-Ons tab - just click the Authorize button to finish configuring your computer to use your new hardware and Add-Ons.
Line 6 POD Farm 1.01 – Start Here Just click Authorize, and Monkey will enable the use of your activated Add-On(s) on the new computer system. The destination computer lacks an Internet connection So you just got the call from Mr. Big Time Producer for a session at so-and-so’s studio, and you want to bring all this great Line 6 tone along for tracking – but their computer does not connect to the Internet.
Line 6 POD Farm 1.01 – Start Here you don’t already have an iLok key, you can purchase one at most store where audio software is sold, or directly from iLok.com. To follow are the steps for purchasing and configuring POD Farm Plug-In and your iLok. What is an iLok? The iLok key is a proprietary USB hardware dongle that holds licenses for software protected by PACE Anti-Piracy’s Interlok® system.
Line 6 POD Farm 1.01 – Start Here If you’ve purchased the POD Farm iLok license from the Line 6 Online Store, please skip ahead to the following iLok Deposit section, since your purchase does not require the “Activation” steps. Note: You can perform the following Online Purchase, Activation and iLok licensing processes on any computer that has Internet access - These steps do not necessarily need to be performed on the computer on which you plan to use POD Farm Plug-In.
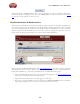
Line 6 POD Farm 1.01 – Start Here iLok Deposit (Line 6 Online Store purchase) If you’ve purchased POD Farm Plug-In for iLok directly from the Line 6 Online Store... Once your transaction is complete, log into your Line6.com account and go to the iLok Deposits page. Here you can check the Status of your iLok License. Initially, following your Online Store transaction, you should see the Status listed here as “inserted”, as shown above. Click the Deposit button to proceed.
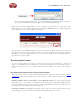
Line 6 POD Farm 1.01 – Start Here Connect your iLok to your USB port and follow the instructions on the iLok site to Synchronize your iLok key. Allow the Synchronize process to complete, and you’ll then be able to select your POD Farm license for download. Follow the steps listed on the iLok.com page to Download the POD Farm License to your iLok key... And you’re done! Now that your iLok USB key is all configured, you can log out and exit the iLok web site.
Line 6 POD Farm 1.01 – Start Here Then press the “Go” button and the correct installer will be displayed for your system so that you can download it to your computer. Once the download of the installer file completes, run the installer file following its step-by-step instructions. Windows® XP® and Vista® users...
POD Farm 1.01 – Using Your Line 6 Hardware Using Your Line 6 Hardware The POD Farm software is designed to work with the new Line 6 POD Studio family of USB audio interfaces. Additionally, a POD Farm Plug-In license can purchased for an iLok USB “smart key”. POD Farm also supports all Line 6 TonePort (models GX, UX1, UX2, UX8, D.I. & KB37) and GuitarPort USB devices.
POD Farm 1.01 – Using Your Line 6 Hardware GX (POD Studio & TonePort) Connect your electric Guitar or Bass Instrument Input - To input your electric guitar or bass, plug it in here using a standard 1/4-inch TS instrument cable. When in POD Farm Standalone operation, this inputs the signal into POD Farm, where you can choose your Tone, and then route the processed signal both to the Record Sends (to your audio software) and directly to the GX hardware outputs.
POD Farm 1.01 – Using Your Line 6 Hardware UX1 (POD Studio & TonePort) Connect your electric guitar or bass Connect your stereo headphones Connect a microphone Mic - To input a signal from a microphone, connect it here using an XLR cable. When in POD Farm Standalone operation, this inputs the microphone signal into POD Farm, where you can choose your Tone, and then route the processed signal both to the Record Sends (to your audio software) and directly to the UX1 hardware outputs.
POD Farm 1.01 – Using Your Line 6 Hardware Monitor In - If you want to hear the signal from a line level source along with all the other audio coming from your computer, but do not want this audio recorded via the UX1 Record Sends, then plug the source in here. Note that this is a stereo jack, so you should use a stereo, 1/4-inch TRS audio cable for this connection. USB - This of course is where you connect the supplied USB cable to UX1, with the other end going to your computer’s USB 1.1 or 2.0 port.
POD Farm 1.
POD Farm 1.01 – Using Your Line 6 Hardware TonePort UX8 TonePort UX8 is a multichannel recording interface designed for professional use, offering plenty of headroom, a wide dynamic range and an exceedingly low noise floor. Designed with high quality electrical components and a rugged exterior, UX8 is built to provide many years of reliability.
POD Farm 1.01 – Using Your Line 6 Hardware is always received and sent at 24 bit. To sync to an external S/PDIF device, set the UX8 clock to sync to S/PDIF in the Line 6 Audio-MIDI Devices application. USB 2.0 This of course is where you connect a USB cable to UX8, with the other end going to one of your computer’s USB 2.0 ports.
POD Farm 1.01 – Using Your Line 6 Hardware 2, as well as Processed, Semi-Processed, or Dry Input). You’ll also see four additional Record Sends in your recording application for UX8 (Sends 1-2 thru 7-8). These Sends are fed directly by UX8’s analog inputs 1 – 8. You can simultaneously record the direct, unprocessed signal from any of these Sends for later processing using POD Farm Plug-In! For more info, check out the POD Farm Standalone Operation chapter.
POD Farm 1.01 – Using Your Line 6 Hardware Main Output Level Controls Main Outputs 1-2 are controlled by a main volume knob and main mute button. The volume knob is an analog level control and does not affect any level being sent to your computer. When Mute is engaged, as solid amber LED illuminates, blinking about once every 2 seconds. Note that these controls operate on main outputs 1-2 only (headphone and S/PDIF levels are not affected).
POD Farm 1.
POD Farm 1.01 – Using Your Line 6 Hardware any audio coming into the Monitor In jack is not routed to the S/PDIF output). The digital signal is always sent at 24-bit resolution. Monitor In - If you want to hear the signal from a line level source mixed with all the other audio coming from your computer, but do not want this audio recorded via the POD Farm Record Sends, then plug the source in here. Note that this is a stereo jack, so you should use a stereo 1/4-inch TRS audio cable for this connection.
POD Farm 1.01 – Using Your Line 6 Hardware Connect your stereo Headphones Connect to your 3rd-party audio interface’s input for “dry” recording Analog Line Outs – connect to your powered speakers or mixer Connect a USB cable from here to your computer USB - This of course is where you connect a USB cable to TonePort DI, with the other end going to your computer’s USB 1.1 or 2.0 port.
POD Farm 1.01 – Using Your Line 6 Hardware GuitarPort Instrument Input - To connect your electric guitar or bass, plug it into this input. When using POD Farm in Standalone operation, this connection routes the instrument’s signal into POD Farm, where you can choose your Tone, and then route the processed signal to the Record Sends (to your audio software) and to the Analog Line Outs.
POD Farm 1.01 – Using Your Line 6 Hardware Using POD X3 Family Devices with Your Computer... If you own a POD X3, POD X3 Live or POD X3 Pro, then you can also reap the DAW benefits with POD Farm Plug-In! To get the POD Farm Plug-In, as well as any other available “Add-Ons”, just connect POD X3 to your computer and run Line 6 Monkey to download, install and authorize the POD Farm software & Plug-In. Read more about Line 6 Monkey and this process here, or just head on over to the Line 6 Online Store.
POD Farm 1.01 – Using Your Line 6 Hardware POD X3 Left & Right Analog Outputs – Connect to your powered speakers or mixer USB 2.0 - Connect to your computer S/PDIF Out - Connect to other S/PDIF devices Input 2 - Connect your microphone Phones - Connect your stereo Headphones Input 1 - Connect your guitar or bass Input 1 (Instrument) – Connect your guitar or bass here using a standard 1/4-inch TS instrument cable.
POD Farm 1.01 – Using Your Line 6 Hardware cable to your computer to use it with POD Farm Plug-In, and/or to use POD X3 as your computer’s sound card device. S/PDIF Digital Output - To send output from POD X3 to another device digitally, connect from this S/PDIF Dig Out to the S/PDIF in on your other device. Connecting digitally is the best choice for routing to external digital recording devices, such as a DAT recorder or MiniDisc.
POD Farm 1.01 – Using Your Line 6 Hardware Microphone Input & Trim knob – Connect a microphone here using a standard XLR cable. You can use the little “Trim” knob to adjust the mic signal coming into POD X3, much like you would on a mixer console. Just like with Input 1, POD X3 itself applies preamp and effects models to your mic input, which is then fed out the Analog Left & Right Outputs, as well as fed to the S/PDIF digital output, and out the Record Sends digitally to your computer across the USB 2.
POD Farm 1.01 – Using Your Line 6 Hardware two different tones at once on a single input, choose how to pan them, record them into your audio software, etc! For details about Single versus Dual Tone and other signal routing options, please refer to your POD X3 Pilot’s Handbook.
POD Farm 1.01 – Using Your Line 6 Hardware Mic Input Low Cut Filter and Pad Switches – Engage the Low Cut Filter for the Mic Input to cut off all frequencies 75Hz and below - useful for eliminating rumble from mic sources. If you are plugging in a Mic with a hot signal level, engage this pad to attenuate the channel strip’s Mic Input by -20dB. Phantom Power Switch – Pushing in this button activates 48V Phantom Power for both Channel Strip Mic Inputs. An LED will light when Phantom Power is activated.
POD Farm 1.01 – Using Your Line 6 Hardware AES/EBU Digital Input & Output - To record digitally from another digital device, connect it’s AES/EBU output to this Input. The AES/EBU In always receives 24-bit audio. To send output from POD X3 to another device digitally, connect from this AES/EBU Output to the AES/EBU In on your other device. Connecting digitally is the best choice for routing to external digital recording devices, such as a DAT recorder, digital video player, digital mixing board, etc.
POD Farm 1.01 – Using Your Line 6 Hardware Output Level Switch Optimize the Studio/ Direct Outs level for Mic vs. Line Ground Lift Switch Studio/Direct Outputs Connect here to route your Toggle the ground on/off fuly processed tones to external gear. Unprocessed Outputs Use as a dry out to D.I.
POD Farm 1.01 – Using Your Line 6 Hardware operating at approximately 19.5 Volts peak-to-peak, making it optimal for line level devices. The loop can also be used with most stomp boxes by adjusting the send and return levels. Use the Left Return jack for mono return. The loop can run pre or post Amp Model, and if nothing is connected to it, POD X3 Pro is smart enough to disable the loop so you still get sound. Using PODxt Family Devices with Your Computer...
POD Farm 1.01 – Using Your Line 6 Hardware PODxt Phones - Connect your stereo Headphones Instrument Input Connect your guitar or bass Instrument Input – Connect your electric guitar or bass here using a standard 1/4-inch TS instrument cable. PODxt itself contains the processing power that turns your naked input signal into that roaring guitar Tone, which is then fed out the Analog Line Outs, as well as fed to the Record Send 1-2 digitally to your computer across the USB connection.
POD Farm 1.01 – Using Your Line 6 Hardware PODxt Live Instrument Input - Connect your guitar or bass Aux Input – (Monitor in) connect a line level, stereo output (from your stereo, MP3 player, etc) Analog Line Outs – connect to your powered speakers or mixer Phones - Connect your stereo Headphones USB - Connect to your computer Instrument Input – Connect your electric guitar or bass here using a standard 1/4-inch TS instrument cable.
POD Farm 1.01 – Using Your Line 6 Hardware PODxt PRO Phones - Connect your stereo Headphones Instrument Input Connect your guitar or bass Instrument input – Connect your electric guitar or bass here using a standard 1/4-inch TS instrument cable. PODxt Pro itself contains the processing power that turns your naked input signal into that roaring guitar Tone, which is then fed out the Analog and Digital Outs, as well as fed to the Record Send 1-2 digitally to your computer across the USB connection.
POD Farm 1.01 – Using Your Line 6 Hardware into any the Instrument inputs (and effects loop, if you are using it). So, these are what you want to connect to your monitoring system when using PODxt Live as your computer’s sound card. Use shielded ¼-inch tipped or XLR tipped cables to connect directly to your powered speakers, mixer or power amp setup. Note that you can also use the Phones jack on PODxt Pro if you want to use headphones for monitoring.
POD Farm 1.01 – Using Your Line 6 Hardware In the PODxt Signal Routing selector you can choose one of four routing modes for the signals that run inside PODxt, and to Record Send 1-2: • Send Processed Guitar - This is the normal mode of operation: PODxt-processed sound is sent to your computer via Record Send 1-2 so it can be recorded in your audio software.
POD Farm 1.01 – Using Your Line 6 Hardware for live performance. To follow are instructions for these different types of setups. Connecting analog outputs to an external device You can route your POD Farm Tone to just about any type of external device simply by connecting the Analog Outs from the back of your POD Studio, GuitarPort, TonePort or POD directly into the external device’s line level, analog inputs.
POD Farm 1.01 – Using Your Line 6 Hardware the POD Farm Mixer View, or go to the Windows® Control Panel). The initial default is one tick to the right of “Extra Small” as shown. Raise this slider if you are getting any dropouts in your monitor signal.
POD Farm 1.01 – Using Your Line 6 Hardware Sound Cards & Sound Issues One of the many unique features of your Line 6 Hardware is its ability to function as a computer sound card. You can choose to make your hardware the preferred sound card for your computer, or alternatively keep your current “Built-In” sound card the default device for playing system sounds, etc…, and connect your hardware to it so you can hear POD Farm tone thru your computer’s sound card.
POD Farm 1.01 – Using Your Line 6 Hardware Windows® Vista® Go to the Vista Control Panel, and select Sound. In the Playback tab... Select your Line 6 hardware if it shows the green checkmark then it is currently the default device for playback. If not, then click the Set Default button. If yo want to set your Line 6 hardware as the default recording Device, then repeat these steps in the Recording tab.
POD Farm 1.01 – Using Your Line 6 Hardware GuitarPort users... Connect a 1/8-inch stereo cord to the Headphone Out, or use the Stereo RCA Line outputs with an adapter. Connect the other end to the Line Input of your sound card. POD Studio & TonePort users... Connect the mono 1/4-inch Analog Outputs (if you have a UX8 then you probably want to use Outs 1 &2). Or, connect a 1/4-inch stereo cord to the Headphone Out Use an adapter if needed to connect to the Line Input of your sound card.
POD Farm 1.01 – Driver Panel & Recording Line 6 Driver Panel & Recording So, just how does all that huge amount of Tone get routed around between your Line 6 gear, computer and recording software you ask? All this is performed by the audio driver - a software component installed with POD Farm that allows the audio to be routed to the right place. This section provides an overview of the different driver types and where you can tweak a few settings to work best with your particular computer setup.
POD Farm 1.01 – Driver Panel & Recording utilize the POD Farm Plug-In with these devices). There, aren’t you feeling smarter already? The options in the Line 6 Audio-MIDI Devices dialog are slightly different if you are on a Windows® versus a Mac® system, and also slightly different depending on which Line 6 hardware you are using.
POD Farm 1.01 – Driver Panel & Recording 2 – Selected Device icon: An icon for the selected Line 6 Device appears here. 3 – Driver version: Displays the current device’s installed driver version number. 4 – ESN: Displays the current device’s unique Electronic Serial Number. 5 – ASIO Client indicator: If you are running audio software that is using this Line 6 device as its ASIO sound card, the name of the software will appear here.
POD Farm 1.01 – Driver Panel & Recording Pressing this button (not surprisingly) launches the Vista Control Panel’s Sound dialog. Here in the Playback tab you can designate your Line 6 USB device as the “Default” audio device if you want all your Vista programs such as Win Media Player, Flash Player, iTunes, Internet video players, etc., to send their playback to it.
POD Farm 1.01 – Driver Panel & Recording The Vista Control Panel>Sounds>Properties - Advanced tab 11 – ToneDirect Monitoring Buffer Size: This slider adjusts the buffer size for the audio responsiveness of the ToneDirect Monitoring signal. Basically, the default setting should be fine for most systems, but if getting audio dropouts or working with large CPU demands on your system, raise the slider a notch or two to the right until it alleviates the problem.
POD Farm 1.01 – Driver Panel & Recording TonePort UX8 has a larger set of options - see the next section for its Inputs & Recording tab. Record Sends Info box: One line for each Record Send appears here along with a general description for the signal each Send is carrying. Refer to your specific Line 6 device type in the following descriptions. Note that multiple Sends for your Line 6 device are only available when using the ASIO driver in your recording software.
POD Farm 1.01 – Driver Panel & Recording Note that the type of signal that is fed to each Send is configured on the POD X3’s on-board Outputs Studio/Direct Mix settings screen. To put it another way, Send 1-2 is fed the same “Studio/Direct Mix” as your main outputs, which could be just a Tone 1, or some combination of Tone 1 & 2, depending on how you set the Studio/Direct mix controls.
POD Farm 1.01 – Driver Panel & Recording Inputs & Recording Tab (TonePort UX8 only - Windows) The Inputs & Recording tab lets you select specific inputs for recording. Input Source options are as follows: Input 1: Instrument 1 or XLR 1 or Line 1 or S/PDIF (L) Input 2: Instrument 2 or XLR 2 or Line 2 or S/PDIF (R) Input 3: XLR 3 or Line 3 Input 4: XLR 4 or Line 4 Input 5: XLR 5 or Line 5 Input 6: XLR 6 or Line 6 Input 7: XLR 7 or Line 7 Input 8: XLR 8 or Line 8 You can also link inputs into stereo pairs.
POD Farm 1.01 – Driver Panel & Recording via ToneDirect™ monitoring for Inputs 1 & 2 of the UX8, which includes two high-Z Instrument inputs, two XLR inputs, two Line level inputs and stereo S/PDIF input. POD Farm’s ToneDirect™ Monitoring is ideally suited for recording guitar and bass with amp and effects processing, providing the instantaneous feel necessary for competent performance while tracking.
POD Farm 1.01 – Driver Panel & Recording Outputs & Monitoring Tab (UX8 Only - Windows) Important: Note that the Outputs & Monitoring tab provides control over the volume of whatever you are inputting into UX8. These controls do not affect Send levels (the audio that streams into your recording software), nor do they control the level of audio coming from your computer (such as the playback level of your software’s session).
POD Farm 1.01 – Driver Panel & Recording Mix Controls Inputs 1 - 12 offer the following controls: Mute (On/Off) Monitor Volume (-100dB to +6dB) Monitor Pan (100% Left - 100% Right)* Stereo Monitor Meters * -3dB panning law is applied to the pan control to maintain a constant monitoring level across the panorama. Main Monitor Volume This slider controls the overall monitoring volume for the current output pair.
POD Farm 1.01 – Driver Panel & Recording The Pan sliders for a “locked” stereo pair are automatically set to 100% Left and Right. The lock icon represents two sources linked as a stereo pair. Using tool tips You can obtain precise value readings for output levels, volume sliders and pan sliders. Do this by hovering the mouse cursor over the meter or slider you wish to read.
POD Farm 1.01 – Driver Panel & Recording Mac® - Line 6 Audio-MIDI Devices Dialog You can launch the Line 6 Audio-MIDI Devices dialog from within the Mac® System Preferences, or from the POD Farm Standalone application’s Preferences > Hardware tab. On Mac® systems, all Line 6 hardware utilizes the Mac® OS X® Core Audio driver format, which means that some of your Line 6 device settings are found in the OS X Audio-MIDI Setup dialog.
POD Farm 1.01 – Driver Panel & Recording 44.1 and 48 kHz sample rates natively, and support 88.2 and 96 kHz sample rates by way of an internal sample rate converter.* This indicator lights up to show you when this converter is active, which can be any time your audio software is requesting a different sample rate you’re your device “natively” supports or is “fixed” at. Also see the Force Driver Format checkbox option. See the description for the Mac Audio-MIDI Setup dialog for more about Sample Rates.
POD Farm 1.01 – Driver Panel & Recording options display its settings. 5c – Audio Input: • In the top selector, you will be able to choose your Record Send for your Line 6 device to view it’s format settings below. • The Format selectors show you the Sample Rate* and Bit Depth that the Line 6 device is operating at for recording. The Bit Depth for all Line 6 devices is fixed at 24 bit.
POD Farm 1.01 – Driver Panel & Recording Mac® OS X® Audio-MIDI Settings Dialog (UX8 Only) 5a 5b 5e 5c 5d 5f 5a – System Settings: • The Default Input and Default Output options allow you to choose the sound card you want your audio applications to use by default. If you want this to be your Line 6 device, select your UX8 here. • The System Output option allows you to choose which sound card the Mac System Settings are played through.
POD Farm 1.01 – Driver Panel & Recording *It is recommended that you do not use the Sample Rate selector in the Mac Audio-MIDI Setup dialog to set your sample rate when your recording software is running. Typically, your recording software will offer a Sample Rate option within its own “Preferences” or “Audio Setup” settings. It is best to configure the Sample Rate within the recording software, and you will see the device’s sample rate switch automatically to match it.
POD Farm 1.01 – Driver Panel & Recording When POD Farm Standalone is not in use by the selected Line 6 device, this Input Source menu, like the POD Farm Tone 1 Input Source menu, offers a list of input options. The options will differ depending on the Line 6 device - (POD Studio and TonePort) UX2 displays the following: When POD Farm Standalone is not running, the Input Source Select menu is available. As shown here, UX2 offers several input Sources to choose from.
POD Farm 1.01 – Driver Panel & Recording POD X3 devices show a list of 5 Record Sends: Note that the type of signal that is fed to each Send is configured on the POD X3’s on-board Outputs settings screen. For example, Send 1-2 carries the same “Direct/Studio” signal you hear on POD X3’s Main outputs, which could be just Tone 1, or some combination of Tone 1 & 2.
POD Farm 1.01 – Driver Panel & Recording Line 6 Audio MIDI Settings Dialog - Inputs & Recording Tab (UX8 Only) 1 2 3 4 5 1 – Input Source Select: UX8 offers 8 individual input sources, each with its own selector where you can choose which physical input is to be used for each.
POD Farm 1.01 – Driver Panel & Recording When POD Farm Standalone is not running, the Input 1 & input 2 selectors are available. As shown here, UX8 offers several input Sources to choose from. The selected Source is what gets routed to the Record Send. Stereo Paired Inputs You can also link inputs into stereo pairs. This affects hardware monitoring controls in the Outputs & Monitoring tab (see below).
POD Farm 1.01 – Driver Panel & Recording 5 - Restore Defaults - click this button to restore all this tabs settings to their original default values. Outputs & Monitoring Tab (UX8 Only - Mac®) Important: Note that the Outputs & Monitoring tab provides control over monitoring levels, specifically, what you hear coming out of the UX8. These controls do not affect Send levels, the audio that streams into your recording software.
POD Farm 1.01 – Driver Panel & Recording By default, the only sounds that come out of the UX8 are the computer’s output and POD Farm 9-10 signal, all through Main Outs 1-2. You can directly monitor other UX8 inputs by un-muting (unchecking the Mute checkbox for) the corresponding input source in this tab. UX8 provides monitoring through the hardware with zero latency, which is ideal for tracking with multiple sources simultaneously.
POD Farm 1.01 – Driver Panel & Recording track and an ample level of themselves above the rest of the mix. Additional output pairs 5-6 and 7-8 are available for headphone mixers or sending to a mixer, other monitors, etc. Stereo Pairs When the “Stereo” checkbox is active in the Inputs & Recording tab for a pair of Inputs, the representative Inputs in the Outputs and Monitoring tab will display them as “locked” as a stereo pair. The lock icon represents two sources linked as a stereo pair.
POD Farm 1.01 – Driver Panel & Recording Important Things to Know for Recording This section will give you some pointers for using your Line 6 Hardware for recording, to help you get your brain wrapped around a few of the complex computer things your geeky friends talk about at parties. We’ve got even more info, including setup tips for specific audio programs and system tweaking tips in the additional documentation found at the POD Farm Online Help site.
Line 6 POD Farm 1.01 - POD Farm Plug-In POD Farm Plug-In Welcome to the wonderful world of POD Farm Plug-In, where legendary, studio-standard Tone and classic vintage effects are all available to you within your favorite Windows® or Mac® DAW (Digital Audio Workstation) software, in a flexible native software Plug-In format! Note that most features described in this chapter are also the same for POD Farm when in Standalone operation.
Line 6 POD Farm 1.01 - POD Farm Plug-In audio tracks or live audio input. A helpful analogy for Plug-Ins is to think of them as effects pedals. Effects pedals change the Tone of your bass or guitar before the signal reaches your amplifier. As with pedals, rack effects units, or any other conventional piece of outboard gear, Plug-Ins provide familiar knobs, sliders & buttons for tweaking their parameters.
Line 6 POD Farm 1.
Line 6 POD Farm 1.01 - POD Farm Plug-In Plug-In User Interface Overview 1 2 3 4 1 - Main Control Bar 2 - View Selection Buttons 3 - Gear View/Panel View/Presets View 4 - Signal Flow View Main Control Bar Input Gain Control & Meter Tone New/Open/Save Options Preset Name Display & Menu Next/Previous Preset Control Preset View Shortcut Output Level Control & Meter Dual Tone Control Input Gain Control - Sets the input gain fed into the Plug-In.
Line 6 POD Farm 1.01 - POD Farm Plug-In Note - These Next/Previous buttons are intended to allow you to incrementally go from one preset to the next - if you click multiple times repeatedly then things may appear a bit sluggish as POD Farm attempts to “catch up” in running through multiple presets. If you want to jump around or find a particular preset, better to use the Presets View. Presets View Shortcut Control - Provides a shortcut to Presets View.
Line 6 POD Farm 1.01 - POD Farm Plug-In Output Level Control and Meters • The Output Level knob controls the main Plug-In output level, which is the total mix of Tones 1 and 2. • Stereo meters provide peak display with clip indicators. As always, you want to avoid clipping - adjust your individual Tone Output Levels, as well as the main Output Level knob here to a achieve a healthy output reading on these meters, but without clipping.
Line 6 POD Farm 1.01 - POD Farm Plug-In Selecting a Model • When you hover over a model category a rectangle box is displayed and a downward arrow shows to the right of the category name. Pressing on the arrow displays a drop down list of available models within that category. Select a model by clicking on the model name in the list. • Double-click on the centered model and it is then placed in a default position within the signal flow of the currently selected Tone.
Line 6 POD Farm 1.01 - POD Farm Plug-In Cabinet View From the Amp View, pressing the Cab button displays the Cabinet View. From here you can select different guitar or bass speaker cabinets, change the positioning of the cabinet in the room, and select among four different microphone emulations.
Line 6 POD Farm 1.01 - POD Farm Plug-In Effects View Selecting any Effect in the Signal Flow View displays its controls in the Panel View... Effect Bypass Button Effect Model Menu Pre/Post Toggle Host Sync/Tap Tempo Options FX Time/FX Speed Controls Effect Bypass Button - Bypasses the displayed effect without removing it from the signal flow. Effect Model Menu - Displays the name of the current effect model.
Line 6 POD Farm 1.01 - POD Farm Plug-In *Note that when in POD Farm Standalone mode, you’ll see only the BPM & Tap Tempo options (since obviously there is no “Host” application tempo to follow!) BPM Tempo Field /Tap Tempo Button - Click the Host Sync button to toggle the Host Sync mode “off” and you can then use these options to manually set a Master Tempo for POD Farm Plug-In. To set a specific BPM, click directly on the BPM value and drag up/down.
Line 6 POD Farm 1.01 - POD Farm Plug-In Presets View Presets View provides a convenient way to browse and load Tones from your local Tone library into POD Farm. Just double-click any preset Name to load it into POD Farm. Source Contents Preset List Pane Source Folder Config Button Search Field Tone Info Button Clear Button Refresh Button Selected Preset Source Contents - The contents of the POD Farm “Tone Folder” is listed here.
Line 6 POD Farm 1.01 - POD Farm Plug-In Info Button - When a Tone preset is selected, you’ll see the Info button to the left of its name. Click this button to launch the Edit Tone Info dialog, where you can enter and edit text that is saved with the Tone. Text you enter in the dialog’s Notes field will then appear in the Preset List’s Notes column. Note that when you do a Save As for any Tone, this Info dialog is automatically launched so you can enter some details about the Tone before saving.
Line 6 POD Farm 1.01 - POD Farm Plug-In Saving a Preset To save the currently loaded Tone Preset, click on the folder button to the right of the Preset menu on the Main Control Bar. Loading a Preset with “Non-authorized” Models As discussed in the Start Here chapter, Line 6 offers Model Pack Add-Ons for your Line 6 hardware, which expand the set of Amp & Effects Models available within POD Farm Plug-In (as well as in POD Farm in Standalone operation).
Line 6 POD Farm 1.01 - POD Farm Plug-In Signal Flow View The bottom of the application window is the Signal Flow View (SFV) which displays the chain of models making up the current Single or Dual Tone paths. To edit any model’s settings, just doubleclick directly on the model within the SFV and its editable controls will be displayed in the upper window (see the Panel View section).
Line 6 POD Farm 1.01 - POD Farm Plug-In Tone Mute - Click this button to mute a Tone - Tones 1 or 2 can be muted individually in Dual Tone mode. When muted, the Tone path is displayed dimmed and the Tone is silenced. All models remain visible within the Signal Flow View, and still fully editable.
Line 6 POD Farm 1.01 - POD Farm Plug-In Model Bypass & Delete Controls - Hovering over or selecting a model within the SFV illuminates the model, and a set of controls is displayed. Use these controls to bypass the model, or to remove it completely from the Tone path.
Line 6 POD Farm 1.01 – POD Farm Standalone Operation POD Farm Standalone Operation This chapter covers features unique to POD Farm Standalone Operation. Note that all other features are identical in operation to those of the Plug-In, so please review the POD Farm Plug-In chapter for details on other features. If you own a Line 6 POD Studio, TonePort or GuitarPort device, the POD Farm Standalone application is available to you.
Line 6 POD Farm 1.01 – POD Farm Standalone Operation then use POD Farm Plug-In on the DAW track to “non-destructively” make changes to your recorded track’s Tone any time up until your final mix. Or, you can choose to feed the fully processed Tone from POD Farm’s Standalone mode to the Record Sends, and record your POD Farm Tones exactly as you hear them! Please see the Mixer View section for details on configuring the Record Sends.
Line 6 POD Farm 1.01 – POD Farm Standalone Operation *Note - Some Line 6 devices offer only a 1/4 inch Instrument input (such as GX, TonePort DI, GuitarPort devices). When one of these devices is in use, no Input Menus nor Input Meters are displayed since this hardware type offers a “fixed” Instrument Input. All other devices offer Instrument, Mono “1” and “2” as well as “Stereo” Sources. • In Single Tone mode, the menu lists each of the Mono and Stereo input sources your specific Line 6 device offers.
Line 6 POD Farm 1.01 – POD Farm Standalone Operation Reference Control The Tuner’s Reference Control tells the Tuner what to use as the base tuning reference note. 440Hz is the standard reference value for A and is generally used for tuning reference in modern, western music. Unless you have a particular need to adjust the Tuner’s reference, you probably want to stick with the standard 440Hz setting for this control.
Line 6 POD Farm 1.01 – POD Farm Standalone Operation Audio Source Selection Menus • Select the audio Source you want fed independently to each Record Send. • If POD Farm is in Single Tone mode, the options available in the Source menus will be Processed, Semi-Processed (Amp, Cab, Comp, EQ, and “Pre” positioned effects only), and Dry Inputs. (The Dry Inputs option feeds a stereo signal, with the same signal on both the left and right channels).
Line 6 POD Farm 1.01 – POD Farm Standalone Operation Preferences The Preferences dialog offers some handy configuration settings for the POD Farm application. Launch the Preferences dialog from the File menu, or from the Preferences button in the Mixer View. There are two tabs of settings to behold here - Tones and Hardware...
Line 6 POD Farm 1.01 – POD Farm Standalone Operation POD Farm Preferences - Hardware tab Launch POD Farm using - Here you can choose a specific Line 6 device for POD Farm Standalone to always use when it launches (provided that device is connected and powered on). If you typically connect only one supported Line 6 device to your computer at a time, then it is easiest to just leave this set to Auto-Detect and POD Farm will do just that.
Line 6 POD Farm 1.01 – POD Farm Standalone Operation Advanced Hardware and Driver Settings - Click on the button here to launch the Line 6 AudioMIDI devices if you want to configure audio driver settings. For lots of geeky info about audio driver settings, please visit the Driver Console and Recording Applications chapter. Updates and Auto-Configuration - Click on this button to launch Line 6 Monkey.
POD Farm 1.01 – Model Gallery Model Gallery About the Model Gallery.........................................................................6•3 Guitar Amp & Cab Models.......................................................................6•3 1964 Blackface ‘Lux . ...................................................................................................... 6•3 Brit Gain 18.....................................................................................................................
POD Farm 1.01 – Model Gallery Effects Models........................................................................................ 6•15 Delay.............................................................................................................................. 6•15 Analog Delay w/Modulation...................................................................... 6•16 Tube Echo................................................................................................... 6•16 Digital Delay........
POD Farm 1.01 – Model Gallery About the Model Gallery You probably know by now that we’re relentless tone fanatics here at Line 6. Once we’ve set our sights on creating a software emulation of a particular piece of gear, we go to great lengths to be sure that we’ve gotten our hands on the very best example of an amp, preamp, effect or speaker cabinet that we can find to study.
POD Farm 1.01 – Model Gallery sound. Tweaked up right, this tone will cut through and sing. We jacked into Input 1 of the Vibrato Channel to get this model cooked up. * FENDER® and DELUXE REVERB® are registered trademarks of Fender Musical Instruments Corporation and are in no way associated or affiliated with Line 6. These product names, descriptions and images are provided for the sole purpose of identifying the specific products that were studied during Line 6’s sound model development.
POD Farm 1.01 – Model Gallery Citrus D-30 In 1968, in a little music store on Old Compton St. in London, Clifford Cooper was having trouble getting amplifier manufacturers to take him seriously as a dealer, as they thought he was too young, and his shop too small. So he did what seemed only logical to an enthusiastic young man with a background in electrical engineering – he designed and built his own amplifiers.
POD Farm 1.01 – Model Gallery 1987 Jazz Clean The 1987 Jazz Clean Amp Model is modeled after* the classic Roland® JC-120. This transistor amp was known for a strident clean sound and built-in stereo chorus. When using the JC-120 model, try cranking up the Treble for a shimmering clean sound that’ll cut through just about any mix. It’s also perfect for that 80’s “new wave” sound (after all, it was Andy Summers’ favorite amp with The Police).
POD Farm 1.01 – Model Gallery Line 6 Spinal Puppet You know how, when you’re playing head-bangin’ music, you look out into the audience and see all those heads bobbing up and down? Those are Spinal Puppets. Need we say more? p Return to Model Gallery List Line 6 Treadplate Looking for tight, high gain tone? The kind of sound that powers classic Metallica or Dream Theater tracks? Then you’ve come to the right place, my friend.
POD Farm 1.01 – Model Gallery * All product names used in this document are trademarks of their respective owners, which are in no way associated or affiliated with Line 6. These product names, descriptions and images are used solely to identify the specific products whose tones and sounds were studied during Line 6’s sound model development. MARSHALL® is a registered trademark of Marshall Amplification PLC. FENDER® is a registered trademark of Fender Musical Instruments Corporation.
POD Farm 1.01 – Model Gallery great clean tone as well. Eric Clapton put Soldano on the map when he played “Saturday Night Live” with his Soldano SLO-100. * MARSHALL® is a registered trademark of Marshall Amplification PLC and is in no way associated or affiliated with Line 6. These product names, descriptions and images are provided for the sole purpose of identifying the specific products that were studied during Line 6’s sound model development.
POD Farm 1.01 – Model Gallery One of the interesting things about the Bassman® is just how interactive the Middle and Treble controls are. The Middle control isn’t a bandpass, as in most tone control setups. Instead, it’s almost like a second treble control. The two are additive, so if you’re running your Middle knob higher than halfway up with this model, you’ll find that the Treble control might give you more bright than you really want.
POD Farm 1.
POD Farm 1.01 – Model Gallery Flip Top The Flip Top model is based on* a 60’s Ampeg® B-15 Portaflex® — one of the most popular studio bass amps of all time. It’s tuned and front-ported, has a closed back, is 25 watts with a single 15-inch speaker, and set a new standard for cabinet and speaker efficiency, tone and convenience in bass amplification.
POD Farm 1.01 – Model Gallery with the high-school jazz ensemble. Try playing a little of the Peter Gunn Theme.... * All product names used in this document are trademarks of their respective owners, which are in no way associated or affiliated with Line 6. These product names, descriptions and images are used solely to identify the specific products whose tones and sounds were studied during Line 6’s sound model development.
POD Farm 1.01 – Model Gallery Preamp Models American Classic This model is based on* an API 512 Mic Pre and API 550b EQ housed in an API Lunchbox 500 6-B. In 1967 API introduced the 512 as the first modular mic pre. Along for the ride also came the 550 EQ and together the modular components were housed in a 4 position rack complete with a handle — the “lunchbox”. This combination is responsible for many legendary recordings of the 60’s and 70’s.
POD Farm 1.01 – Model Gallery Lo-Fi Looking for something aggressive, trashy, or just plain interesting? Try the Lo-Fi! It gives you tones that are heavily band-passed (meaning there’s little low end or extreme high end), with lots of distortion available from the driver knob. You’ll find it’s just the thing when you want your vocals to sound like they came through a telephone, megaphone or toy microphone.
POD Farm 1.01 – Model Gallery echo will be versus the input signal, and allows Tap Tempo. A short delay time and low feedback setting will give you a classic “slap back” delay. Longer delay times give you a distinctly separate echo, and higher feedback settings increase the number of echoes. There’s always a MIX control, and each of the Models has a few other controls as well....
POD Farm 1.01 – Model Gallery Digital Delay This model is a straight up digital delay with Bass and Treble tone controls. Nothing fancy here, just basic echo-cho-cho-cho. After all, it’s good to cleanse the palate every once in a while. p Return to Model Gallery List Modulation Mod Effects are things that swoosh, pulse and warble — from phase shifters to flangers to choruses.
POD Farm 1.01 – Model Gallery * MXR® is a trademark of Applied Research and Technology, Inc. and is in no way associated or affiliated with Line 6. These product names, descriptions and images are provided for the sole purpose of identifying the specific products that were studied during Line 6’s sound model development. p Return to Model Gallery List U-Vibe The U-Vibe model is based on* the now-legendary Uni-Vibe, which was put on the map in 1969 by Jimi Hendrix.
POD Farm 1.01 – Model Gallery authentic kind of spin that a Leslie delivers, you’ll want to set the MIX knob to max, since a Leslie had no ‘dry’ path. * LESLIE® is a trademark of Suzuki Musical Instrument Manufacturing Co. Ltd. and is in no way associated or affiliated with Line 6. These product names, descriptions and images are provided for the sole purpose of identifying the specific products that were studied during Line 6’s sound model development.
POD Farm 1.01 – Model Gallery affiliated with Line 6. These product names, descriptions and images are used solely to identify the specific products whose tones and sounds were studied during Line 6’s sound model development. p Return to Model Gallery List Screamer From Stevie Ray Vaughan to Michael Landau, the simple Ibanez® Tube Screamer® is the overdrive heard ‘round the world. This medium-gain pedal was introduced in the early ‘80s, and in many blues circles, you’re not allowed to solo without one.
POD Farm 1.01 – Model Gallery Bronze Master Originally designed for bass, but equally cool on guitar... the Maestro® Bass Brassmaster is considered by many to be the Holy Grail of bass distortion units, and ultra-rare bird designed in the early ‘70’s for Maestro® by synth genius Tom Oberheim. It showed up on Chris Squire’s gear list in a mid-70’s Yes tour program. In fact, the Brassmaster was the first distortion unit we can think of designed primarily with the bassist in mind, and man, did Mr.
POD Farm 1.01 – Model Gallery Vetta Comp This effect is taken from the Vetta II, Line 6’s flagship guitar amplifier. A Line 6 original, Vetta Comp has a fixed ratio (2.35:1, in case you’re asking) with the threshold (that would be your SENS knob) adjustable from -9dB to -56dB and up to 12dB of gain available at the LEVEL knob. In other words, turn the SENS knob ‘til you like the way your signal’s compressed, then set the volume with LEVEL.
POD Farm 1.01 – Model Gallery Slap Plate This reverb dishes up the vibe of early rock and roll recordings, like Sam Phillips’ great work at Sun Studios. Thank you very much. p Return to Model Gallery List Wah The POD Farm Wah effects simulate classic wah pedals, and can be used to provide a “parked wah” sound.
POD Farm 1.01 – Model Gallery Models, change drive settings, or use different guitar(s), pickup configurations, or other changes to your input source, and the volume of audio that it’s providing. You can turn the Gate on/off by clicking its bypass button, and the setting of the Gate is saved as part of a Tone. p Return to Model Gallery List Comp (Compressor) The Comp (Compressor) effect in POD Farm is modeled after* the classic, studio-standard LA-2A® tube compressor.
POD Farm 1.01 – Model Gallery Model List To follow is a list of all Amp, Cab and Effects models that are included as “Factory-Standard” models for each Line 6 device supported by POD Farm (and/or POD Farm Plug-In), as well as included within each optional Model Pack. These models will appear within POD Farm’s Gear View menus when the respective device is the one in use by POD Farm, and if the optional Model Packs are authorized for the Line 6 device.
1996 Mini Double n n 1960 Gibtone Expo n n 1960 Two-Tone n n n 1973 Hiway 100 n n n 1965 Plexi 45 n n n n n 1968 Plexi Lead 100 n 1968 Brit Plexi Bass 100 1968 Plexi Jump Lead n n n 1968 Plexi Variac’d n n 1969 Brit Plexi Lead 200 n 1990 Brit J-800 n n n n n 1996 Brit JM Pre n n n 1996 Match Chief n n n 1993 Match D-30 n n n n n 2001 Treadplate Dual n n n 2001 Cali Diamond Plate n 1985 Cali Crunch n n n n 1987 Jazz Clean n 1967 Wishbook Silver 1
Line 6 Smash n n Line 6 Fuzz n n Line 6 Chunk Chunk n n Line 6 Big Bottom n n Line 6 Treadplate n n n Line 6 Lunatic n n n Line 6 Agro n n n 2003 Connor 50 n 2003 Deity Crunch n 2003 Deity Lead n n 2003 Deity’s Son n n 1963 Blackface Vibro n n 1967 Double Show n n 1972 Silverface Bass n n 1987 Brit Gain Silver J n n 1992 Brit Gain J-900 Clean n n 1992 Brit Gain J-900 Dist n n 2003 Brit Gain J-2000 n n 2002 Mississippi Criminal n n Citrus D-30 n n
Bass Expansion Pack FX Junkie Pack Collector Classics Pack Metal Shop Pack Power Pack PODXT Standard POD X3 & Platinum Bundle Model Name POD Studio, TonePort, GuitarPort & iLok Standard POD Farm 1.
1x12 2001 Line 6 n n n 1x12 1953 Small Tweed n n n 1x12 1964 Blackface ‘Lux n n n 1x12 1960 Class A-15 n n n 2x2 2001 Mini T n n n 2x12 2001 Line 6 n n n 2x12 1965 Blackface n n n 2x12 1996 Match Chief n n n 2x12 1987 Jazz Clean n n n 2x12 1967 Class A-30 n n n 4x10 2001 Line 6 n n n 4x10 1958 Tweed B-Man n n n 4x12 2001 Line 6 n n n 4x12 1967 Green 20s n n n 4x12 1968 Green 25s n n n 4x12 1978 Brit Celest T-75s n n n 4x12 1996 Brit Celest V-30
Bass Expansion Pack FX Junkie Pack Collector Classics Pack Metal Shop Pack Power Pack PODXT Standard POD X3 & Platinum Bundle Model Name POD Studio, TonePort, GuitarPort & iLok Standard POD Farm 1.
Ping Pong Delay n n n Reverse Delay n n n Tape Echo n n Echo Platter n n Low Rez n n Phaze Eko n n Bubble Echo n n n Modulation FX Sine Chorus n Analog Chorus Line 6 Flanger n Jet Flanger n n n n n n n n n n Phaser n n n U-Vibe n n n Opto Tremolo n n n n n n n Rotary Drum n n n Auto Pan n n n Lumpy Phase n n Stereo Square Chorus n n Expo Flange n n Random Chorus n n Analog Square Chorus n n POD Purple X n n Random S & H n n T
Stereo Square Flange n n Reverb FX ‘Lux Spring n n n n King Spring n n n Small Room n n n Tiled Room n n n n n n n n n Large Hall n n n Rich Chamber n n n Chamber n n n Standard Spring Brite Room n n Dark Hall Medium Hall n n n Cavernous n n n Slap Plate n n n Vintage Plate n n n Large Plate n n n n n Distortion FX Facial Fuzz n Tube Drive n n Fuzz Pi n n n Screamer n n n n n n n Octave Fuzz Classic Distortion n Killer Z n
n Chrome n n n Chrome Custom n n n Throaty n n n Conductor n n n Colorful n n n n n Auto Wah n n Synth Lead n n Synth String n n Synth Analog n n Synth FX n n Buzz Wave n n Rez Synth n n Saturn 5 Ring Mod n n Double Bass n n Synth Harmony n n Dingo Tron n n Clean Sweep n n Seismik Synth n n n Filter FX 4 Band SemiParametric EQ Sub Octaves n n Bender 6•33 n n n n n n Bass Expansion Pack n Weeper FX Junkie Pack n Collector Classic
POD Farm 1.01 – POD Farm How To.... How To... Basic Operation........................................................................................7•2 How to Insert POD Farm Plug-In on an audio track...................................................... 7•2 How to switch Views (Gear, Panel, Presets)................................................................... 7•3 How to add models to a Tone . .......................................................................................
POD Farm 1.01 – POD Farm How To.... Basic Operation How to Insert POD Farm Plug-In on an audio track Like any audio Plug-In, you can load POD Farm Plug-In as an “Insert” effect on any audio track in your host software to utilize it’s processing on any input fed into the audio track, or to process the playback of any audio clip within the audio track.
POD Farm 1.01 – POD Farm How To.... How to switch Views (Gear, Panel, Presets) The top portion of the POD Farm window is where these “Views” are displayed. The View Toggle buttons at the left load each of these Views. The Gear View is where you can choose your Amp & Effects models to insert into your Tone. The Panel View is where you edit the Amp & Effects settings. And the Presets View offers a fully searchable “tree view” list of all the saved Tone Presets.
POD Farm 1.01 – POD Farm How To.... Selecting a specific model directly from a category menu in Gear View p Return to How To Topics How to edit Amp or Effects settings All POD Farm Amps and Effects can be edited easily in the Panel View. Just click the Panel button at the top left, and then click on any Amp or Effect model in your Signal Flow to display its Edit Panel. See the full info here.
POD Farm 1.01 – POD Farm How To.... For knobs: • Click the left button of your mouse anywhere on the knob or other control. • Use your keyboard’s left/right or up/down arrows to “fine-tune” it’s value, adjusting in small increments. • To “reset” the Tone 1 or Tone 2 Pan knob to center, double-click directly on the Pan knob. For Model and Tone menus: • Your keyboard’s up/down arrows select the next/previous item in the menu once you’ve clicked on the menu to select it.
POD Farm 1.01 – POD Farm How To....
POD Farm 1.01 – POD Farm How To.... Main Control Bar - The row of controls across the very top of the POD Farm window is the Main Control Bar. Here you’ll see the Preset Menu, regardless what View is currently displayed below. This menu lists the contents of the current Source folder selected within the Presets View. Just choose any Tone from this menu and you’ll see it load into the Signal Flow View.
POD Farm 1.01 – POD Farm How To.... Click on the little folder Icon on the Main Control Bar and choose Save to overwrite the current Tone preset with your changes. Or, choose Save As to leave the current Tone preset as it was, and save the new setting you’ve created as a new Tone. If doing a Save As, in the Save Tone As dialog you’ll be able to name the Tone, and optionally choose the location where to save it on your computer.
POD Farm 1.01 – POD Farm How To.... Choose each Tone’s individual Preset here Signal Flow View - Dual Tone mode p Return to How To Topics How to switch to Single Tone mode POD Farm is capable of running in Single Tone or Dual Tone modes (please see the previous Dual Tone description). Any time you load a Single Tone Preset (one without a “+” symbol in its title) from the Main Control Bar Preset Menu, or from the Presets View, it will load in POD Farm’s Single Tone mode.
POD Farm 1.01 – POD Farm How To.... Obviously, you’ll first want to make sure your Line 6 device is properly connected to the USB port of your computer and powered on*. If not, exit POD Farm, connect the device and try again. *Note – It is specifically recommended to always connect your Line 6 device directly to your computer’s USB port, and not into a USB hub. USB hubs can sometimes cause communication errors with USB audio devices.
POD Farm 1.01 – POD Farm How To.... How to connect your Hardware to a guitar amp We get this one a lot – Many Line 6 users want to know how to physically connect their hardware to a guitar amp, because they think it will sound better that way.
POD Farm 1.01 – POD Farm How To.... for you in the Optional Add-Ons tab of Line 6 Monkey. For more about using Line 6 Monkey, please read up in the Start Here chapter. p Return to How To Topics How to register your Line 6 Hardware purchase It’s important to register your Line 6 hardware so that you can obtain customer support and stay informed about the latest new products and Add-Ons. Visit the Line 6 web site Support section and select the Register Gear option there.
POD Farm 1.01 – POD Farm How To.... just launch Line 6 Monkey and go to the Optional Add-Ons tab and see what’s available for your Line 6 hardware. Follow the steps to easily purchase and download Add-Ons and start using them in minutes. You can launch the Line 6 Monkey program from: • Windows® - Start Menu / Programs / Line 6 / Tools / Line 6 Monkey • Mac® - Finder / Applications / Line 6 / Line 6 Monkey Or, you can head directly to the Line 6 Online Store to find out more.
Line 6 POD Farm 1.01 – Troubleshooting Troubleshooting Audio Glitches................................................................................................................ 8•2 Why can’t I hear the effects?........................................................................................... 8•4 Why can’t I launch POD Farm in Standalone Operation?.............................................
Line 6 POD Farm 1.01 – Troubleshooting Audio Glitches Audible pops and clicks and other audio glitches may occur when another program or device is trying to stream audio or video, or if your computer cannot provide enough system resources (RAM memory, or hard disk or computer processor speed) for POD Farm. There can be many different causes for this type of problem, since there are so many possible computer models, parts, and configurations.
Line 6 POD Farm 1.01 – Troubleshooting Note that some Windows® audio programs also offer access to an ASIO Buffer size control within their own preferences or audio options, but is recommended that you always make ASIO buffer settings adjustments in the Line 6 Audio-MIDI devices dialog only. On Mac® systems, Line 6 devices utilize the Mac® Core Audio driver system and all these audio driver settings are all handled by the Mac® Operating System’s Audio-MIDI Setup dialog.
Line 6 POD Farm 1.01 – Troubleshooting On Windows®, the latest PC’s typically utilize the Serial ATA (SATA) interface format for Hard Disks, which is fast and typically requires no user tweaking. But if your PC utilizes the IDE Hard Disk controller interface type, check that your internal IDE controller (which controls your hard disk and CD/DVD drives in your computer) is configured for DMA mode for higher speed operation.
Line 6 POD Farm 1.01 – Troubleshooting Why can’t I launch POD Farm in Standalone Operation? POD Farm Standalone Operation requires that a Line 6 POD Studio, TonePort or GuitarPort USB audio interface is USB connected to your computer. Only these devices include the necessary audio components necessary for the ToneDirect Monitoring and Mixer capabilities offered in POD Farm’s Standalone mode. If you do have one of these Line 6 devices connected, then please see the USB Errors section for possible causes.
Line 6 POD Farm 1.01 – Troubleshooting Input & Output Level knobs (POD Farm Plug-In only) - When inserted on a track, POD Farm Plug-In receives the input from your DAW software’s track, meaning it is affected by the level of your track input, the software’s track input controls, the amplitude of audio clips within the track, and the track volume for output. Therefore, POD Farm Plug-In offers both Input and Output knobs & meters at the top of the window.
Line 6 POD Farm 1.01 – Troubleshooting Hardware Volume - The Volume or Output knob on your Line 6 hardware determines the overall volume of everything you hear coming out the analog Outs/Main outs. Be sure it is turned up sufficiently to get a usable output. Note that this also affects the Headphone level on some Line 6 units, while others offer a separate Headphone volume knob.
Line 6 POD Farm 1.01 – Troubleshooting • Can’t get any input level from a microphone when plugging into a POD Studio/TonePort/ POD X3 Mic input? – Be sure you are using a good XLR type mic cable, and if you are plugging the cable directly from the mic into the Line 6 device’s XLR Mic In jack (no need to first go into a mixer or preamp with POD Studio or TonePort hardware – POD Farm will provide the preamp for you). Check that the Mic Gain knob on your Line 6 device is turned up.
Line 6 POD Farm 1.01 – Troubleshooting not, then the Line 6 driver may not be installed correctly. You can run Line 6 Monkey with your Line 6 device connected and choose “Drivers” in the Updates tab to make sure you have the latest version. Or, just try re-installing the driver using Monkey, following the installer steps it provides. • If your Line 6 Hardware is not configured as your computer’s Sound Card: You must connect a cable from the Output of your Line 6 device to the input of your sound card.
Line 6 POD Farm 1.01 – Troubleshooting I still hear noise when the Gate is on The POD Farm Gate will not completely eliminate noise but it will reduce it considerably. Please see the information on the Gate to learn how to gate works and how its light can help you adjust the Gate for best performance as you change Amp Models, pickups or guitars.
Line 6 POD Farm 1.01 – Troubleshooting • USB connection to your Line 6 hardware is required in order to use the audio features of POD Farm in Standalone operation and/or POD Farm plug-In. So make sure your device is connected to your computer via USB and powered on if you want to use these features. Note - POD X3 and PODxt devices can utilize POD Farm Plug-In as an optional Add-On, but POD Farm requires a connected POD Studio, TonePort or GuitarPort device to be launched in Standalone operation.
POD Farm 1.01 – Glossary (What Is...?) What Is… What are the Amp, Cab and Effect Models?.................................................................. 9•3 What are the Amp Model and Cab Model controls in Panel View?.............................. 9•3 What is ASIO® ?.............................................................................................................. 9•4 What is BPM?..................................................................................................................
POD Farm 1.01 – Glossary (What Is...?) What is Tremolo?........................................................................................................... 9•23 What is a USB hub?....................................................................................................... 9•23 What is Variax®?............................................................................................................ 9•23 What is Wah?..........................................................................
POD Farm 1.01 – Glossary (What Is...?) What are the Amp, Cab and Effect Models? Line 6 pioneered the use of modeling technology for guitarists with the world’s first modeling guitar amp. Since then, all Line 6’s products have included Models developed through extensive, meticulous studies of guitar, bass and pro audio equipment heralded for its classic tone qualities.
POD Farm 1.01 – Glossary (What Is...?) Cabinet Model Menu Room (Early Reflections) Value Amp Bypass Button Mic Model Menu Cab View Amp Model Menu These controls are covered in detail in the Panel View section. p Return to What Is Topics What is ASIO® ? ASIO® is a protocol for computer audio that allows audio software to communicate with audio hardware. It is a feature available on many recording programs, which use ASIO® to communicate with a sound card or other audio device.
POD Farm 1.01 – Glossary (What Is...?) with your music. Also see the related Host Sync & Tap Tempo options in the Plug-In chapter. p Return to What Is Topics What is the Bypass button? All amp & effects models include their own “bypass” button on then, which you’ll see whenever you hover your mouse over a model within the Signal Path View. Engaging the Bypass button turns the amp/effect model’s processing “off”, yet still allows the signal to pass through it unprocessed.
POD Farm 1.01 – Glossary (What Is...?) What is Comp (Compressor)? Comp, which is an abbreviation for Compressor, is one of the POD Farm Effects. Compressors even out audio signals by reducing the volume of the loudest sounds to better match the volume of quieter sounds. You can use subtle compression to make your guitar playing sound more even, or drastic compression for dramatically increased sustain and a very consistent level.
POD Farm 1.01 – Glossary (What Is...?) (talent not included). POD Farm can be a key element for any DAW, since it offers a huge array of pro quality tones, Plug-In support for most any major DAW software, and great ease-of-use! p Return to What Is Topics What is De-Esser? A de-esser is an audio tool designed to reduce sibilance (Sss and Shh sounds) from vocals.
POD Farm 1.01 – Glossary (What Is...?) perhaps?) Please see the details covering the Host Sync and FX Time/FX Speed options in the Plug-In chapter. Some Delay effects are modeled after classic gear described in the Model Gallery.
POD Farm 1.01 – Glossary (What Is...?) Selecting an effect model directly from the category menu in Gear View Many of the effects are modeled after classic gear described in the Model Gallery. p Return to What Is Topics What is EQ (4 Band Equalizer)? EQ, which is an abbreviation for Equalizer or equalization, is one of the POD Farm Effects.
POD Farm 1.01 – Glossary (What Is...?) SPEED from a slow swoosh to an alien warble. As with most Modulation effects, FX Speed controls also allow you to “sync” to your tempo using POD Farm Plug-In Host Sync feature - please see What are the FX Time/FX Speed Controls? and the related tempo options in the Plug-In chapter for more details. Some Modulation effects are modeled after classic gear, as described in the Model Gallery.
POD Farm 1.01 – Glossary (What Is...?) What is FX X-Over, Lo Cut (on Bass Amps) The FX X-Over, Lo Cut knob (a clever abbreviation for Effects Crossover, Low Cut) is found on all Bass Amps and is designed to reduce the low frequencies of Delay, Modulation and Reverb effects’ “wet” signals to alleviate the “muddiness” that can sometimes occur when used on bass guitar. Turn the Lo Cut knob clockwise to select a frequency range from 25Hz to 800Hz.
POD Farm 1.01 – Glossary (What Is...?) Host Sync On Host Sync Off When the Host Sync button is activated, this sets the POD Farm Plug-In tempo to follow the current project tempo of the VST/AU/RTAS host software. You can then utilize the FX Time/FX Speed - Sync On/Off button found in most Delay and Modulation effects’ Edit Panels to follow this Host tempo.
POD Farm 1.01 – Glossary (What Is...?) Hot Key Assignments Command - Action Windows® Mac® Menus (After selecting item in menu...) Next Item Down or Right Arrow Down or Right Arrow Previous Item Up or Left Arrow Up or Left Arrow Single Step Up Up or Right Arrow Up or Right Arrow Single Step Down Down or Left Arrow Down or Left Arrow Knobs (After selecting knob...
POD Farm 1.01 – Glossary (What Is...?) What are Model Packs? Model Packs are optional Add-Ons that you can purchase for your POD Studio, TonePort, GuitarPort and PODxt device, to expand its set of amp and/or effects model set. When you add Model Packs to your Line 6 device, the extra models are available for both POD Farm in Standalone operation and POD Farm Plug-In! • The Metal Shop pack contains 18 bone crushing high gain amp models. • The Classic Collection pack contains 18 vintage amp models.
POD Farm 1.01 – Glossary (What Is...?) the abbreviated names that appear in the host automation menu for the Tone 1 Wah Position and the Tone 2 Wah Position parameters, respectively. To follow is a table showing the abbreviated Parameter Command, as it appears in your host software, and a Description for the parameter’s function. (Note that in your host software you’ll see two of each command, preceded by a “1” or “2” designating Tone 1 versus Tone 2)...
POD Farm 1.01 – Glossary (What Is...
POD Farm 1.01 – Glossary (What Is...
POD Farm 1.01 – Glossary (What Is...?) • Some older computers have the audio output of their internal CD drive connected to the internal sound card via a direct analog connection, so the audio from the CD drive is never “seen” by the computer as the CD plays. If your computer is set up this way, making your Line 6 device your preferred audio device would mean you could not use the computer’s CD to play audio CDs via Windows Media Player or other programs.
POD Farm 1.01 – Glossary (What Is...?) The Record Send controls in POD Farm, Standalone Operation For details about the Record Sends and options offered for your specific Line 6 device, please see the Hardware chapter, and specifically look for the section covering your Line 6 hardware and for Windows® or Mac® .
POD Farm 1.01 – Glossary (What Is...?) A Rotary Drum + Horn (or rotary speaker) is one of those things that makes you go, “Gee whiz!” when you first hear about it: a speaker is mounted on a rotating motor, and spun around as sound plays through it. A switch allows you to select slow or fast speed for the rotation, and one cool thing about a rotary is the gradual change in sound that you hear as the speaker speeds up or slows down to the new speed.
POD Farm 1.01 – Glossary (What Is...?) What is the Signal Flow View? The bottom of the POD Farm window is the Signal Flow View (SFV) which displays the chain of models making up the current Single or Dual Tone paths. To edit any model’s settings, just doubleclick directly on the model within the SFV and its Edit Panel will be displayed in the upper Panel View window.
POD Farm 1.01 – Glossary (What Is...?) For descriptions of all the Signal View elements, please see the Signal Flow View section in the Plug-In chapter. p Return to What Is Topics What is a Sound Card? A sound card is the piece of hardware in (or attached to) your computer that plays back and receives sound into the computer for recording or other uses.
POD Farm 1.01 – Glossary (What Is...?) What is a Tone Preset? A Tone Preset is a saved file on your computer which holds all controls that affect the processed sound applied to POD Farm. This includes Amp, Cab, Mic and Effects models in use, their bypass on/ off state, their parameter settings, their display within the POD Farm GUI, the Tone Preset Name, and any text data entered in the Text Info dialog.
POD Farm 1.01 – Glossary (What Is...?) What is Wah? Wah is one of POD Farm’s Effects, and there are two different Wah models to choose – the Vetta Wah, and the Weeper (or even more Wahs if you own some of the optional Model Packs). These Wahs are designed after classic wah pedals. Use the knob to “sweep” through the pedal range for a “parked wah” sound (much like your favorite Michael Schenker solo).
POD Farm 1.01 – Online Help & Support Online Help & Support Hungry for more info? We’ve got plenty of helpful resources just a click away...