
Datasheet


4
LT3463/LT3463A
3463f
BLOCK DIAGRA
W
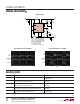
Figure 1. Block Diagram
OPERATIO
U
The LT3463 uses a constant off-time control scheme to
provide high efficiency over a wide range of output cur-
rent. Operation can be best understood by referring to the
block diagram in Figure 1. When the voltage at the FB1 pin
is slightly above 1.25V, comparator A1 disables most of
the internal circuitry. Output current is then provided by
capacitor C2, which slowly discharges until the voltage at
the FB1 pin goes below the hysteresis point of A1 (typical
hysteresis at the FB1 pin is 8mV). A1 then enables the
internal circuitry, turns on power switch Q1, and the
current in inductor L1 begins ramping up. Once the switch
current reaches 250mA, comparator A2 resets the one-
shot, which turns off Q1 for 300ns. Q1 turns on again and
the inductor currents ramp back up to 250mA, then A2
again resets the one-shot. This switching action continues
until the output voltage is charged up (until the FB1 pin
reaches 1.25V), then A1 turns off the internal circuitry and
the cycle repeats. The second switching regulator is an
inverting converter (which generates a negative output)
but the basic operation is the same.
SHDN1 (Pin 9): Shutdown Pin for Switcher 1. Pull this pin
above 1.5V to enable Switcher 1. Pull below 0.3V to turn
it off. Do not leave this pin floating.
FB1 (Pin 10): Feedback Pin for Switcher 1. Set the output
voltage by selecting values for R1 and R2.
GND (Pin 11): Exposed Pad. Solder this exposed pad
directly to the local ground plane. This pad must be
electrically connected for proper operation.
UU
U
PI FU CTIO S
–
+
–
+
–
+
3
300ns
ONE-SHOT
25mV
LT3463: R
S1
= R
S2
= 0.1Ω
LT3463A: R
S1
= 0.1Ω, R
S2
= 0.063Ω
25mV1.25V
1.25V
A2A1
Q1
10
V
IN
FB1
FB2
1
V
OUT1
V
OUT1
SW1
3463 F01
L1
V
IN
V
IN
R1
R2
V
OUT1
V
OUT2
V
REF
R4
R3
C1
C2
V
OUT2
C3
–
+
300ns
ONE-SHOT
A4 A3
Q2
11
8
4
7
6
5
SW2
GND
D2
D2
D1
D3
SWITCHER 1
SWITCHER 2
L2
2
C4
SHDN2SHDN2
9
SHDN1SHDN1
R
S1
R
S2