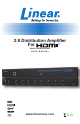
2:8 Distribution Amplifier For d Model # HDMI-DA-2X8M USER MANUAL www.linearcorp.
ASKING FOR ASSISTANCE Technical Support: Telephone (800) 421-1587 (760) 438-7000 Fax (760) 438-7199 Technical Support Hours: 6:30 AM - 4:30 PM PST Monday through Friday. Email: techsupport@linearcorp.com Website: www.linearcorp.com Notice Linear LLC reserves the right to make changes in the hardware, packaging and any accompanying documentation without prior written notice.
TABLE OF CONTENTS 1. Introduction / Operation Notes 2. Features 3. Panel Descriptions 4. Connecting and Operating the 2:8 Distribution Amplifier For HDMI 5. Application Diagram 6. RMT-2 Installation 7. IR Code Configuration 8. RJ-11 To Serial Control Interface 9. Rack Ears Installation Diagram 10. Wiring Diagram 11. Specifications 12.
INTRODUCTION The Linear 2:8 Distribution Amplifier For HDMI is the perfect solution for anyone who needs to send one or two sources of digital high definition video to multiple displays at the same time. It supports HDMI equipment, such as DVD players, satellite set top boxes, and HDMI displays. In operation, the digital source is connected to the distribution amplifier’s input while eight HDMI outputs are available to be used in part or in full.
FEATURES Features • Switch easily between any two HDMI/DVI* sources • Outputs are mirrored to eight HDMI/DVI* displays simultaneously • Supports resolutions up to 1080p, 2K and 1920 x 1200 • Extends the range of HDMI compliant devices by equalizing and re-clocking the HDMI signal • HDMI/HDCP compliant Includes: (1) 2x8 Distribution Amplifier For HDMI (1) 6’ HDMI cable (M-M) (1) 24V DC Power Supply (1) RMT2-IR remote (1) Set of Rack Ears (1) Users Manual NOTE: *When used with a HDMI to DVI Adapter
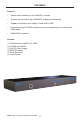
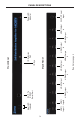
HDMI Input 1 HDMI Input2 Input LED Indicator 3 Back Panel IR Eye IR Extension Port *See Note on page 4 HDMI Output HDMI Output HDMI Output HDMI Output 8 4 6 8 HDMI Output HDMI Output HDMI Output HDMI Output 1* 3 5 7 RJ-11 To RS-232 Serial Port Front Panel 24V DC Power Input Power LED Indicator PANEL DESCRIPTIONS
CONNECTING THE 2:8 DISTRIBUTION AMPLIFIER FOR HDMI How to Connect the 2:8 Distribution Amplifier For HDMI 1. Connect the supplied cable from the HDTV HDMI source into the HDMI input port 1 of the 2:8 Distribution Amplifier For HDMI. 2. Connect a second HDTV HDMI source to HDMI input port 2 on the 2:8 Distribution Amplifier For HDMI using a user supplied HDMI cable. 3.
APPLICATION DIAGRAM Multiple HDMI-DA-2X8 devices can be daisy chained together to distribute a single HDMI signal to a maximum of 73 units, for a total of 512 displays.
RMT2-IR INSTALLATION 1. Remove battery cover from the back of the RMT2-IR remote. 2. Verify that dip switches 1 & 2 are in the down (OFF) position. (See page 6) 3. Insert the battery, hold the battery so that you can see the positive side facing up. The side that is not marked must be facing down. 4. Test the RMT2-IR remote by pressing ONLY one button at a time. The indicator light on the remote will flash once each time you press a button.
IR CODE CONFIGURATION How to Resolve IR Code Conflicts In the event that IR commands from other remote controls conflict with the supplied RMT-2IR remote control, changing the remote channel will alleviate this issue. The RMT-2IR remote control and the 2:8 Distribution Amplifier for HDMI have DIP SWITCHES for configuring the remote channel that both units use to communicate. These settings must match each other for proper operation.
RJ-11 TO SERIAL CONTROL INTERFACE DB-9 to RJ-11 DB-9 Pin Description Connects To RJ-11 Pin 1 Carrier Detect N/A 2 Receive Data 3 3 Transmitted Data 2 4 Data Terminal Ready 5 Ground 6 Data Set Ready N/A 7 Request To Send N/A 8 Clear To Send N/A 9 Ring Indicator N/A 5 N/A 1&6 1 6 1 FRONT: FRONT: 9 RJ-11 6-Pin 6 Female DB-9 1 6 Connectors not to scale Binary Table ASCII 1 2 Input 1 2 Binary 0011 0001 0011 0010 Terminal Settings Bits per second .........................
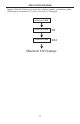
RACK EARS INSTALLATION DIAGRAM Rack mount ears are provided for installation of this unit into a 1U rack mount space. 1. 2. 3. 4. Locate the side screws on the unit. Remove the front 2 screws that are located closest to the front of the unit. Using the removed screws, screw the rack mounting bracket into the unit. Repeat the procedure on the opposite side of the unit.
9 HDMI cable maximum distance is 15 ft at 1080p resolution without a HDMI-SB or HDMI-CAT5-EXT HDMI WIRING DIAGRAM
SPECIFICATIONS Video Amplifier Bandwidth ............................................................................ 165 MHz Input Video Signal ................................................................................... 1.2 Volts p-p Input DDC Signal .............................................................................. 5 Volts p-p (TTL) Single Link Range ........................................................................1080p / 1920 x 1200 Input Connector Type ........................
WARRANTY Note: These products are designed to be installed and serviced by trained professional installation companies. Linear LLC warrants this product to be free from defects in material and workmanship. For the term of the warranty, see the list of products below. The Warranty Expiration Date is reflected by a date code that is affixed to all of Linear’s products. This warranty extends only to wholesale customers who buy direct from Linear or through Linear’s normal distribution channels.
H D MI -D A-2X 8 M (7 6 0 ) 4 3 8 -7 0 0 0 (80 0 ) 4 2 1 -1 5 8 7 FA X (8 0 0 ) 4 6 8-1340 www. lin e a rc o rp .