
User Manual


4
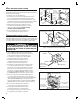
PATIO STATION ROUGH-IN
Route Cat-5 cable from the master’s wall
housing to each patio station location.
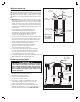
At each patio station location, install a Model dmc1HRW
Flush-mount Rough-in Enclosure about 50” above the fl oor level.
Leave about 12” of extra cable extending at the patio station
enclosure. Wrap the cable around a wood block to keep the
cable from falling back through the enclosure’s knockout.
Depending on the type of construction, the enclosure
can be screwed or nailed to a stud, or in masonry
applications just let the enclosure hang on the cable so
the brick mason can fl ush and level it (see Figure 7).
Bring the other end of the cable into the master’s wall housing
through the top left wiring access hole or slot. Leave about 12” of
extra cable extending at the wall housing. LABEL THE CABLE.
DOOR STATION ROUGH-IN
Route MS4DCXSC cable from the master’s wall
housing to each door station location.
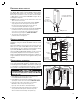
At each door station location, install a Model ME3 Door
Station Rough-in Enclosure about 50” above the fl oor level.
Leave about 12” of extra cable extending at the door station
enclosure. Wrap the cable around a wood block to keep the
cable from falling back through the enclosure’s knockout.
Depending on the type of construction, the enclosure can be
screwed or nailed to a stud, or in masonry applications just let the
enclosure hang on the cable so the brick mason can fl ush and
level it. For wood, vinyl, or aluminum siding construction, use a
surface-mount housing for the door station. Two surface-mount
intercom door station enclosures models are available: Model
DS3BXB (black) and DS3BXW (white). Surface-mount enclosures
attach to the fi nished wall using galvanized screws (see Figure 8).
Bring the other end of the cable into the master’s wall housing
through the top left wiring access hole or slot. Leave about 12” of
extra cable extending at the wall housing. LABEL THE CABLE.
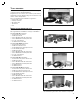
MONO MUSIC SPEAKERS
Monaural 45-ohm speakers can be connected to the dmc1
master to distribute radio or CD sound throughout the
installation. Each mono speaker is controlled by a single
Model MVC1 (white) or MVC1A (almond) volume control
that mounts in a single-gang J-box.
Route Cat-5 cable from the master’s wall housing to each mono
speaker’s volume control J-box location. LABEL THE CABLE.
From each volume control J-box location, route
MS2SX5SC cable to the speakers location (see Figure 9).
Secure the cable to avoid drywall damage.
Install the appropriate speaker mounting ring (if required) for
each speaker. Follow the speaker’s instructions for specifi c
details on dimensions and mounting of the speaker ring.
1.
2.
3.
4.
1.
2.
3.
4.
1.
2.
3.
LATH
SHEATHING
FOR STUCCO
FLUSH-MOUNT DMC1HRW
ROUGH-IN ENCLOSURE
ROUTE CAT-5 INTO
ENCLOSURE AND
AROUND A
WOOD BLOCK
Figure 7. Patio Station Rough-in
Figure 8. Door Station Rough-in
CAUTION
ANY SPEAKER CONNECTED TO THE DMC1 MUST BE 45 OHMS!
Do not connect any 8 ohm speakers or damage to the dmc1
master will occur!
LATH
SHEATHING
FOR STUCCO
FLUSH-MOUNT ME3
ROUGH-IN ENCLOSURE
ROUTE MS4DCXSC
INTO ENCLOSURE
AND AROUND A
WOOD BLOCK
Figure 9. Mono Speaker Installation
MS2SX5SC CABLE TO
SPEAKER LOCATION
INSTALL
SPEAKER
ROUGH-IN
RING (IF
REQUIRED)
CAT-5
FROM
MASTER
SINGLE-
GANG
J-BOX