Quick Start Guide Telephone Entry & Access Control System (EP-402 / EP-436) (EP-736) ( EP-EXN ) Quick Start Guide or dial
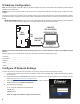
IP Address Configuration NOTE: This Quick start guide is applicable to Entry Pro (EP) Series Telephone Entry system. The thumbdrive in the hardware bag contains additional installation and wiring instructions. WARNING: Do Not connect an Ethernet cable from the EP CPU to the Local Area Network (LAN) before the Initial IP System Configuration has been completed. The e3 Entry Pro and Access Control system can be a standalone system or part of a larger multi-unit Access Control network.
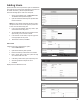
5. Select the Network Setting icon, then the IP Address icon to display the IP settings page. Enter the static IP address, Subnet Mask, Gateway and DNS server so that it matches the requirements of the local network provided by the IT administrator. 6. Click Save & Reboot for the settings to save and take effect. (The reboot will take approximately 2 minutes.) NOTE: The IP settings will be lost if the unit is powered down without performing Save & Reboot. 7.
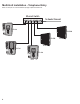
Multi-Unit Installation - Telephone Entry Below is an example of a multi-unit installation displaying multiple EP and EXN units: Ethernet Switch To Router/Firewall EP-436 EP-EXN Client EP-EXN Client EP-736 EP-436 Controller Client 4 Client
Adding additional hardware to build a system with multiple interconnected units - one database (EP Series Only) NOTE: Standalone installations proceed to pg. 6 to add users. EP-x36 Series units provide the ability to add additional controllers to expand the amount of doors, inputs and outputs. These additional controllers are referred to as clients. An IP Installer is a utility located on a thumb drive shipped with all systems.
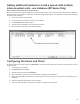
Controller to Client Conversion This section is for systems that contain multiple TE front ends on the same network. By default each TE front end is configured as a controller. When multiple TE front ends are in the same network, only ONE can be the controller. All others must be clients. This step will need to be performed on all TE units that will NOT be the controller on the network. All EP-EXN’s are pre-configured as clients and do not need to go through this step.
Controller to Client Conversion (continued) 6. Locate the license client key sheet document contained in the manual and hardware packet. The system now will provide a new license key. When this key is applied to license the panel will convert from a server role to a client role 7. Copy this key so it can be pasted into the license screen. 8. Enter information into the correct fields. 9. Click Next. 10. Apply power to TE Display unit. 11.
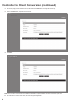
Controller to Client Conversion (continued) 14. The license page provides Software Version, MAC Address and Edit button to change the license key. 15. Click on the Edit button, and paste the new license. 16. Click Save. NOTE: The TE Front End is now a client which can be added to the EP Models as an expansion Module. The license screen will now say TE Client. 17. For instructions on how to add a client, refer to the Programming Manual.
Adding Users Specific information must be input into the system to establish basic user profile. An access level must be created before a new User can be created. An asterisk (*) denotes required information. Perform the following steps to create a new user profile. 1. On the main navigation menu, click New User button. The Resident data entry fields will appear. 2. Input relevant data into data entry boxes provided under the Personal section.
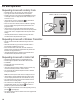
EP Unit Operation Requesting Access with an Entry Code • Residents have up to 40 seconds to key in their entry code. • Up to eight seconds are allowed between each keystroke. • All digits of the entry code must be entered. Example: If the entry code length is set for four digits, and the code is 0042, the user must enter “0 0 4 2”. key will reset the • If the wrong key is pressed, pressing the keypad. The correct code can then be entered.
Limited Warranty This Nortek Security & Control LLC product is warranted against defects in material and workmanship for twenty-four (24) months. This warranty extends only to wholesale customers who buy direct from Nortek or through Nortek’s normal distribution channels. Nortek Security & Control LLC does not warrant this product to consumers. Consumers should inquire from their selling dealer as to the nature of the dealer’s warranty, if any.
Page left intentionally blank 12