
Quick Start Guide


2
IP Address Conguration
NOTE: This Quick start guide is applicable to Entry Pro (EP) Series Telephone Entry system. The thumbdrive in the hardware bag contains additional
installation and wiring instructions.
WARNING: Do Not connect an Ethernet cable from the EP CPU to the Local Area Network (LAN) before the Initial IP System Conguration has been
completed.
The e3 Entry Pro and Access Control system can be a standalone system or part of a larger multi-unit Access Control network. Regardless of the type
of installation the initial IP conguration of the EP is done between a Laptop/PC and the EP unit directly connected to each other not part of the local
network.
IMPORTANT COMPATIBILITY NOTE: The legacy Linear access control Models AE-1000, AE1000Plus, AE-2000, AE2000Plus, AM3, and AM3Plus
are of a different hardware and software design and do not integrate with the new generation networked models.
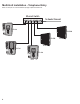
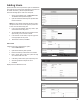
LAN
PORT
COMPUTER’S
LAN PORT
COMPUTER
FOR CONFIGURING
NETWORK SETTINGS
CPU
BOARD
Network Cable
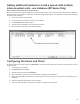
NOTE: It is recommended that the Telephone Entry System have a static IP Address assigned, not a DNCP assigned
address.
Consult the appropriate on-site IT administrator to obtain the following information before conguring the EP system:
•• IP address: ____________________________________
•• Subnet Mask: __________________________________
•• Gateway: _____________________________________
•• DNS 1: _______________________________________
•• DNS 2: _______________________________________
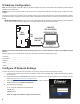
Congure IP Network Settings
To allow for the system to be recognized on the local network, it is necessary to change the unit’s default IP address as follows:
1. Connect your programming computer directly to the LAN port of the EP-xxx unit. A standard CAT5 or better networking cable is used for the
direct connection.
2. Assign a static IP address of 192.168.0.149 to the computer. (For instructions on how to change the static IP address of a Windows computer,
please visit: http://technet.microsoft.com/en-us/library/ff710457
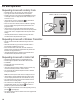
3. After assigning the static IP address to the computer, open a web browser and enter the
default IP address of the unit (Default = 192.168.0.250).
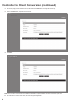
4. The unit presents the login page.
NOTE: It is highly recommended to change the default Password.
To log on, enter the default User ID and Password:
User ID: admin
Password: admin