
Quick Start Guide


3
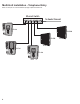
RJ45 LAN
PORT
CPU
BOARD
123456
Ethernet Switch
ROUTER
FIREWALL
INTERNET
Network Cable
Network Cable
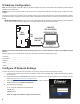
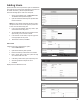
5. Select the Network Setting icon, then the IP Address icon to display the IP settings page.
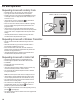
8. Connect the networking cable from the Local Area Network to the unit’s LAN port. The local computers will then be able to access the system
by entering the new static IP address of the unit.
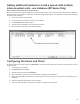
Enter the static IP address, Subnet Mask, Gateway and DNS server so that it matches the requirements of the local network provided by the IT
administrator.
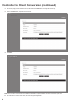
6. Click Save & Reboot for the settings to save and take effect. (The reboot will take approximately 2 minutes.)
NOTE: The IP settings will be lost if the unit is powered down without performing Save & Reboot.
7. Disconnect the programming computer from the unit. The system is now ready for connection to the local network.
CAUTION: The EP is an Access Control system and should be on an isolated or segmented Security network where a protected network
security appliance (rewall, etc.) is installed and maintained. This will help prevent unwanted access from the shared company network
environment.