
Speaker User Manual

H481-6 INSTALLATION
®
Warranty
Linear LLC warrants this product to be free from defects in material and workmanship for two years (2 years). The time period will be measured using the date code labeled on the
product. Linear LLC is not responsible for damage to the product resulting from the buyer's improper handling, stocking or warehousing of the product. Any implied warranty aris
-
ing from the sale of the product including implied warranties of merchantability and fitness for purpose are limited. Linear LLC shall not be responsible for any losses, damages or
expenses, whether direct, consequential, or incidental arising from the use or the inability to use the product. Some states and countries do not allow limitations on how long an
implied warranty lasts or the exclusion or limitation or incidental or consequential damages, so the above exclusions may not apply. The Linear LLC warranty gives specific legal
rights in addition to other rights, which may exist and vary from state to state and country to country.
The warranty is limited to repair or replacement of products returned, freight prepaid, to Linear LLC, there is NO PROVISION FOR LABOR COST OR OTHER REIMBURSEMENTS OF ANY
KIND.
1. Failures due to product abuse, such as negligence, improper use, and electrical surge including damage from lightening, water damage or other damage due to natural
disasters are not covered by the warranty. The most common form of product abuse is surge damage caused by lightening.
2. The warranty shall also be voided by any tampering with the date code, labels or other markings on the product.
3. Products that are damaged in transit to Linear LLC due to improper packaging or by the carrier (shipping company) will not be covered under the warranty. If the product was
damaged or lost by the carrier, it is the sender's responsibility to create a claim against the carrier.
4. The user is responsible for all labor costs associated with removing, reinstalling and returning the product to Linear LLC.
Linear LLC, at its option, will repair or replace the defective product. Replacements will be made from B-Stock, if an exact replacement is not available, Linear LLC, at it's option,
will select the nearest equivalent product. The user is responsible for freight charges to Linear LLC. Linear LLC will return warranted repaired or replacements by UPS Ground or an
equivalent service. A customer may pay the additional costs for second-day or next-day service.
All products returned for warranty service require a Return Product Authorization Number (RPA#). Contact Linear Technical Services at 1-800-999-5225 for an RPA# and other
important details.
PRINTER’S INSTRUCTIONS:
INSTR,INSTL,H481-6 - P/N: 9900537 X2 - INK: BLACK - MATERIAL: 20 LB. MEAD BOND - SIZE: 8.500" X 11.000" - SCALE: 1-1
Copyright © 2004 Linear LLC
P/N 9900537 X2
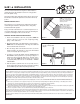
Attach using flat-head
screws or heavy-duty
staples
STEP 1 -
Place the bracket
face down on a hard surface,
and place the wings in their
desired positions.
STEP 2 -
Once in place, use
the palm of your hand to
apply equal pressure to
the back of the Wing/Bracke
t
joint until the wing snaps into
place.
FIGURE 1
FIGURE 2
The new-construction brackets are designed to enable installers to
identify and preserve the installation location of in-ceiling speakers
before the drywall is hung.
The brackets feature interlocking flanges (wings) which connect to the
bracket frame and enable the speakers to be mounted in almost any
position.
DAMPING THE WALL CAVITY
The performance of your speakers will be enhanced by using flame-
resistant fiberglass insulation to dampen the wall or ceiling cavity
around and behind the speakers.
Doing so will reduce the transmission of sound into adjacent rooms or
floors while enhancing the speaker's bass response by deadening the
sound waves emanating from the rear of the woofers.
MOUNTING THE NEW-CONSTRUCTION BRACKETS
1. Decide on the installation location for your speakers. NOTE:
Be
sure the locations you choose are clear of high-voltage wiring,
piping, or other obstructions.
2. Attach the bracket flanges to the bracket frame as shown in Figure 1.
NOTE: Make sure the dimpled side of the flange faces OUT and
interlocks with the frame from the rear.
3. Once the flanges have been attached to the frame, secure the
bracket assembly to the wall studs or ceiling joists with flat-head
screws or heavy-duty staples. See Figure 2.
4. You may choose to have the drywall contractors CAREFULLY and
ACCURATELY cut the speaker holes for you using a routing tool or
similar device. Discuss this with them prior to doing the work to
ensure good results. NOTE: The bracket frames are constructed
of heavy-duty ABS plastic but are not unbreakable – ALWAYS
USE CAUTION.
5. After the drywall is up and the holes are cut, you may choose to
give the speaker frame and speaker grille to the painter for painting
(see the H480-2 speaker manual for painting instructions).