
Quick Start Manual

CONGRATULATIONS!
Your purchase of an M&S Systems music and communications system is an investment that will provide years of enjoyment and service
for your customer.
M&S audio products are backed with more than 40 years of experience in the design and manufacture of precision acoustical equipment
for the home. To ensure that your customer receives the high-quality music and voice reproduction that the system is designed to deliver,
it is important that each step of the installation be done carefully. If you follow the step-by-step illustrated instructions below, the result will
be a successful professional quality installation. In the event you need troubleshooting assistance, please call our technical staff at 1-800-366-
9422.
INSTALLATION INSTRUCTIONS
RT11 REMOTE POWER SUPPLY KIT
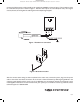
Intended use: MC111M/DM Master units, optional DRW/DRM door release systems.
Tools required: Standard fl at screwdriver #1, wirestripper/cutter.
☛ USE ONLY THE M&S SYSTEMS BRAND CABLE INCLUDED IN THIS KIT. The cable
is designed and constructed with electrical specifi cations necessary for proper audio performance.
I
MPORTANT: THE USE OF NON M&S SYSTEMS BRAND CABLE OR CABLE SUBSTITUTION WILL VOID PRODUCT
WARRANTY. Note: All M&S Systems cable has the M&S Systems name and the part number printer on it!
☛ DO NOT plug in the transformers until the master is connected and all remote stations are
connected.
☛ DO follow all national and local electrical codes.
☛ DO NOT SPLICE CABLES. Splices are unreliable and increase the chances of introducing a wiring
error.
☛ DO NOT lengthen the cable. Added cable will reduce the power available at the master and lead to
system malfunction.
☛ DO NOT remove or defeat the ground prong on the transformers. Always install these transformers
into properly grounded 120VAC receptacles. (NEMA 5-15R
DOs DONT’s
&
PRINTER’S INSTRUCTIONS:
INSTR,INSTL,RT11 - LINEAR P/N: 115806 D - INK: BLACK - MATERIAL: 20 LB. MEAD BOND - SIZE: 8.500” X 11.000” - SCALE: 1-1 - SIDE 1 OF 2