
Smoke Alarm User Manual

INSTR,INST,TSD-90A
Linear P/N: 208449 G
Material: 20 Lb. Mead Bond
Ink: Black
Size: 8.500" x 11.000"
Front Side 1 of 2
Scale: 1-1
TSD-90A
SUPERVISED
DIGITAL SMOKE
ALARM
Installation Instructions
(760) 438-7000 G FAX (760) 438-7043
USA & Canada (800) 421-1587 & (800) 392-0123
Toll Free FAX (800) 468-1340
www.linearcorp.com
DESCRIPTION The TSD-90A is a high quality,
photoelectric smoke alarm with a built-in supervised
digitally-coded radio transmitter. The TSD-90A is supervised
to monitor alarms, restorals, low battery, status, tamper, and
test conditions. The TSD-90A transmitter is compatible
with any Linear SX format supervised security receiver.
The TSD-90A sounds a local alarm as soon as smoke is
detected. Twenty seconds after the local alarm sounds, the
TSD-90A’s transmitter will send an alarm signal to the
supervised receiver. The alarm signal will be repeated every
20 seconds as long as smoke is still present. A restoral report
will be sent when the smoke detection chamber clears.
Supervisory status reports are sent from the TSD-90A every
hour.
Coding switches are not required or used in the TSD-90A.
Each transmitter is pre-coded at the factory to a unique code.
With the SX format, there are more than sixteen million codes
possible.
The smoke alarm and transmitter are powered by two 9-volt
batteries. These batteries are supplied with the transmitter
and can power the unit for up to two years. If the battery
voltage drops below a preset level, a low battery report is sent
to the receiver with any status, alarm, tamper or test
transmission.
NOTE: After replacing batteries, press transmitter test button
to reset “low battery circuit”.
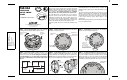
STEP 1 Remove mounting plate. Remove the TSD-90A
mounting plate by turning the plate counterclockwise.
STEP 2 Identify components. Examine the TSD-90A to
identify the component locations.
STEP 3 Install batteries. Connect the two 9-volt batteries
and place them into battery holding cups.
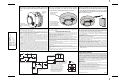
STEP 4 Pick smoke alarm location. Referring to the
NFPA standard on the back of this sheet, select a good
location to mount the TSD-90A. Mounting the TSD-90A on
foil-backed wallpaper or on a metal single-gang electrical
box is not recommended because the radio range will be
reduced.
STEP 5 Install mounting plate. Use the two screws and
anchors provided to attach the mounting plate to the wall or
ceiling. Alternately, the mounting plate can be attached to a
plastic single-gang electrical outlet box. For the best radio range,
observe the “best signal” label on the bottom of the unit.
STEP 6 Program TSD-90A into receiver and test. Follow
the receiver’s instructions to set it in a program or learn mode.
Press the TSD-90A’s transmitter test button (not the smoke
alarm’s test button) to send a test signal. The transmit LED
should light. Verify that the signal was received and that the
transmitter was properly entered into the receiver’s memory.
TWIST MOUNTING
PLATE TO
UNLOCK
REMOVE
MOUNTING
PLATE
BATTERY
COMPARTMENTS
TRANSMITTER
BOARD
TRANSMIT LED
TRANSMITTER
TEST BUTTON
D I N I N G
K I T C H E N B E D R O O M B E D R O O M
B E D R O O M
L I V I N G
R O O M
S M O K E
A L A R M
PLASTIC
SINGLE-GANG
ELECTRICAL
BOX
SCREW
ANCHORS
FOR WALLBOARD
OR
PRESS TEST
BUTTON
SX
FORMAT!
CONNECT AND
INSTALL TWO
9-VOLT DURACELL
MN1604 ALKALINE
OR TWO ULTRALIFE U9VL
LITHIUM BATTERIES (BOTH
MUST BE THE SAME TYPE)